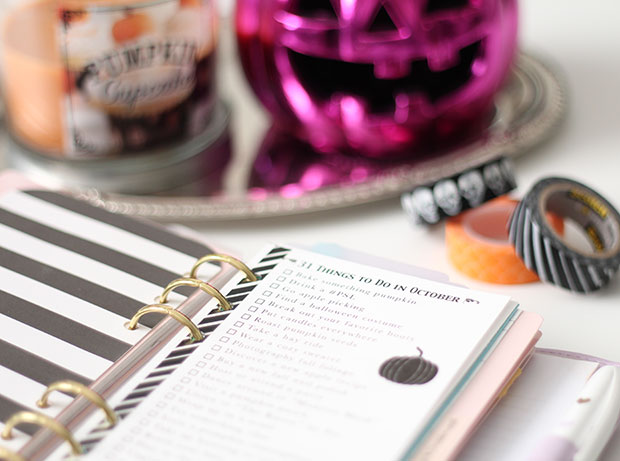
October was a really great month! I have to say, although I believe the days passed much too quickly, I feel like I have never had a more wonderful or productive month. I know I have said this before and I think I am beginning to sound like a broken record, but I really think that my 31 Things to Do in October printable was a major reason I was able to fit so much into my month and almost stay on track making sure that I was constantly in the fall spirit enjoying my days, the change in weather, and making special memories with friends and family! I am so pleased to know that so many of you also downloaded this printable and have also been enjoying it in your planner, utilizing it as a tool to also help you make similar memories and enjoy the little things that make the month of October special.
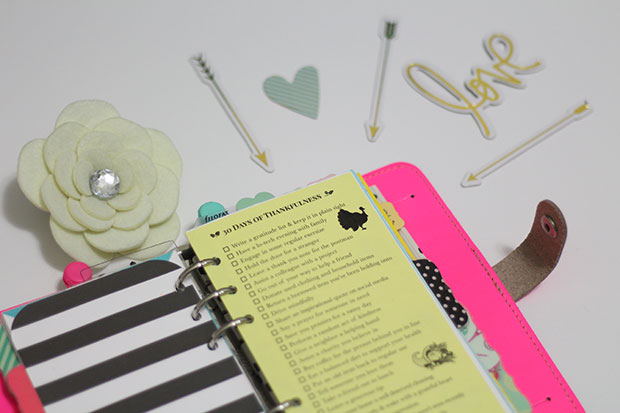
As you may have already seen, I posted my November printable, 30 Days of Thankfulness, yesterday, and I am hoping that this new printable also helps to keep me in a positive and grateful mindset during the month of November. I am already overwhelmed with gratefulness by the response from members of the planner community who have already gone ahead and downloaded this new printable. I know gratitude is a topic that comes up often in the planner community, and I think this printable will be a wonderful way to help us all take a moment to see what’s truly important in life and show our gratitude for our lives through thoughtful, well intentioned actions!
So, you are probably wondering what else I have been loving this month, product-wise? Well, to be completely honest, there really have only been a handful of items that I have been obsessed with this month since my main priority has been focusing on experiences and not “stuff” this month.
[show_boutique_widget id=”179620″]
My first monthly favorite has been my Sally Hansen Complete Salon Manicure nail polishes, yet again. I have been loving wearing a combination of three of my fall favorites, Pat on the Black, Almost Almond, and Jungle Gem. Next up is the lipstick I have been loving. Since it’s fall I have been all about a purple lip, and I picked up the Milani Violet Volt lipstick this month and have been loving the color! I also picked up a new drugstore foundation this month, after my long time favorite, the Bourjois Healthy Mix Serum Foundation, ran out. I ended up choosing the L’Oreal Visible Lift Serum Absolute Advanced Age Reversing Makeup, which is a total mouthful, but has been working wonderfully for my dry skin! My last beauty related favorite has been a perfume, my Dior Addict Eau Fraiche, which I nearly complete forgot I owned because it had been tucked away in the back of my beauty closet for months!
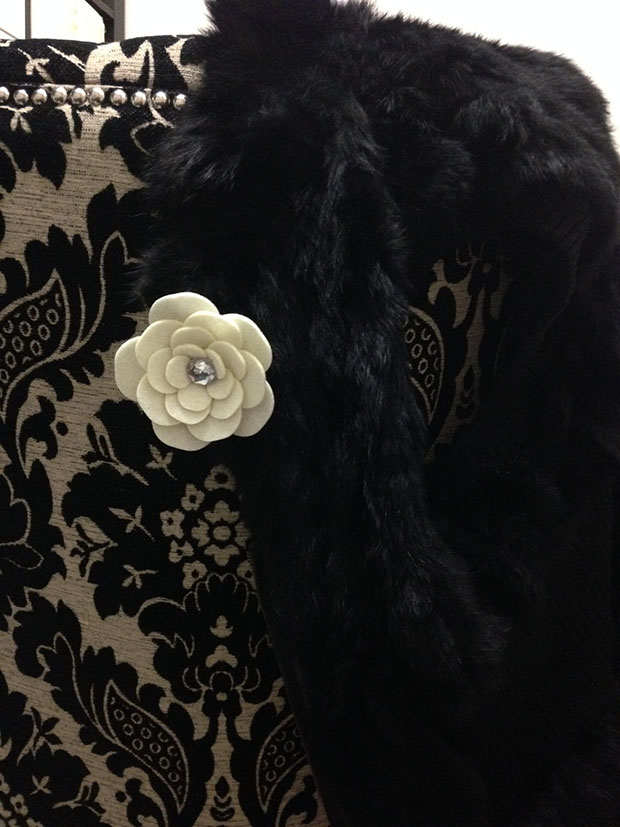
As for non beauty favorites, this month I purchased my first fur vest after deciding that I really wanted one this year to add to my wardrobe! I did some research on different options, decided on the quality I wanted and the price range I was willing to spend within and then found this beautiful black fur vest at Neiman’s! It’s currently on sale as well, so if you are in the market for a high quality fur vest, I do recommend this one! Also, this month I was lucky enough to receive a Fluoro Pink Original Filofax in personal size to review from Filofax! I’m not sure if its too early to say, but I have to admit, I think I may have found planner peace with this beauty! Keep an eye out on my YouTube channel for a set up video coming soon! Finally, my last favorite for this month has been my macaron planner charms that I purchased from an Etsy Shop called Mahal Made! If you love macarons or sweets in general and would like to purchase some cute little charms for your planner, I highly recommend this shop!
Of course, it wouldn’t me a monthly favorites without a video, so in case you would prefer to see me do a little show and tell, here is my October Favorites video linked above for your viewing pleasure!
Now, it’s your turn. Let me know what made your October favorites list! Do you have any suggestions for me of products I should try? Oh, also, if you were one of the members of the planner community who downloaded my 31 Things to Do in October Printable, let me know how you enjoyed it this month? How many of the items were you able to check off? I’d love to know, so leave me a comment or send me a tweet or Instagram picture!
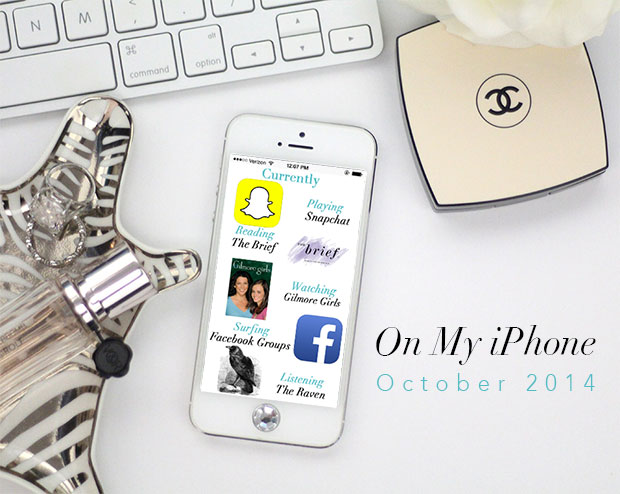
On my iPhone is a new monthly feature on Strange & Charmed where I give you a peak into what I have been loving on my iPhone for the month! Covering topics like apps, games, podcasts, music, websites, books and more, I hope this series helps you all discover new and exciting content out there that can be enjoyed from your iPhone! To stay up to date with this series, make sure to follow the On My iPhone tag!
So, it’s officially fall and now, one of the best months of the year is coming to a close. I know I have already waxed poetic about how much I love October, and although I am very sad to see it go, I know that it was a very fun-filled month for me! I made sure to pack a lot of fun fall and Halloween activities into the month and I have plenty of memories to look back on and to celebrate! I, of course, made sure to collect a few awesome internet favorites on my iPhone this month, some of them were old favorites rediscovered, and others were some new releases that I am excited to share with you!
Currently Playing, Snapchat: At about mid-month, I finally jumped on the bandwagon and created a snapchat account. I have been loving sharing impromptu photos and little behind the scenes glimpses of my life on my snapchat story! If you have snapchat, make sure to follow me and I will add you back. My username is MissTrenchcoat, of course!
Currently Reading, The Brief: I know I have mentioned my love for Levo League in the past, but they have recently released a daily e-newsletter that shares a dose of news and pop culture fun to act as a pick me up to your workday, Monday thru Friday! If you could use a simple and short little workday email to help brighten the day or help entertain you during your commute home, feel free to check out The Brief for yourself!
Currently Watching, Gilmore Girls:This month has been an epic TV month for me, ever since I discovered that all the seasons of Gilmore Girls are now available on Netflix! I loved Gilmore Girls when I was younger and I am very excited to be catching up on one of my favorite shows. So, if you were a big fan of Gilmore Girls in high school and college, definitely add the show to your instant queue!
Currently Surfing: Facebook Groups:Specifically, I have been getting back into the Filofax and Planner groups on Facebook ever since my love and obsession with my planners was reignited with a few new planners I was sent to review! If you are interested in joining any of these groups, I will go ahead and link a few of my favorites below, but I must warn you that these groups are incredibly addictive and I suggest you don’t join any of these groups unless you are super serious about participating!
Currently Listening, The Raven: One of my favorite October and Halloween themed activities is listening to the audio recording of The Raven, narrated by Christopher Walken. It’s available via YouTube and I love spending a quiet fall evening at home listening to Walken’s creepy but festive voice, reciting this creepy yet festive literary classic!
My new Kate Spade iPhone case as pictured with my awesome Fluoro Pink Filofax!
Oh and of course, one final little thing on my iPhone… my new Kate Spade iPhone case! I picked this up at the outlet the other week and I think it’s absolutely adorable for fall!
Don’t miss my On My iPhone video for this month as well! I know I missed making a video last month due to scheduling issues, but I do go into greater detail during my videos than I do on my blog posts, so if you want to know more, click through to the video!
So, now it’s your turn! What have you been loving on your iPhone or iPad this month? Any great new apps that have caught your attention? Let me know in the comments or better yet, send me a tweet to let me know!
As a blogger, SEO is one of the most intimidating aspects of managing a website. For one, it feels like everyone talks about it like the be all and end all of running a successful online site, and apparently they’re speaking some unknown foreign language throwing around terms that any uninitiated webmaster or blogger would find confusing! It took me a number of years researching the subject to really understand what SEO was all about, and once I understood all the technical terminology and elements involved, it ended up being much less complicated than I once feared. Furthermore, I discovered that as my blogging skills increased, I was naturally incorporating aspects of SEO in my posts without even realizing it! So, you may already implement certain rules of SEO in your current blog without even knowing it, which I hope is something of a relief to you, as I know it was to me! So, I thought it would be helpful if I put together a post on the subject of SEO, demystifying the term and giving you 10 important tips for bloggers to use to better implement SEO into their sites!
What is SEO?
SEO stands for search engine optimization. It’s essentially the process by which you affect the visibility of a website or webpage in organic (aka unpaid) search results. As a blogger, search engines like Google and Yahoo are a major source of traffic to your site. After all, when you first start out with a blog and don’t yet have a large following or significant web presence, you will begin to get readers and an audience via search engines. Someone out there on the web is searching for something, an answer to a question, a product review, an opinion piece on their favorite show, and they come across your blog via the search results. Obviously, if you have ever done a simple google search before, you know that a single search can yield hundreds of pages of results, and your goal, through using SEO techniques, is to get your relevant information higher up on the search results list to increase the chances of your content being seen and clicked on, bringing traffic to your blog!
Why SEO is important?
SEO is important because there are certain things you can do to make sure that your blog posts get seen by more people who are searching for content! You really don’t have to know any coding or have any computer science skills to make sure you are implementing some of the most important techniques. If you have been running a blog for a little while, you probably already have the skills necessary to take advantage of SEO!
10 SEO Tips for Bloggers!
1. Focus on creating high quality content that people are searching for.
This one may seem like a no-brainer to any serious blogger, but you’d be surprised how many blogs and sites create underwhelming content. If you want your content to be seen, you need to create interesting content that people would be willing to spend time experiencing. It also helps if you are creating content that falls in line with what people are searching for. For example, many people use search engines to find answers to questions or to solve problems in their own lives. If you write informational content that helps to answer common questions and issues that may be effecting large groups of people, it is more likely that people will find your content, enjoy it and want to become a regular reader!
2. Writer longer blog posts.
Once upon a time, there was a specific word count that was necessary for webpages to boost their visibility in search, and to some extent, there is still a rule of thumb out there that you should make sure each page of your site contains at least 500 words. However, newer SEO stipulations explain that longer blog posts, in general, do much better in search than shorter ones. I realize this is a little bit of a grey area, but the point is, whenever possible, write longer blog posts. Take the extra time to create a little more content, add a few more points to your article, whatever you need to do to make it longer, that will help when it comes to SEO!
3. Use clever and descriptive titles for your posts.
This is one of those common sense rules of SEO. When you are titling your blog post make sure it adequately describes the content of the post. Furthermore, I always believe it’s best if you create a more clever headline that may include a play on words, alliteration or a numbered list (ex. 10 Ways to Clean Wine Stains).
4. Use images as often as possible throughout your posts.
Image search results are just as important as text search results and pictures do so much to improve the content of a post. Not only do pictures illustrate the content of a post, but they are help to develop the aesthetic appeal of your site. I know when I am searching online, I often give preference to links with images than text alone, even when the text is relevant to my search. A picture is worth 1,000, so use them as much as you can in your blog posts!
5. Make sure to name your images descriptively and also include alt text.
To ensure that your pictures show up in relevant search results, make sure to give your images descriptive names. Instead of IMG_123, give your image a name that explains what people are looking at, that way you increase the likelihood of your images being seen during search. Now, as far as alt text goes (alt text = alternate text), this is an option that you may see in your blog’s content management system when you go to upload new media to a blog post. The alternate text is simply a spot for an additional description that may be more matter of fact than the name of the file. Whenever possible, make sure to add alt text to your images. It doesn’t show up on screen when you publish a post, but it does help boost your images in search.
6. Use descriptive categories and tags for your posts and make sure your permalink are structured by category and blog post title (not by date!)
When you are writing your blog post, you have the option to add categories and tags to your post that help to give a bit of extra description and organization to the content. Make use of both of these features by assigning your post to a category that will act as a means of sorting your post by content, and tags that will help identify key words or terms that describe your post. Make sure to use logical, easy to understand categories, instead of personalized terms that may only make sense to you or frequent readers. For example, file a recipe post under “Recipe” not “Alexis Cooks” because more people will be searching for the term recipe than a more obscure phrase or term. Also, when selecting the structure for your permalinks (the permanent web address that will link back to your post) choose a structure based on your categories and blog post titles, not by a date structure! A category structured permalink may look something like this yourblogname.com/recipe/WorldsBestMeatballs, while a date structure would read more like yourblogname.com/2014/10/26/WorldsBestMeatballs. I think you can see, that the first example is much clearer for people to understand, and that means it’s also clearer for search engines to understand when filing search results!
7. Share your links through social media.
Once you have done all the hard work of creating and writing a great blog post, your work doesn’t end once you hit publish! You need to make sure you put the links to your awesome content out there on the internet for people to find and for search engines to link back to! The more links to your blog floating out there in the web, the better, but make sure not to inundate your social media feed with an endless stream of links. I think a reasonable rule of thumb is not to post more than 1-2 links per hour per social media feed!
8. Own your own domain.
In case you didn’t know, it’s always better to own your own domain than to stick with a third party blogging service domain. Once I moved my blog to strangecharmed.com from strangeandcharmed.blogspot.com, my traffic grew rapidly! Although that .blogspot.com or .wordpress.com may seem harmless, it actually overcomplicates your domain and makes it harder for people to find your blog because its actually just a sub-webpage of a larger website. Even if you can’t go the self-hosted wordpress route that I recommend, make sure to spend the extra few dollars a year to buy your own custom domain, even if you stay with blogspot or other similar blogging platforms.
9. Choose a blog layout that shows your complete post on the page- don’t make people click through for additional page views!
We have all been to blogs and websites that only display a summary or the first few lines of a post in their feed, enticing you to click through to the full post if you want to continue reading. Some people consider this something of a nuisance, preferring to click out of the website rather than to pay the toll of an additional page view before any real value has been acquired, but research is now showing that this style of layout actually hurts page views in your SEO rankings as well as annoying your readers. Remember, if it takes a real person an extra step to get to your full content, it also adds an extra step for the search engine as well, and when push comes to shove, your content may be spot on, but if you are putting a barrier between your readers and your content, your traffic and SEO ranking will suffer. If you are using this sort of layout, you should be able to change the default in your websites “reading” options by changing your posts to Full Text instead of Summary.
10. Reach out to other bloggers and do guest posts to increase your inbound links.
Having multiple inbound links is another way to bolster your rankings in SEO, and the best and most legitimate way to do this is via guest blogging on other sites. Not only will guest blogging give you the opportunity to get your content out in front of a new audience that may then begin to drive traffic to your site, but the actual links from other blogs to your blog will show up in search results and improve your site’s overall SEO performance! So make some valuable blogging connections and put your name out there beyond your own little corner of the internet, and you will see a myriad of different benefits!
So, those are my 10 SEO Tips for Bloggers! Like I said earlier, most of these tips are the sorts of things you end up doing as you grow your blog and improve your blogging skills overall, but it’s good to know how much certain techniques are actually helping you beyond the obvious! If you enjoyed this post and you are a blogger, feel free to link back to this post from your own blog and share these important tips with your blogger friends! Also, leave a comment down below if you have any other great SEO tips you think would be helpful to share!
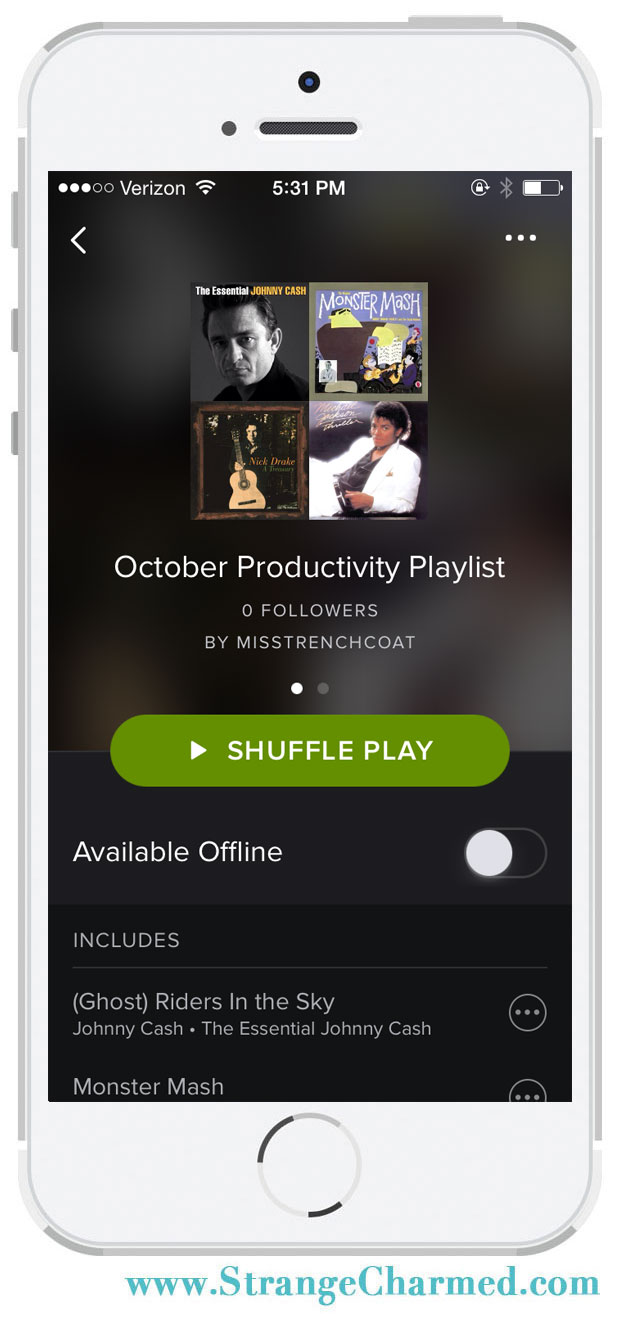
Welcome back for another installment of My Productivity Playlist, aka Whistle While You Work 2.0! Since it’s October, I thought it would be super fun and festive if I themed out this playlist to fall favorites and haunting Halloween sounds! I’ve gone ahead and made another Spotify Playlist in order to share these tunes with you, and it seems that you guys like this idea because many of you told me so and began following me on Spotify which I do appreciate. Plus all you followers had the added bonus of actually accessing this playlist before I published this post!
Toccata and Fugue in D Minor by Johann Sebastian Bach
The Phantom of the Opera by Andrew Lloyd Webber
I Put A Spell on You by Nina Simone
Witchcraft by Frank Sinatra
Montagues and Capulets by Sergei Prokofiev
Sweet Transvestite by The Rocky Horror Picture Show
Told you it was festive! I hope you guys enjoy this playlist and of course I want to know what you’re listening to right now! So, leave me a comment or go ahead and send me a tweet and tell me what music you have been loving this month to get into the Halloween spirit or just to help get you through the day!
I recently received a very lovely comment from a reader and member of my online community about my life and the work I do creating inspiring and motivational content for others. The comment was truly sweet, and ever since I received it, I have been thinking a lot about my life and the way it must seem to others who follow me online. From the outside looking in, I seem to be living a very charmed life! By all means, I feel incredibly grateful and thankful for my life, because I know that I do live extremely well and am overall, incredibly happy with my situation in life. That doesn’t mean I don’t have bad days like everyone else, or struggle with things like anxiety or depression from time to time, but I know I lead a charmed life. Hence this blog is called Strange & Charmed because it encompasses the duality of my quirky yet blessed life, but I think you already knew that.
What you don’t know about me, the part I am not so open about sharing, is my past, most notably my life before I began blogging in 2008, and even further back than that. Truth be told, as much as I live a wonderful, happy life today, things were not always going so well for me. Growing up was pretty rough for me. For most of my childhood my family was lower middle class, my parents divorced when I was young and from that time onward, I was always moving from one place to another, never setting down roots or establishing friendships in any one place for too long. At various points in my life, I was exposed to some decidedly unfortunate aspects of life, like addiction, abuse, neglect and of course, poverty. It’s a little hard for me to even admit that here to you all on my blog because to be completely honest, it’s painful to even remember those times. However, I think it’s important for me to share this with you guys because we have all gone through bad times in our lives and although some of us have experienced different struggles, we all have them and they are all painful!
What I want you to really take away from this is that if happy well-adjusted Alexis can come from a a place in life where she didn’t have very much and then turn around and make something of her life- something lovely and wonderful- then you certainly can too! I gave it some thought, and put together a list of some of the things that helped me to get where I am today. If you are struggling right now or in a rebuilding phase, hopefully these tips will help you get inspired to make changes in your own life in order to fulfill your dreams and potential.
1. Make a plan: So life isn’t great for you right now, but it doesn’t have to be that way! The first step to getting the charmed life you want is to make a plan. What can you do right now to make your life better? What is lacking in your life that you need to acquire to come to a better place? Figure out what you need and make a plan on how to achieve it!
2. Get to work: If you want something, you have to work for it, it’s that simple! I know this can be a scary concept sometimes because it means that we actually have to take control and get things done ourselves. Your wonderful life is out there waiting for you, but you need to work for it- the world isn’t just going to roll over and hand it to you.
3. Ask for help: I think one of the major things people get wrong when they are trying to build their lives is that they feel like they have to go it alone, as if having help diminishes what you have or can accomplish. This just isn’t true. Don’t be afriad to ask for help if you need it. Sometimes, we don’t know exactly what we need from others, but reaching out for a lifeline can often bring unexpected and positive results.
4. Get out of your comfort zone: We all know that change isn’t easy, and it certainly isn’t comfortable. However, if you want to bring change to your life, you are going to have to get outside your comfort zone and be prepared to feel very uneasy and unsure. Stick to your plan and understand that just because you can feel the pain of change, doesn’t mean that you are hurting yourself. In the long run, a little discomfort during the process is much better than staying in a bad situation.
5. Replace bad habits with new ones: Often times, we are our own worst enemy in our lives. If you complacently play the role of innocent victim, your life will never change. Instead, try to pin-point the areas in your life where you feel helpless, and make changes in your habits to develop confidence. For example, if you feel like you are always working but never have money and like to blame “bad luck” when you get a speeding ticket or a bill goes missing, acknowledge that the common denominator in those situations is you and that you need to become more responsible with your money by getting into the habit of paying bills early or making sure you practice safe driving. Whatever bad habits are holding you back, acknowledge your part in them and do what you can to build new habits in their place.
6. Always be ready and willing to learn: I believe that the people who have the greatest lives are the people who always keep their eyes open for new opportunities to learn. You seriously never know what important life lessons are around the corner, but if you walk around with blinders on all day you will miss them and in turn may miss important signs from the universe that may help you make the most of your life. Be open and always prepared to absorb new information and messages that can bring greater insight to your life.
7. Mix it up: They say the definition of insanity is doing the same thing over and over and expecting different results. If you have made your life changing plan and have gone ahead and broken out of your comfort zone but you still don’t see changes yielding any results, mix it up. Don’t be afraid to try something new, or to approach your problems from a new angle. Remember, the path of life isn’t a straight line, you may have to take a few turns from time to time!
8. Have a back up plan: So, you have made your plan, and you are determined to stick to it, but things just aren’t working. This is why you need a backup plan- something else to fall back on if your original plan doesn’t pan out. After all, it’s important not to rely too much on one single course of action. Like they say “don’t put all your eggs in one basket!” Options are good, just so long as you aren’t bouncing between options too frequently!
9. Stay inspired: It could take years for you to see major changes in your life, at least, I know it did for me! Don’t let this deter you or cause you to loose hope in your dreams. After all, this is life, and your in it for the long-haul! Make sure to constantly look for motivation and inspiration for your journey so you don’t loose steam. Even when things get tough, and they will get tough as you try to make major life changes, remember this quote by Kenji Miyazawa “We must embrace paid and burn it as fuel for our journey.”
10. Share what you have learned: As you take this journey of self-advancement, you will certainly learn a thing or two along the way. I believe that what we have learned, we must also share with others. Although this post may be titled “Secrets of a Charmed Life” there is nothing “secret” about it. The formula for a charmed life isn’t something that’s hidden from people, in fact, if you really pay attention, you are receiving signs and messages to uplift and advance you all the time. It’s just a matter of believing in yourself and trusting that you will end up where you need to be in life. As you go along on this journey, take a moment to stop and share your knowledge with others. It’s almost like leaving a trail of breadcrumbs behind so that you do not get lost along the way and so that others can also find you and see the direction you have headed.
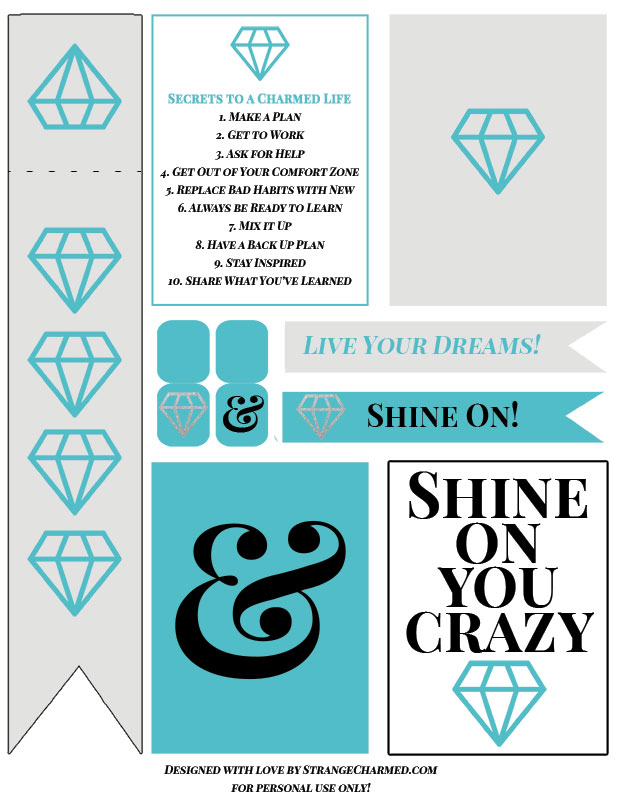
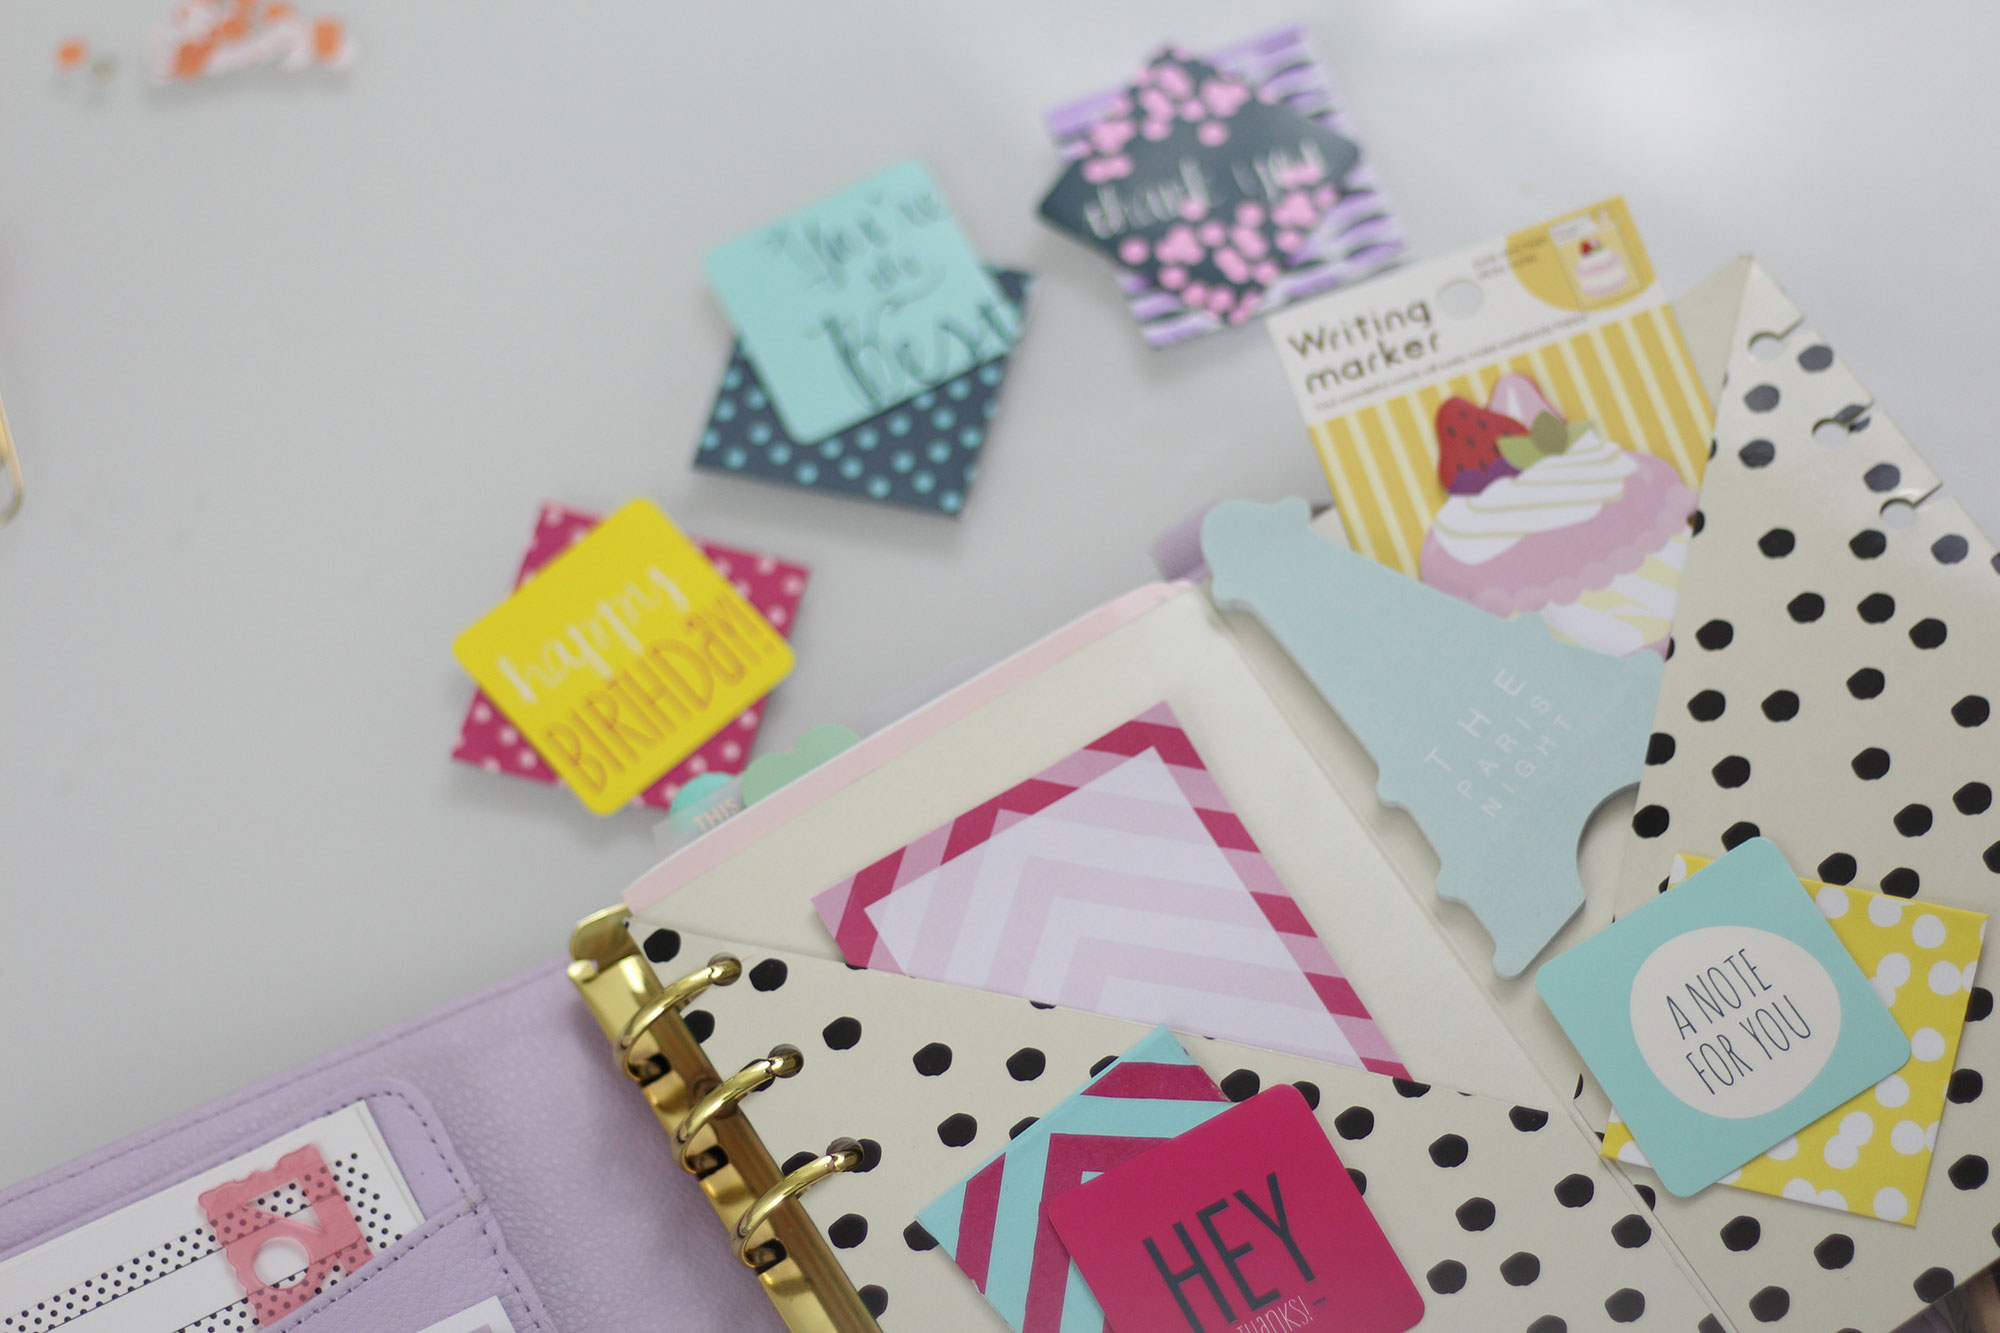
Now, to help you guys remember these little lessons, I have created a lovely free printable with a book mark, some journaling cards, some page tabs, and deco flags! Like I said above, you will need a lot of inspiration for your journey, and I hope these small reminders help you stay inspired. For best results, I suggest printing these on 98 bright, 32lb paper or a nice heavy card stock if you have it handy! If you enjoy this printable, I may start making more of these sorts of things and including them in my blog posts as little mementos that you can keep with you in your planner, a notebook, or on your inspiration board! Make sure to let me know what you think and what sorts of printables you would like in the future, and of course, make sure to share this in your social media! I would also love to see pictures of these journaling cards and deco items at home in your planners and notebooks, so please make sure to upload a picture to Instagram and tag me!
It has been quite a while since my last real What’s in my bag post! I know I did the back to school version at the end of the summer, but that was more of a hypothetical on what I would carry with me if I was going back to school! Even so, I know you guys are like me and love a great bag and just have to see what is inside. Handbags are just one of those things that I think women are just naturally curious about. On on hand, they are a very personal item that houses the important items that get us through our days, and on the other, they can be a fashion statement of our personality and taste. I know anytime I see a new What’s in my bag post, I immediately feel the need to reorganize and reflect on my own handbag status. I find myself questioning how my own bag and it’s contents are working for me. Do I still like the shape? Is it the right size for my needs? How does the size of the bag work with my body frame? Am I happy with the hardware? Does the brand represent me and my aesthetic values? Ultimately, it leads to the question of do I want a new bag?
I know some of these questions may seem a little intense or overly analytical, but if you’re a person who is spending a few hundred dollars (or more!) on a handbag, I think these are important questions to ask yourself. Even if you don’t normally purchase “designer” handbags, I still think these sorts of questions are important because at the end of the day you are spending money on a fundamental item of your wardrobe, and when it comes to purses, the sky’s the limit when it comes to available variety. So, that’s why I wanted to share with you a very helpful little Style Guide to Handbags that was recently published by Rue La la. If you’re thinking about a new bag or just want to get a little more information and history on styles you already own, I definitely recommend checking out this free reference!
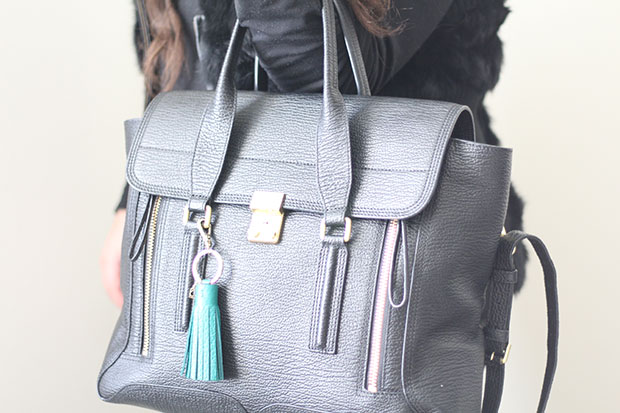
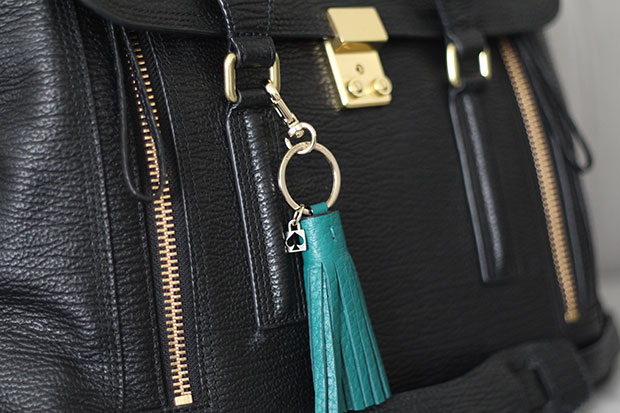
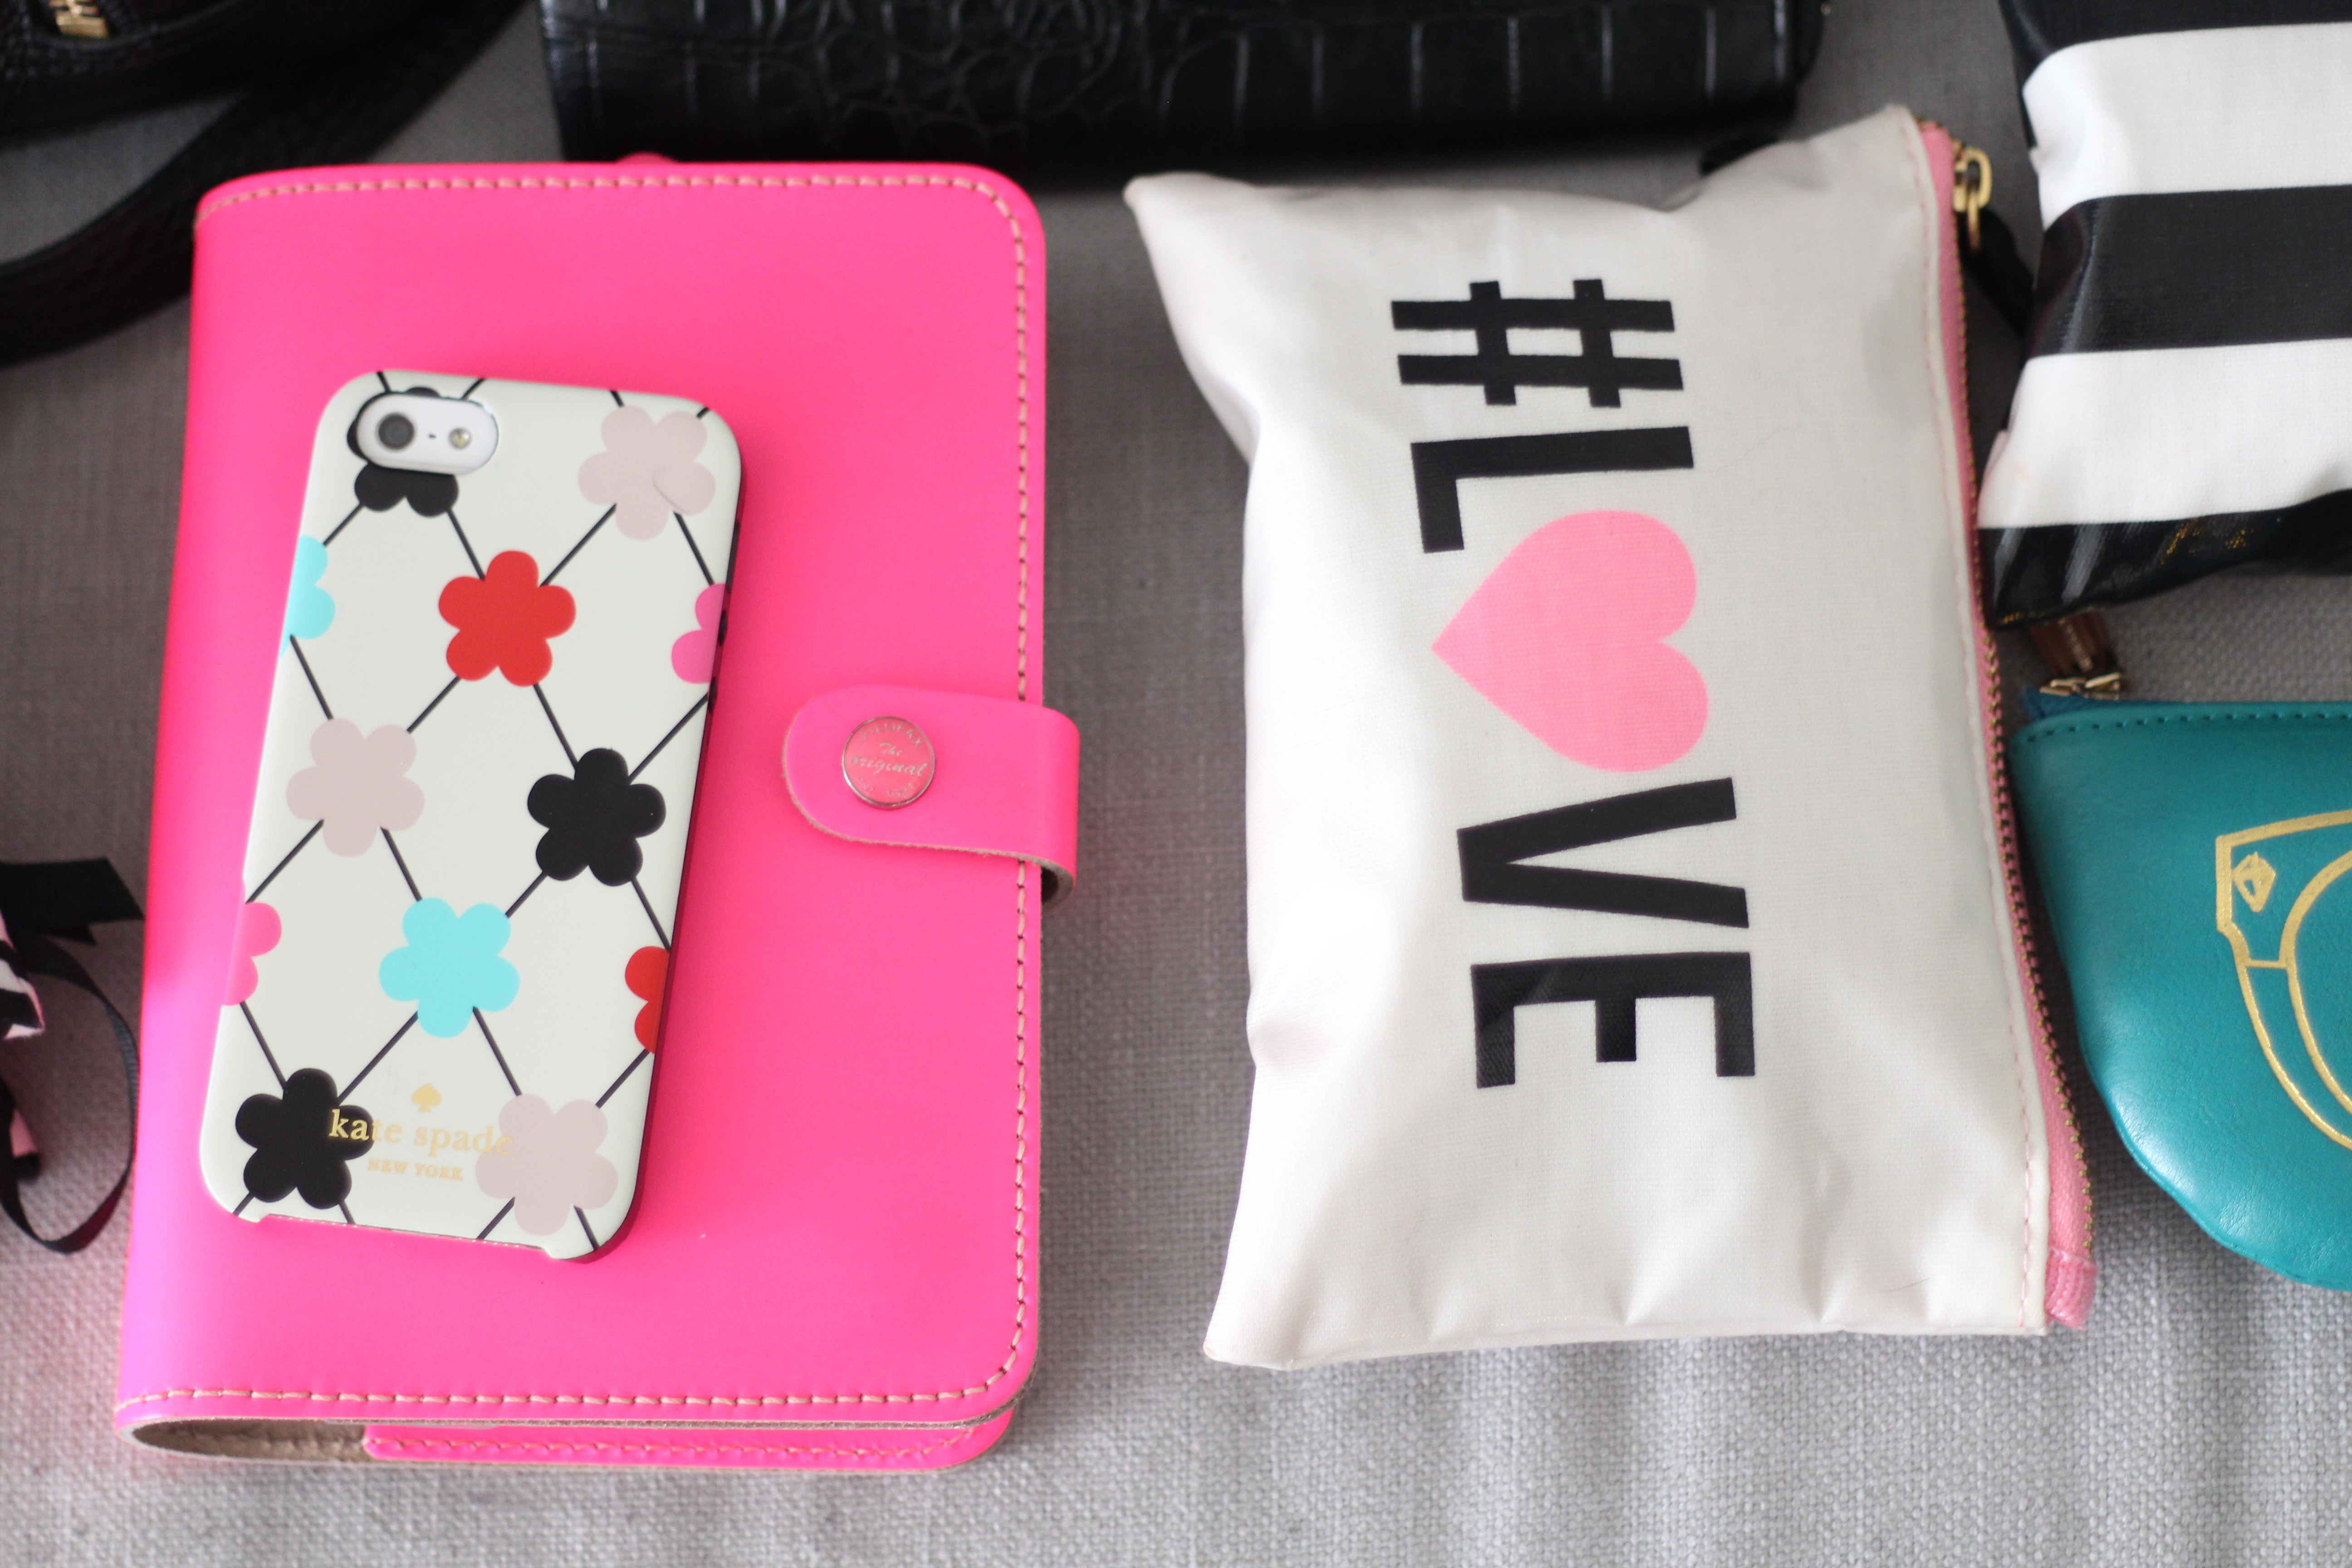
Now, back to my bag and what’s inside because I know you’re dying to know! Well, for about 6 months now, I have been carrying the super chic Phillip Lim 3.1 Pashli!t It is by far the most expensive bag I have ever owned, and was definitely a purchase I put a lot of thought into. According to the Rue La La Handbag 101 Guide, I would say this bag is somewhere between a Tote and a Satchel, which happen to be two of my favorite styles of handbag because you can just fit so much into them and look chic doing so! One of my favorite parts of this bag is the material, it’s a highly durable, almost pebble style leather that wears beautifully and really holds up well to the daily grind.
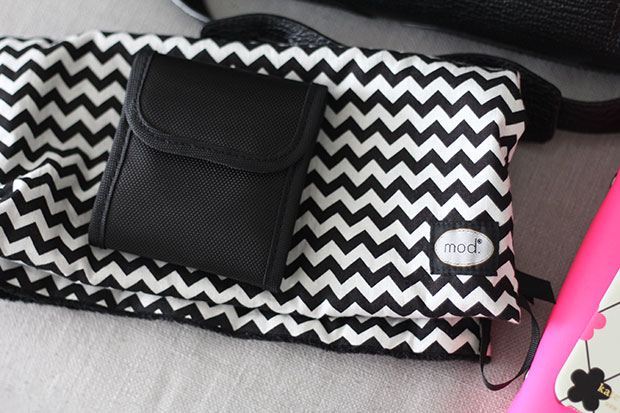
You can stuff quite a bit into this bag and I really do a good job at pushing the capacity limits! Since this is my “Blogger” bag, I use this to carry around not only my necessities, but also important tech items like my DSLR (not pictured) and my Macbook Air for working on the go! I carry my DSLR in a microfiber camera bag by Mod, so it’s protected while traveling, and my Macbook Air sleeps in a Michael Kors sleeve!
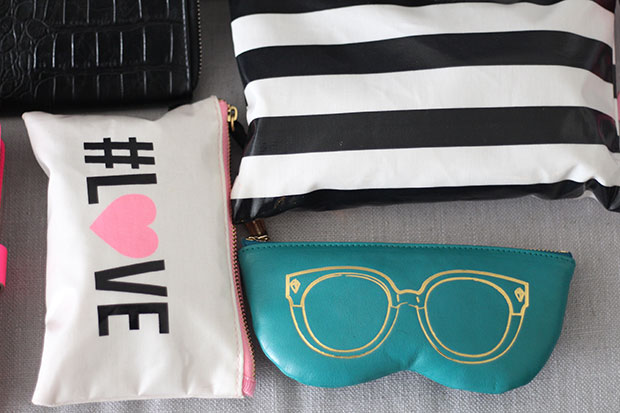
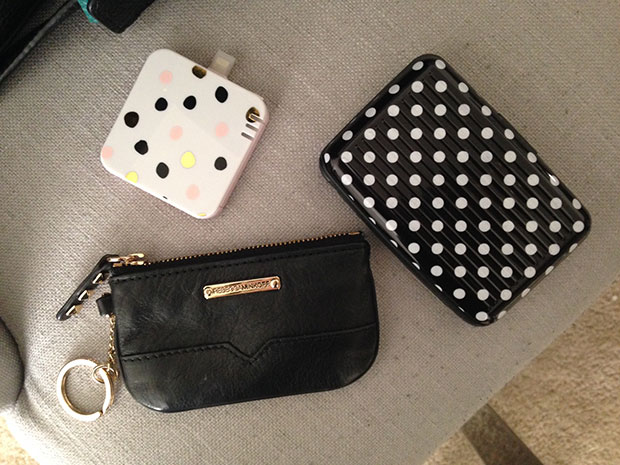
Since this bag lacks any organizational elements or a variety of compartments, I end up carrying most of my necessities in pouchesfrom Forever 21. I use one for general necessities and one for beauty!
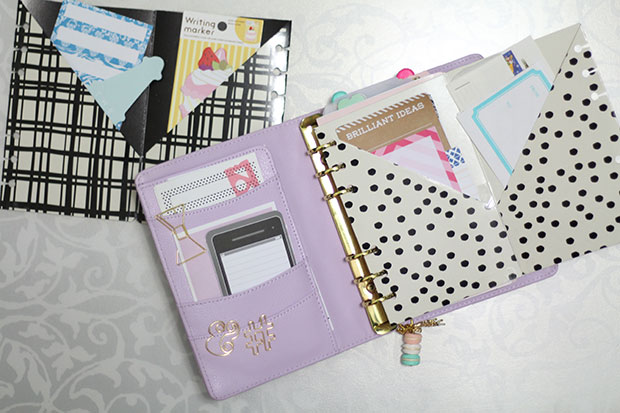
Of course, I absolutely can’t leave home without a few essentials, like my iPhone 5 and my new Filofax Original Fluoro Pink planner, that keep me organized and on task when I am getting down to the nitty-gritty of my blog to-dos!
So, of course to go along with this post, I also filmed an updated What’s In my Bag video! Make sure to check it out if you want to see more exact details of the contents of my bag as well as the contents of my pouches! Make sure to check out the Rue La La Handbag 101 Guide online as well– it’s a great little resource for handbag lovers, so make sure to share it with your friends!
xoxo,
This post was created in conjunction with Rue La La to promote their new Handbags and Purses Guide. Thank you so much to Rue La La for creating this guide and for giving me the opportunity to share it with my readers!
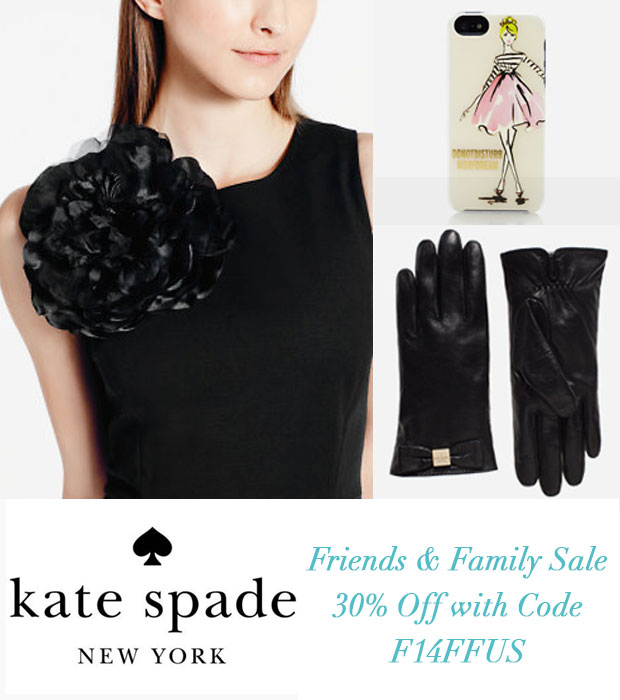
Happy Friday Everyone! I have something very fun and exciting to help you kick off your weekend! This morning when I woke up, I had one of the best emails ever sitting in the inbox! Kate Spade is having their 3 Day Friends and Family Sale now through Sunday October 19th! So, as I usually do when I receive these sorts of sale emails, I popped over to their site and checked to see if there was anything I wanted and I was very surprised to find that there were a bunch of items I was drooling over! Now, I know and you know that I love Kate Spade, but normally I can only find a small handful of things I really want, but not today! Today apparently, everything in the online shop was to die for so I thought I’d share with you guys since I know many of my readers also love Kate Spade and sale time is the best time to shop Kate Spade, in my opinion!
Here’s what I was drooling over!
[show_boutique_widget id=”174924″]
I am definitely going to pick up a thing or two during the sale, definitely the leather gloves! I have been dying for those for some time! Oh and I for sure need those magnets for the fridge! What about you? See anything you like from my selection of must-have’s? Make sure to use the code F14FFUS at checkout to get your 30% discount when you shop online!
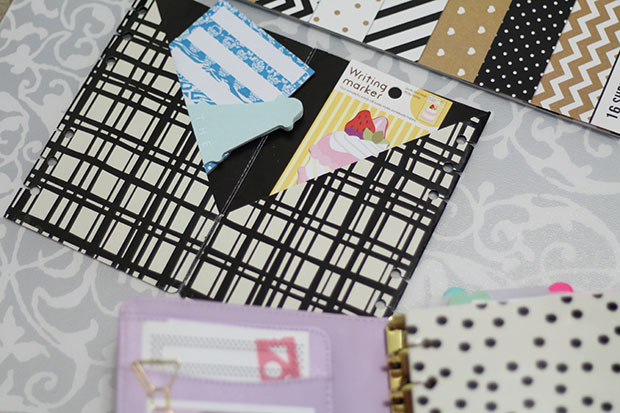
Immediately after I received my newest planner, the Kikki K Lilac and Gold 2015 Time Planner, I went through something of a Filofax revival! All of a sudden I was super obsessed with my planner again, I scoured the internet for new inserts and goodies and started watching way to many planner set up videos for new inspiration. At some point, I watched a video where a woman showed her setup and briefly commented on a DIY folder she had assembled for her planner. I remember thinking it was one of the cleverest things I had seen in a planner in some time, and made a mental note to attempt to DIY one for myself, not knowing exactly how she had gone about making hers. A few weeks later, I found a little note in my planner that referred to this file folder DIY, and feeling crafty, I decided to see what I could come up with!
Many of you have seen exactly what the result of my labor was, and have commented on your interest in seeing a DIY on the topic. So, I went ahead and filmed a video where I walk you through how I made mine. As this wasn’t my original idea, I really wanted to find the source of my inspiration and link you all to the original video I had seen that had inspired this creativity, but for the life of me, I can’t find the video! I searched through my YouTube history, spent days searching videos trying to find the originator of this idea, but alas, I could not find it and thus do not know who I should credit for this idea, but thank you, whoever you are! I love this little folder I have made for myself and I think you guys will love this DIY because it’s really almost too simple!
I considered whether or not I should write out the directions to this tutorial, but I know I will probably get a bunch of questions on the process because I feel like crafty tutorials like this need to be seen, not read. So, below is the video where I walk you through the process. Here is a list of supplies I used and suggest for this project:
A Target $1 Spot File Folder
A cutting mat
A metal ruler
An exacto knife
A permanent glue roller
Clear tape
Scissors
A single hole punch
I hope you all have enjoyed this video and this DIY! I think this little folder is great for storing a variety of different planner supplies like extra paper, sticky notes, page flags, stickers and more! It can also act as a divider as well or even a dashboard if you keep yours in the front of your planner like I do! If you have a planner that lacks lots of pockets or if you just need a more unique storage idea, definitely take the time to try this out and share it with your planner friends as well!
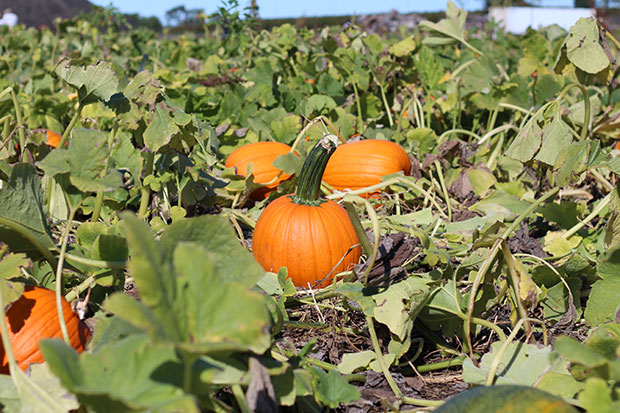
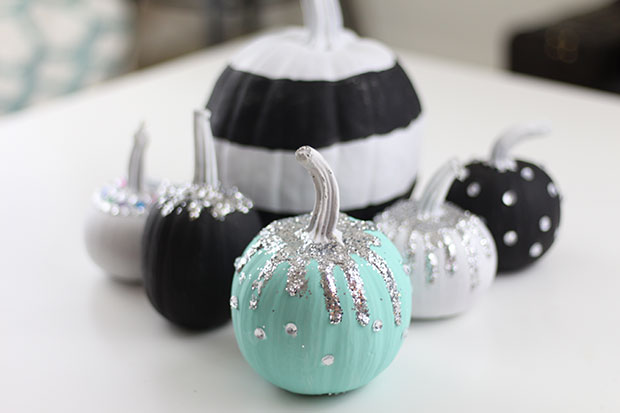
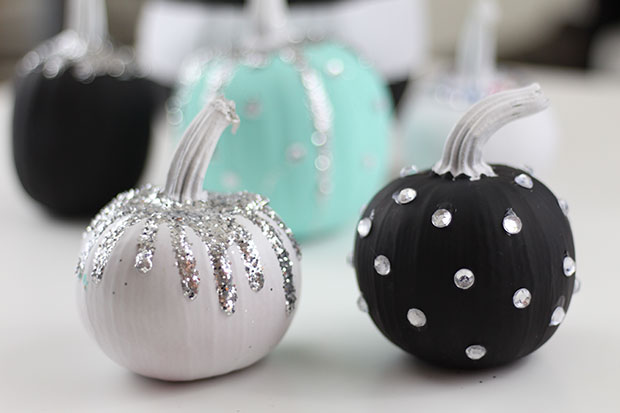
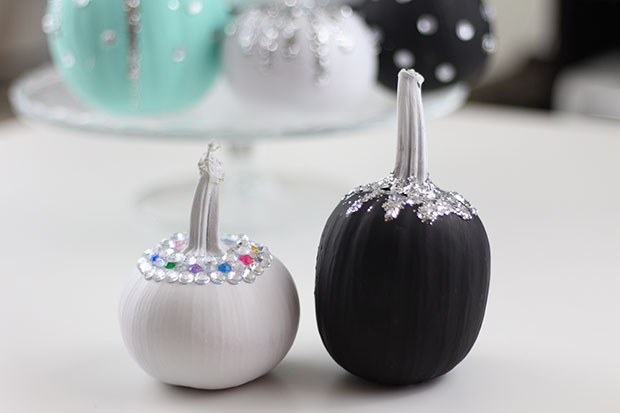
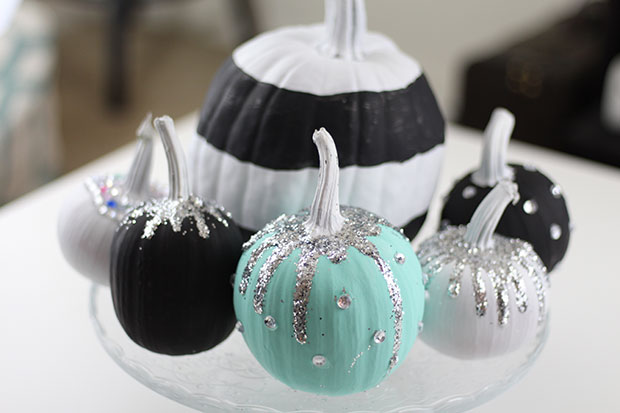
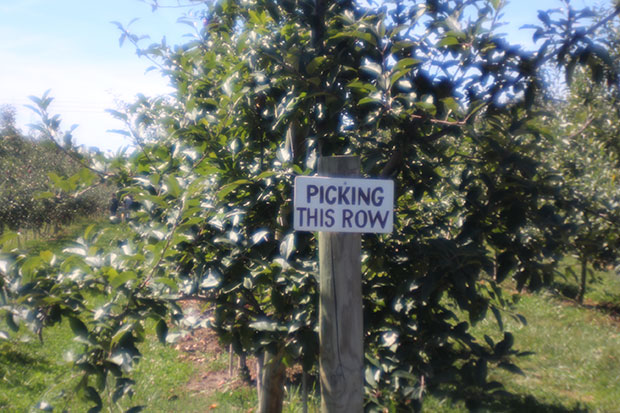
We are nearly half way through my favorite month of the year and although I am sad to see the time passing so quickly, I will say that I am very happy about how much I have managed to pack into this month thus far! This may be my most eventful October to date and I may have to credit my 31 Things to Do In October Printable for that! You seriously need to check it out and download it before the month is over- it has really helped me stick to the Halloween/Fall spirit! In 14 days I have actually managed to check off 14 items from that list, including take a hayride, visit a pumpkin patch, and complete a corn maze- three fun activities that I crossed off this past Sunday during my visit to a local farm. You may have noticed the Instagram picture of an adorable little pumpkin just waiting to be picked… yep, I brought him home with me along with a few of his friends. In fact, for the first time in a number of years, I not only purchased real pumpkins (I normally prefer the fake, non decomposing types) but I also had a blast decorating them! Yea, you see these pics? These aren’t designer pumpkins I pulled from Pinterest, no, they are my pumpkins! I decorated them all by myself, and I honestly couldn’t be prouder! Of course, for those who know me and my aesthetic, it should be no surprise that I went with a glittery black and white scheme with a punch of turquoise thrown in the mix. I’m especially pleased with my black and white rugby stripe pumpkin that I painted by hand after a few failed attempts at creating straight lines with tape. He’s quirky and a little messy… just like me.
These pumpkins were really fun to paint and decorate and not too difficult either. All I did was primed the pumpkins with a white spray paint primer (thank goodness I used spray paint because it made the process so much smoother and gave me a fresh base for my pumpkins) and let them dry. Then I painted two of them black by hand with some acrylic paint, and one turquoise. I knew I wanted to use silver glitter and plastic rhinestones to bling them up, so I got those over at the craft store! For the glitter topped pumpkins, all I did was spread Elmer’s School Glue in sort of a drippy pattern on the tops of the pumpkins and then covered the glue in glitter before it dried. As you can tell, some of the glue dripped down a bit more obviously in certain areas, but it all adds to the charm! Then for the rhinestone pumpkins I just applied some super glue to the backs of the rhinestones and arranged them in place. I like how one of the rhinestoned pumpkins looks like it’s wearing a jeweled collar and the other looks like polka dots. Of course my special turquoise pumpkin got the best of both worlds with the glitter and the rhinestones and I love her excessive bling. She is my official Strange & Charmed pumpkin, so she sits front and center!
Anywho, enough about painting pumpkins! On to the real topic of this post, my favorite non-Halloween, Halloween movies! Okay, so what do I mean by non-Halloween? Well, I mean movies that aren’t your typical blood, guts and gore horror movie! These aren’t necessarily all kid friendly movies, and some definitely fit into the horror genre, but they aren’t your typical slasher/monster/ghoul movies either!
So, I hope you enjoyed this little update to my month and got some good ideas for some movies to watch as we near Halloween! If you’re looking for some actual Halloween type movies, I found this list of the best Halloween films currently on Netflix. If you’re looking for a more traditional scare, I’m sure you could fill more than a few movie nights with some of those! Let me know in the comments which movies you are excited to watch for Halloween and if you do some pumpkin decorating I would love for you to tag me in an Instagram picture so I can see your October spirit as well!
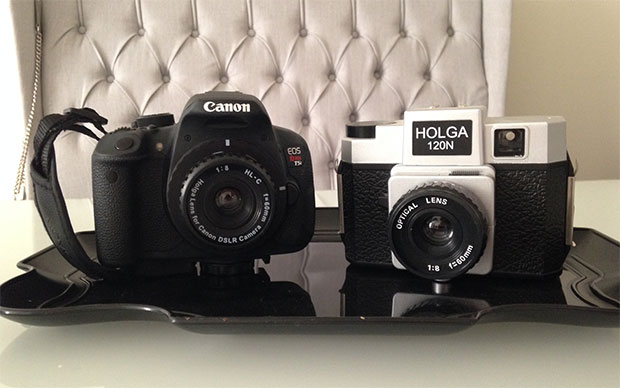
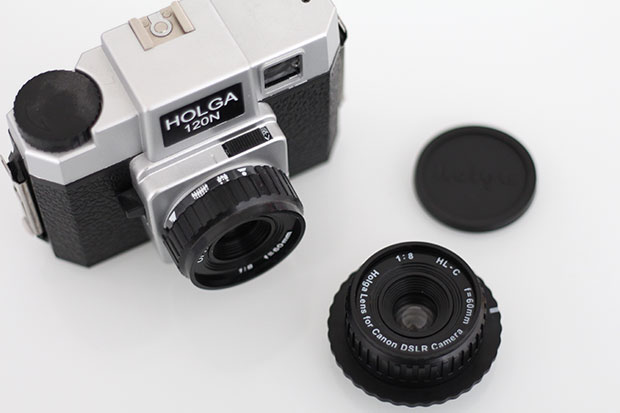
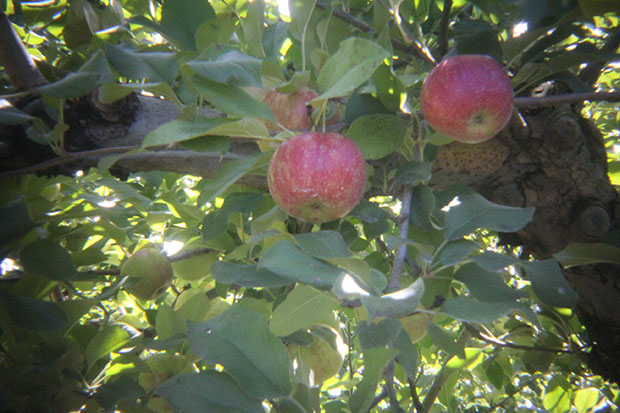
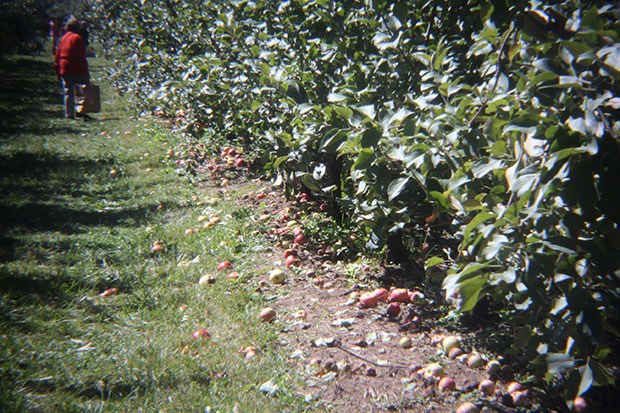
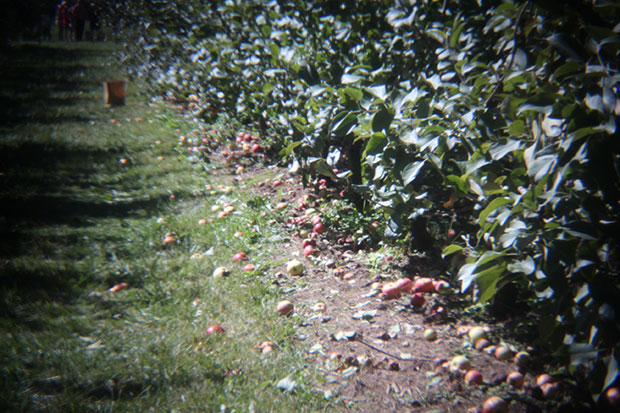
If you saw my September Favorites, you know that I recently purchased a bunch of new “toy” lomography lenses for my DSLR. Go ahead, call me a Hipster, but I actually really enjoy lo-fi photography and that whole lomography movement in artistic photography isn’t going away, in fact I think it’s only getting stronger. In case you’re reading this and asking yourself what lomography is, let me sum it up for you. Lomography is basically an artistic photographic style that values the aesthetic of analog cameras. It’s been something of a movement since the advent of digital photography, preserving the artistic experience of film photography. You may be familiar with the plastic “toy” cameras sold at Urban Outfitters, such as the Diana and the Holga, throwbacks to a dying age dominated by film, or at least you are familiar with the many Instagram filters that can give you that analog film camera look with just a tap of a finger! Well, good news, you can actually buy lenses for your DSLR that have been made by Diana and Holga to give you that great vintage quality in your digital images, and I am going to talk about four of those that I purchased and have been testing and give you my feedback in case you also want to give these lenses a try. I recently took all four of my new toys out with me while I went apple picking and shopping in a quaint little country town near my home. This little experiment on a bright sunny day, gave me the ability to test the lenses in optimal lighting conditions.
Now, keep in mind, these lenses are called “toy” lenses for a reason. They are plastic (for the most part) and not made to be high quality optics. They also only cost me an average of $25-30 each, so they are definitely not pro lenses, but for DSLR owners who also enjoy the lomo look or would like inexpensive lenses to play around with, they are an option out there, and options are good! Another thing to keep in mind is that because these are cheap plastic lenses, they don’t have any sorts of electrical mechanisms that speak to your DSLR body, so you will need to shoot in manual when using these lenses. Your camera will act like there is no lens connected to the body, so depending on the camera you have, you will lose certain features as well, but if you are comfortable or knowledgable in shooting manual, you shouldn’t have any problems. I kept my DSLR in manual with my ISO set to auto (because these lenses don’t have large apertures to let in much light). I also kept my shutter speed as slow as I could without causing blur, again, in order to help increase the amount of light getting in through the lens. Finally, I also used the Live View mode on my display as opposed to shooting through the view finder. In certain situations, you just can’t be sure of the lighting and live view (as least until your comfortable shooting in the lighting/environment you have) will help!
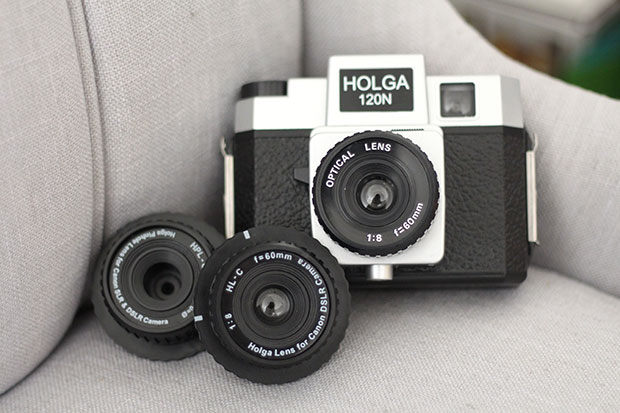
Holga
I purchased two lenses made by Holga. The first is their 60mm f/8 Lens, which is the same lens that you would find on a standard Holga camera, but made with a special mount to fit a DSLR. Because these are lo-fi, basically analog lenses, they can’t do things like autofocus, so you have manual control of that by twisting a ring on the outside of the lens that has some convenient little non-specific images that denote portrait, family, group, and infinity! It’s not precise, but it’s also not rocket science! The lens definitely skews on the dark side, and has a good amount of vignetting, but overall, I thought it gave me some of the best “vintage inspired” results out of all four of the lenses. To me, it produced the sorts of images that I might see while flipping through the pages of my grandmothers scrapbook and it’s actually given me a few awesome family photo ideas to work on for the holidays.
TL;DR: Authentically vintage, albeit tricky to use. Will continue to play with it for fun effects!
The second of the two Holga lenses I tested was the Pinhole. This lens is says its 25mm, but since it is just a tiny pin sized hole, there isn’t anything you need to adjust and no way to focus. If you have ever used a pinhole camera before, you know that it’s all about controlling the light with these because their aperture is nothing more than a teeny tiny hole that lets in next to no light. This one was probably my least favorite out of all the lenses I tested, and for good reason. Even on a super bright and sunny day, this lens was still overly dark, and I believe the ISO for this picture was at least 400-600, while the shutter was 1/60. In the typical pinhole fashion, you can certainly make out the heavy vignette circle around the image created by the tiny hole, which I do think adds a really interesting vintage feel, but this is the sort of lens that has a time and a place to use and for me, I don’t find I have many reasons to use it!
TL;DR: Lens is way to dark to use on a regular basis, won’t be bringing it out again unless I have a great concept to shoot.
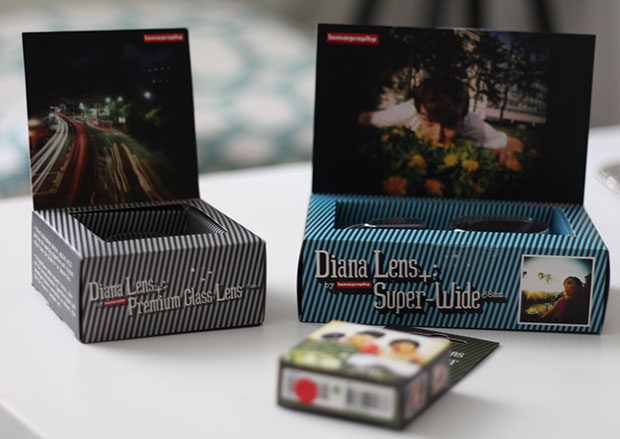
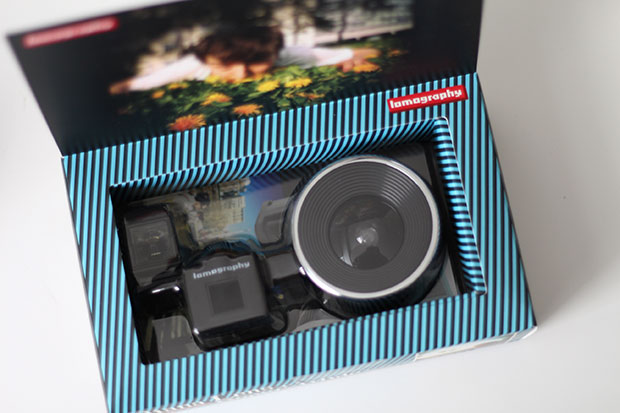
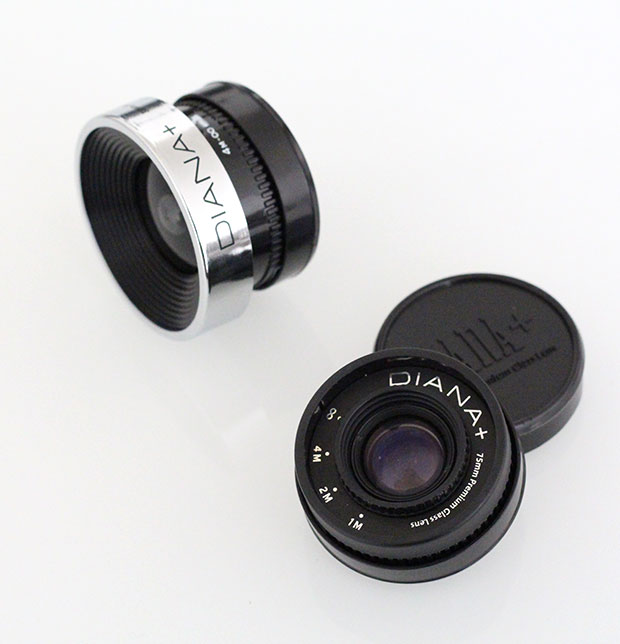
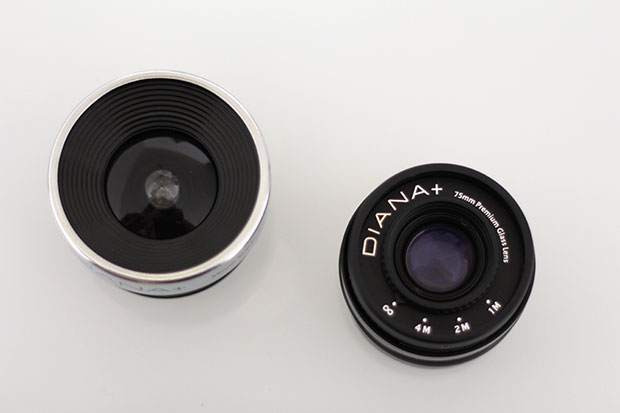
Diana F+
Now on to the Diana lenses. These one’s are a little more unique because they are the actual lenses that fit onto Diana F+ Cameras. In order to fit them to your DSLR, you need to purchase an adaptor that connects the lens to your camera body. Downside of these lenses is that the adaptor is only available for Canon and Nikon cameras (unlike the Holga lenses which are actually made to directly fit a few different camera manufacturers). Now, the first Diana Lens I want to talk about is the 38mm Super Wide Angle. In comparison to the other three lenses, this one felt the most plastic-y. The Holga’s were actually made from quite a hard sturdy plastic, but this Diana lens felt light and wobbly like it may just break apart- but good news, it didn’t! Even after much in and out of my bag and traveling around, it held up, it just felt unstable! This lens is also the largest out of the toy lenses I purchased. It too, like the Holga 60mm, has a focusing ring with a very non-precise system of focus measuring, but again, once you got used to using it, you sort of understood the focusing distances. The thing that is quite interesting about this lens is that it creates some very interesting effects with the light. The Diana F+ is often dubbed the Dreamy Diana, because of the soft, ethereal lighting effects that it creates. This lens works well in situations where you have a lot of lighting contrast, so a bright sunny day was a good time to shoot with it, or conversely, I would also love to take this out into the city at night and capture the electric city lights and signs that brighten the night (it’s on my to do list)! Because of the dreamy lighting effects, I actually think that I prefer to use this lens for video as opposed to photography. I played around with it while we were apple picking and I loved the vintage feel of the scene as the light danced around in glowing blobs! Overall, it wasn’t a terrible lens and I found the artistic quality of it to be very lovely!
TL;DR: Feels cheap, but gives a unique artistic feel. Best for creating vintage inspired video, in my opinion.
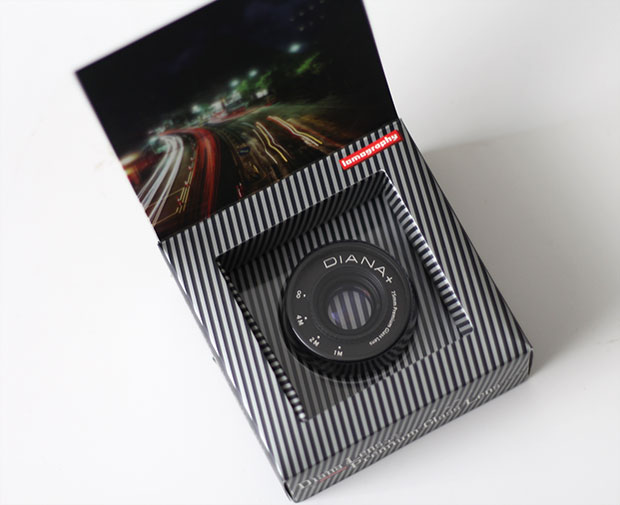
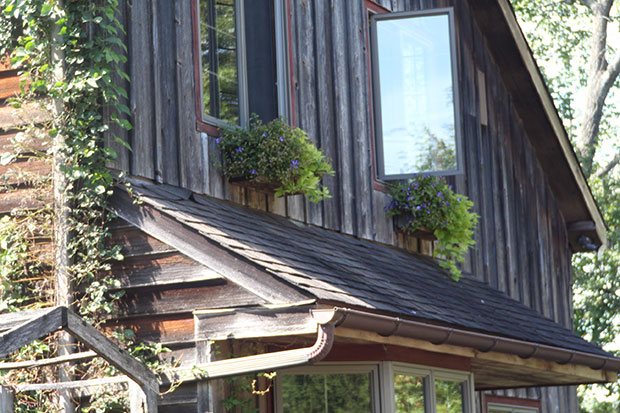
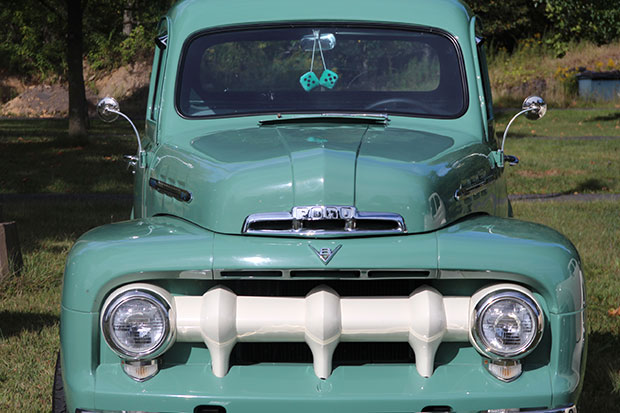
Now to the final lens, and you can say I saved the best for last! This final lens is the Diana 75mm Premium Glass Lens. Yes, I said premium glass. Again, this is a lens that was made for Diana F+ Cameras, sort of as an upgrade to the cheap plastic made lenses that come standard with the camera in order to bring more sharpness to the film photo’s. Out of all the lenses, it was my favorite, but it was also about twice the price of the others. First, let’s address the construction of this lens because it’s a little odd and a bit of a juxtaposition with the term premium glass. Yes, the optical element of this lens is glass, but the body is still plastic, albeit a much sturdier plastic than the 35mm Super Wide. It’s a relatively small lens, that definitely has a more premium look to it than the others, however, it has the strangest manual focus. Instead of the focus ring being placed outside the body of the camera, this one is actually located in the front center of the lens, right around the glass, which makes it awkward to adjust. People with large hands and fingers may find it a pain to focus this way, I found it a pain and I have small hands and fingers, but I will say that this odd focusing ring actually lends itself to an overall positive experience with the lens. As you can see from the sample images I took, this lens is sharp. It produces clear, crisp images once you can get the lens in the proper focus. You have to remember, this is a 75mm lens, so it lends itself to being more of a portrait style lens by nature, and personally, I find that it’s the sort of lens I want to use when I’m taking stills of friends, or I’m on a nature hike, walking at a leisurely pace and photographing flowers and plants. I know that may sound weird, but the fact that you have to take a moment to finger the focus to the appropriate spot means you need to take a moment to stop and think about the shot. I think that slower paced, more thought process driven method of shooting is actually very important and a great opportunity to learn more about your own style of photography. For the size and the price and the quality combined, I have no excuse not to keep this little guy with me!
TL;DR: Good quality lens with relatively sharp optics and small form factor. Is now a staple in my camera bag.
I hope you guys found this installment of Picture Perfect to be helpful and informative. I would say that although most of these lenses aren’t wonderful quality, the fact that they are pretty inexpensive is reason enough to pick one up if you are a DSLR owner who maybe only owns a real lens or two. I could imagine that if you are reading this, you most likely only own an entry-level DSLR with the kit lens, so these loom lenses are a fun way to mix up your photography, especially if you want to pick up the 75mm because that focal length is a pretty good one to own and for the price, you can’t beat it! Even if you’re not so into photography, I think these lenses would actually make really great gifts for friends, family and loved ones who may be interested in photography and own a DSLR! Especially students because I think they would get a lot out of playing with these sorts of artistic/creative lo-fi lenses!