How has your February been? This month has been filled with excitement for me, I love celebrating Valentine’s Day with my Husband and of course, Galentine’s Day with my besties! I hope your month was wonderful and that you are ready to go for a new month of fun and FREEBIES!
Okay, so let’s talk March Freebies, shall we?
As per the usual, I have a March Dashboard for your planner, along with my Make Your Own Luck March monthly task list! They are both in the same shop listing, so you only need to check out once and you get both designs in both personal and A5 size.
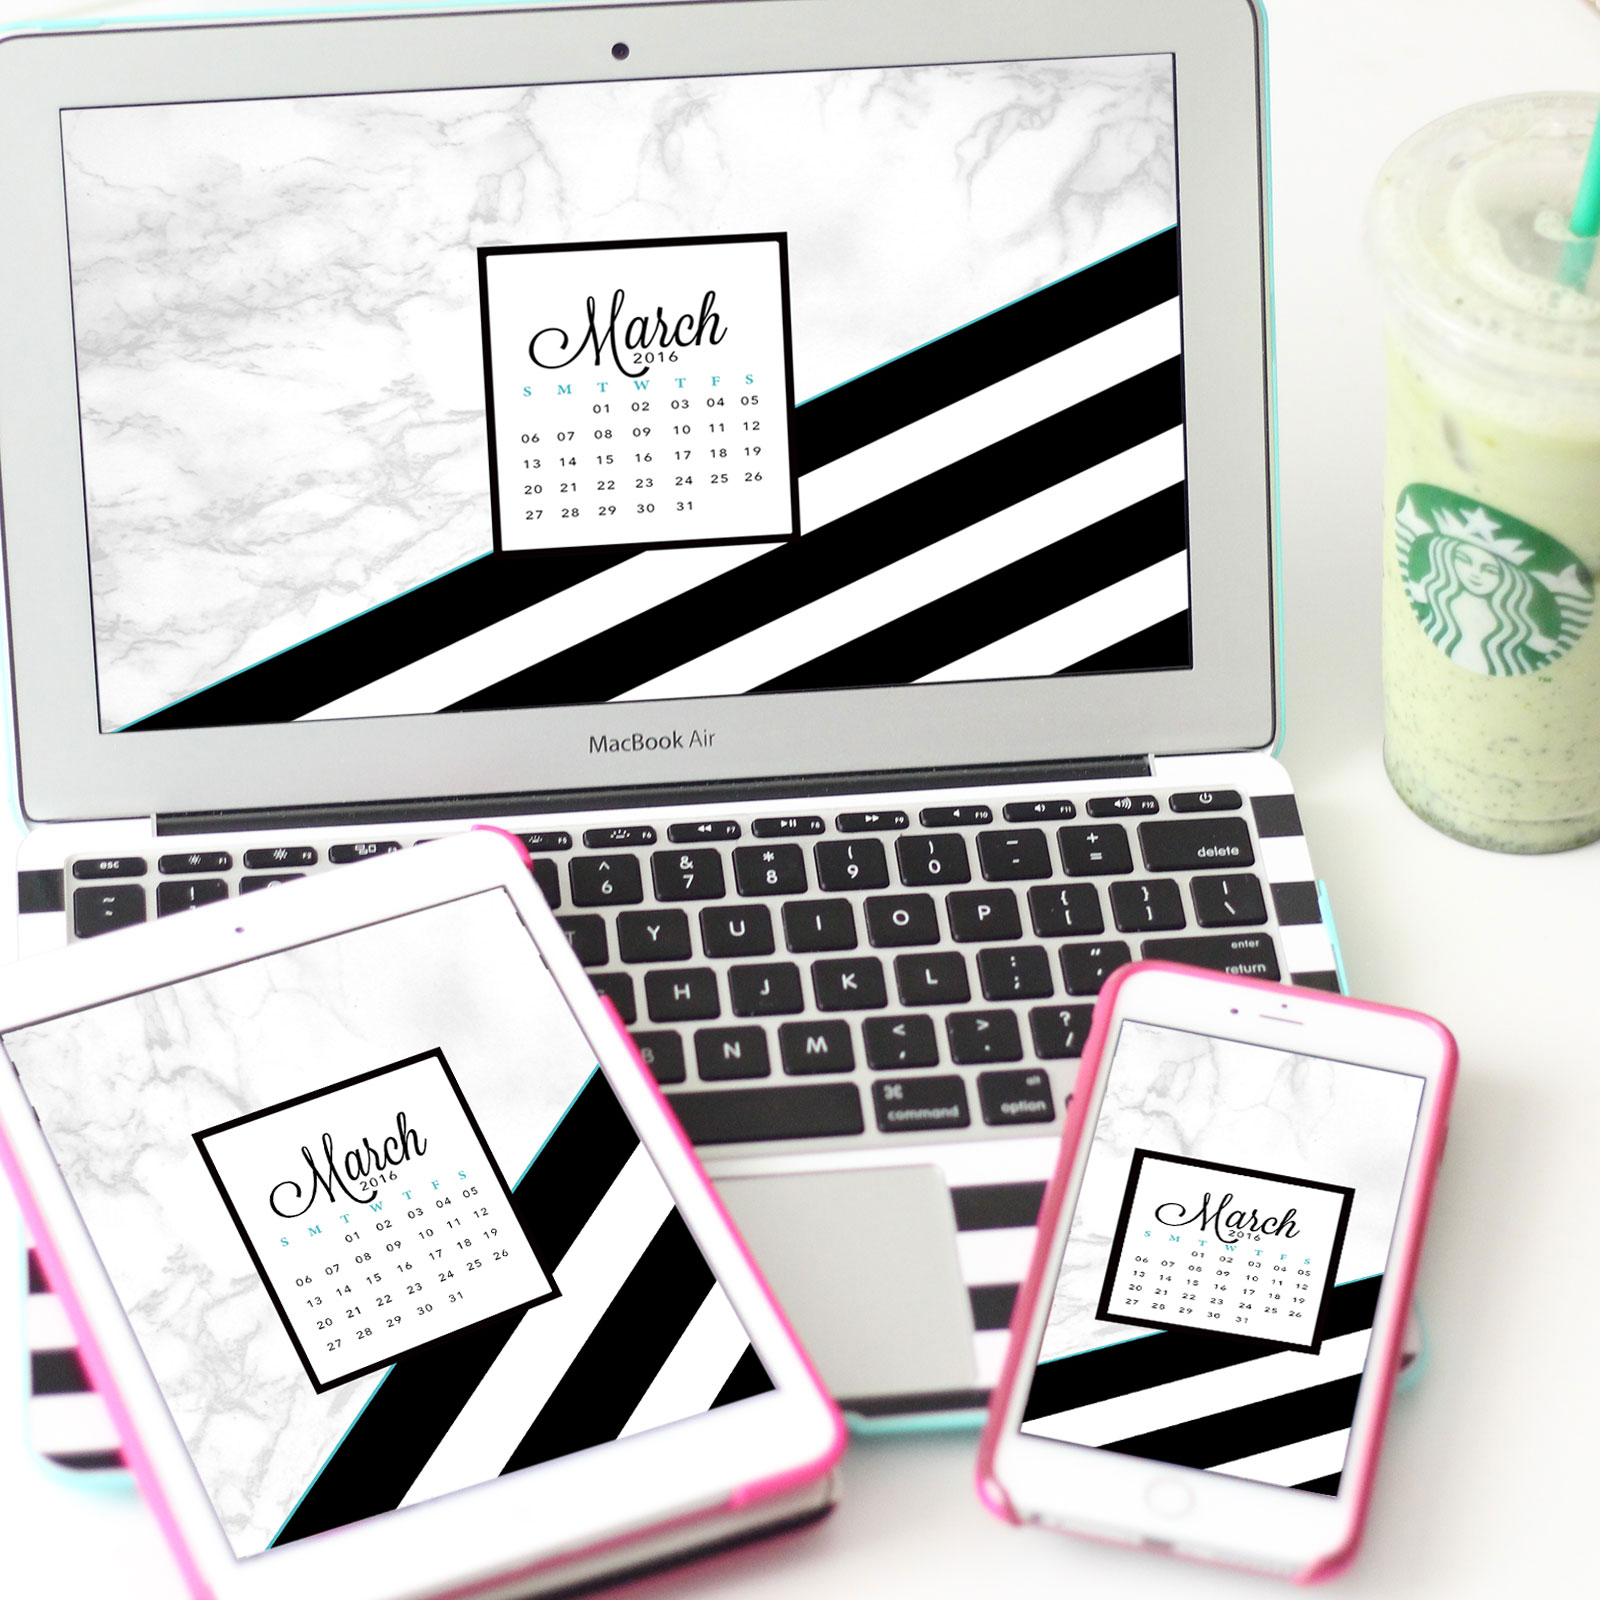
Also made a new set of monthly Tech Wallpapers. In celebration of my birthday on March 13th, these wallpapers are a mix of my two favorites, white marble and stripes! It’s the same pattern I use for my Charmed Life Planner Cover and my Macbook Air skin! I hope you enjoy these wallpapers and that they keep you inspired for the month. I know I love making them for you!
If you download any of these items and put them to use on your gadgets or inside your planner, I would LOVE to see them in action, so please make sure to share your photos on social media, tag me @MissTrenchcoat and use the #CharmedGTD so everyone in the community can see your photos and like them as well!
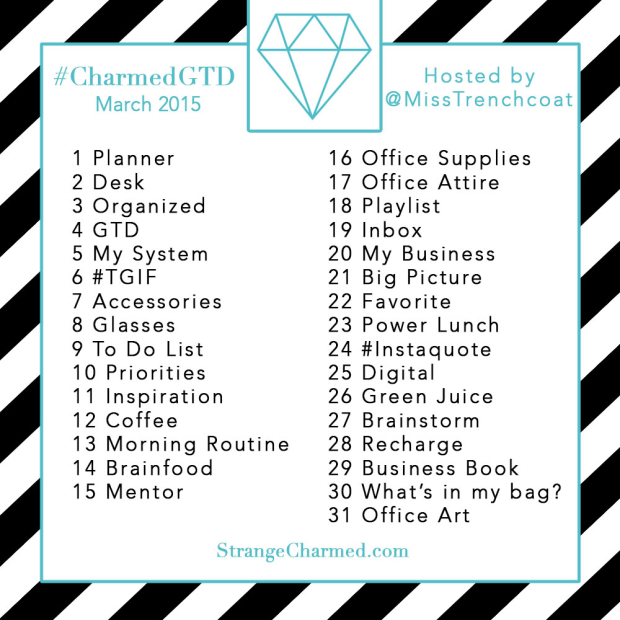
I don’t know about you but nothing inspires my productivity quite like a good Instagram Photo Challenge! Last March I debuted my #CharmedGTD Instagram Photo Challenge and so many of my productivity loving followers participated that the month proved to be an epic success! March is a super important month to me because my birthday is March 13th, so I love celebrating the month with my friends.
If you love Instagram and would like to participate in this challenge, here’s all you have to do!
Step 1: Right Click on the graphic above and email it to your smartphone to post on Instagram announcing your participation! (Or you can open this webpage on your smartphone and save the graphic directly to your phone’s camera roll)
Step 2: Read the prompts on the graphic each day, take a picture that illustrates the prompt of the day, and post it to Instagram. Make sure to add a fun description to your image that includes the hashtag #CharmedGTD so everyone participating can see each others pictures!
Step 3: Make sure to follow me @MissTrenchcoat and interact with the other participants by liking and commenting on their images!
Instagram is one of my favorite ways to interact with my community and the #CharmedGTD photo challenge is all about inspiring you everyday to Get Things Done! (Get it #CharmedGTD = Charmed Gets Things Done, inspired by my favorite productivity book Getting Things Done by David Allen!) If you have been curious about trying a photo challenge but haven’t ever participated before, I’d love for you to join- remember, this is just something fun to do on social media so if you miss a day or days, don’t sweat it! You can always catch up or skip prompts as needed, the point is just to get involved, let the daily prompts inspire you and of course, HAVE FUN!
If you would like to participate, again, make sure to repost the graphic above to your Instagram account and of course, let me know that you are joining! I can’t wait to see your pictures and I hope we all have a wonderful and productive March!
I think it’s been a few months since my last full playlist post, so this is completely overdue, but I just wanted to share the tunes I’ve been listening to lately. This is a pretty random mix, but I like it and I hope you do too. Happy listening and I hope this playlist brings you some inspiration and productivity as we close out February!
Enjoy!
So what have you been listening to lately? Let me know on the comments!
The Marketing Assets Your Business NEEDs! Sign Up for My FREE TRAINING!
Truth:Your visual marketing assets are most of the reason people follow you online and purchase your products. Even if you don’t have a product based business, the images you use and share to represent your brand online are crucial to the success of your service based business and even your brick and mortar locations. For me, putting together a strong photography based marketing strategy was much of the reason my business skyrocketed over a year ago, and it remains one of the main reasons why I am still growing at a quick and steady pace.
In terms of my own business specifically, Pinterest is the number one traffic driver to my website and shop. Hands down! The images I share on Pinterest linked to great blog content and new products are my number one asset. Without those great images, people wouldn’t be interested in the content and products they are linked to.
Traffic driver number two for my business is Google search, number three is Google Image Search and number four is Facebook! Okay, so do you see the pattern? Three out of the four top drivers of traffic to my site are image related. My images are seriously driving my success online!
So, what does this information mean for you? Well, over the past year, I’ve been tracking this success and analyzing it, and what I have come up with this that their are 5 Photographic Marketing Assets that are the major needle movers. So much so that I believe that if you focus on these 5 assets, and create your own, you will also experience growth in terms of traffic and sales for your business.
Look, this is the internet, right? The only way you are going to know if this strategy works for you is to try it yourself, which is why I am hosting a FREE TRAINING WEBINAR sharing these 5 assets and examples of them so you can implement my strategy yourself.
If you’re finding this information after February 21st, don’t worry, I will have a replay of the event for you to watch, but if you can make it to the live event on the 21st, you are going to get a special Q&A with me and also a time sensitive bonus!
I’ve been speaking to a lot of people lately, students and followers within my community, about getting started with a service based business. Service businesses are a little different than product businesses because it’s not all about creating something and putting it out there, you have to develop your own personal skills first, organize your offer and then seek out clients that need the skills you have. If you want to start a business as a life coach, stylist, personal shopper, professional speaker, designer, photographer or any of the other thousands of possible service based businesses, this article is going to teach you how to get one up and running and how to get started promoting it!
Step #1: Get the Experience
I’m often asked how one goes about getting the necessary experience to start a service based business. Depending on the service, you may have to go to school or get a specific certification for it, like being a lawyer or a health coach. But if your service doesn’t require schooling or any specific certification in order for you to practice it (which you find out by researching the field and the norms associated with it) then you need to get yourself some real world experience. A web developer or designer could gain experience by getting a job in the field and practicing their skills, or a life coach or public speaker would want to find some clients (perhaps friends or family) to test their skills on. In this period of time, you are either working for someone else, working for low cost or no cost at all. Think of this as your intern stage where you are gaining the skills you need to eventually earn an income from your service.
Step #2: Put Together Your Offer
Once you have some good experience under your belt and feel like your trial clients are happy with their results with you, you can develop your offer. Your offer is whatever your specific service will be, in some form of packaged form. For example, a public speaker would put together some speeches on topics they have experience on and develop a price that they can offer to businesses and events looking for such speakers. If you’re a wedding planner, you will want to work up all the services you will perform for a customer and price them out individually and as a packaged deal so when you meet with engaged couples, you have a clear outline of what you can do for them and how much it will cost. A photographer may work up an offer that’s based on an hourly rate with examples of how many usable photos will result during the time frame. Whatever your service is, work up the offer, do some market research for other similar services in your area and use your trial clients to help you determine a reasonable price for your offer.
Step #3: Brainstorm Opportunities
Once you have experience and an offer worked up, you then need to start thinking about who needs your service and where you can find them. Depending on your business you will want to understand your ideal client and research where you can make contact with them, either in person or online depending on your offer. Once you have a list of people, other companies or places where you can find opportunity, you then need to start making cold calls. Cold calls are when you approach someone about an offer that did not seek out you or your services. Cold calling can be tough, it really can be, there is no way around that. But, it is necessary for you to build up your network of contacts. You can always work with your trial clients to see if they have contacts for you and work on a referral basis, but you also need to put yourself out there and find opportunities for yourself. Your goal for each cold call should be to present your offer to a decision maker with the ability to hire you, hopefully closing a deal with them, or getting the contact information for someone who may be interested in your services. If you have done your research, the person you pitch your offer to should have a need for your service so if they don’t hire you for one reason or another, they should at least be able to direct you to a new contact. From there, you will continue to make cold calls and develop a network of contacts, closing some deals and growing your list at the same time. This is one of the reasons why having an active social media presence can be a lifesaver, especially if you run a service based business. It makes finding opportunity much easier. If you are in this boat, with a service based business you want to get off the ground and you want to make the road a little easier for yourself by developing your presence online, I would highly suggest checking out my online business program, Empire Building. In Empire Building, I teach you the 5 pillars to successful online communication using the exact strategies I used to build my website page views to over 200,000 a month, and gain a social media presence of over 50,000 followers! Most of this growth happened within a six month period of time, that helped me to replace my income after I left my day job, so no matter where you are starting, Empire Building can help you grow if you apply the information to your business and execute! Thankfully, Empire Building is packed with worksheets that help you take the lessons and apply them to your scenario, so you don’t have to build your own success blueprint from scratch, I give you the tools that streamline everything for you!
I hope this information helps you get your service based business off the ground and if you have any other questions for me, I’d love to help you work through them, so leave me a comment or send me an email!
So, you really want to start your own business and claim the title of #GIRLBOSS for yourself, but you aren’t sure you have the required skill set. While starting your own online business doesn’t require a specific resume, I’ve found that their are a few essential skills that tend to separate the successful from the average. Here are the skills I have found to be the most crucial as I run my own business.
Communication
Great communication skills are a very valuable asset for any #GIRLBOSS, but especially for one that deals with online business. In the real world, having strong speaking and writing skills are a necessity but online, they can mean life or death for your business. It’s so hard to communication online. Yes, it’s easy to send a tweet or leave a comment, but it’s hard to get your messaging across on noisy social platforms and through the hustle and bustle of ads and other constant interruptions on websites. You either need to have great public speaking skills so you can kill it on video platforms OR you need to have impeccable writing skills if you want to carve a name for yourself via a blog. If you have the complete package, you are golden, but if not, don’t fret because you can always improve either!
How to Improve Your Communication Skills: If you need to work on either of these critical communication skills, I have some recommendations for you. To improve your writing, I love the book On Writing Well. It’s a simple guide that can help anyone at any writing level clean up their written communication and start crafting better messages. If you need to improve your oral communication skills, I would suggest joining Toastmasters, which is an international organization that helps people improve their public speaking.
Graphic Design
Design skills are another complete must for a #GIRLBOSS with an online hustle because everything online is driven by design. Your website, your content, and even your products need to have a great design to them in order to turn heads online. Yes, you can always hire out a designer to do this sort of work for you, but if you don’t have the basics down, you are leaving the design, and really the direction of your business, in the hands of a stranger.
How to Improve Graphic Design Skills: When it comes to improving your design skills there are a few things you can do. First, you can get a sense of what your ascetic is by searching through other websites, magazines, and through sites like Pinterest to understand what you like and what you don’t like. Next, I would put together collages via Pinterest to see how different images and design elements work together to create on cohesive vision. If you have a specific project you are working on, like a website redesign or you’re trying to research design for an upcoming project, you can make a board on Pinterest for the project and drop all your inspiration there. Be careful of what you curate because much of understanding good design is knowing that less is more and that a good designer knows how to build a great design with the fewest possible pieces.
Photography
Photography is another skill that is invaluable for a #GIRLBOSS to have in order to run a successful online business. Images are so much of what compels us to connect and purchase products and services online and so any serious #GIRLBOSS should be comfortable behind the camera. Styled photography is a key element of branding that is necessary for a variety of platforms such as Instagram, Twitter, and Facebook, not to mention how crucial it is for your website or online shop!
How to Improve Photography Skills: If you need to up your photography game, I would highly recommend my Digital Styling Lightroom Course. It’s a video based course with 5 modules designed to teach you how to shoot, style and edit great photography for your brand. It’s currently on sale for a special price, so click here to take advantage of it!
Sales
I know the average #GIRLBOSS hates thinking of herself as a salesperson, but you do need to have a basic understand of how “sales” works, in order to close the deal with your customers. The thing you need to know as a salesperson, however, is that sales isn’t really about selling your product. Rather, it’s about selling yourself. A good sales person can sell any product to anyone, they don’t really need to know much about a product, they just need to have confidence in themselves and a charismatic personality.
How to Improve Sales Skills: I know it’s probably not the first book that would pop up if you did a search for tools to help you become a better salesperson, but I’d recommend the book Think and Grow Rich by Napoleon Hill. The book is super old, but stands the test of time, even in the modern online marketplace because it isn’t about the products you are selling, its about the basic principles of selling yourself to another human being.
I’m sure their are other skills here and there that would benefit and savvy #GIRLBOSS, but these four are the crucial ones you need to have under your belt in order to really have what it takes to stand out in business, especially online business. If you’re lacking in a skill, definitely prioritize honing it because all of these skills are learnable!
We all know that Instagram is currently the fastest growing social media platform, so now more than ever, business owners— especially online entrepreneurs— should be using the application to the best of their ability in order to drive more traffic to their site and ultimately make more sales via the application. Unfortunately, Instagram doesn’t make it especially easy for businesses to drive leads and make sales, but a savvy business owner knows that there are ways out of this jam! So, today, I wanted to share with you three simple and easy to implement tips that you can use right now on Instagram to help you make the most of the platform and gain new followers and well deserved sales!
1. Take Styled Product Shots
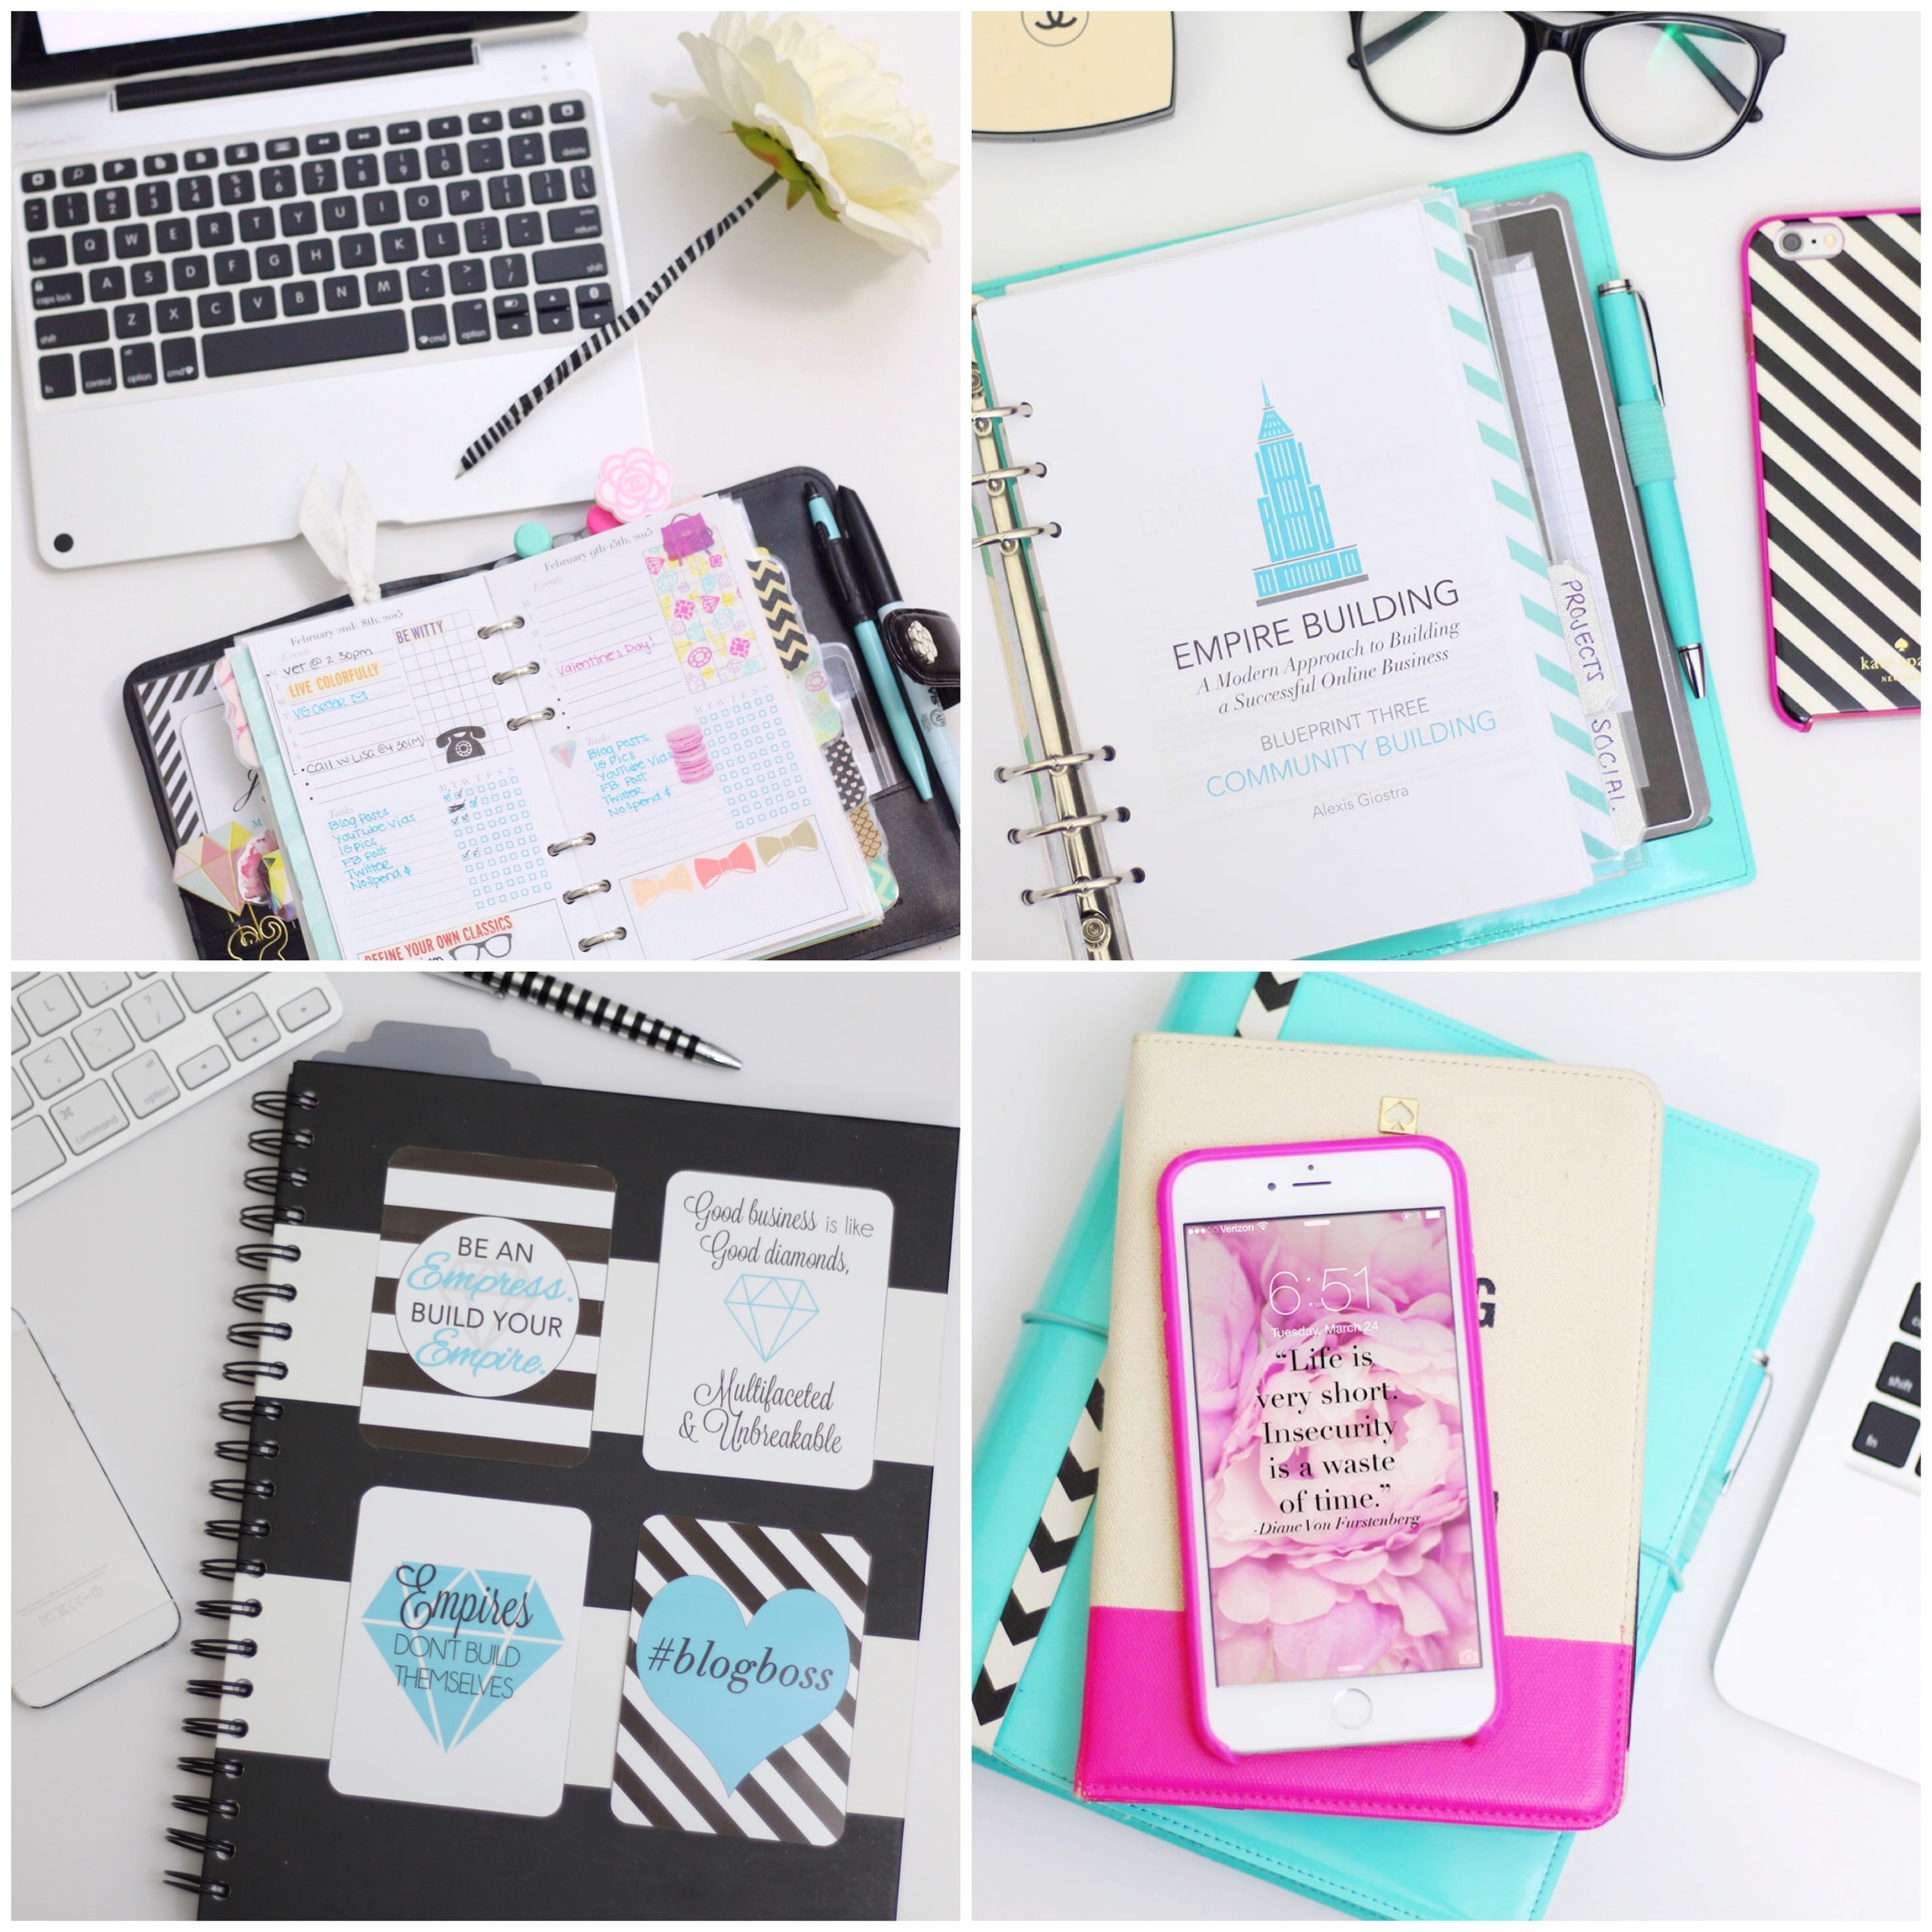
The first thing that every business owner should be doing on Instagram is taking styled product shots. I wrote a whole post about how I take mine so check that out if you want more tips on this specifically, but obviously nothing is going to get you further on Instagram than great photos. If you sell physical or even digital products, you should be styling those items into shots to share. Above are a few examples of styled product shots for my digital/virtual products to give you some ideas. If you sell services, you too need to be styling shoots, but instead of showing a product you need to convey a message that aligns with your service. A home organizer may want to share styled shots of organized pantries and linen closets, a dog walker may want to share pictures of happy pets, whatever your speciality, get creative and start shooting some images that show your work in action!
When I said that Instagram doesn’t make it especially easy for businesses to drive leads and sales, this has to do with the fact that the application only gives you one single location for utilizing clickable links. For an online business, direct links to products, email lists or other online platforms is crucial to gaining more of a following and achieving more sales. To work around this issue, I highly suggest using a free resource called Bit.ly which allows you to take long URLs and turn them into custom short links. I then use these links in my Instagram feed by listing them as my location so that the link is clearly visible. Now, the link still isn’t clickable, but the idea is that a unique short link is easier for people to remember and if they are curious they can quickly type it into their browser and get immediate access to whatever you are promoting! Because I run an online business, I make sure that my location services are turned off on my phone before doing this so that the link doesn’t become a live location link for me, but if you run a brick and mortar or do want to mark your geographic location, feel free to skip this step!
3. Host a Photo Challenge
We’ve all see and perhaps even participated in a photo challenge hosted on Instagram, but have you utilized this great community building activity for your own business yet? If not, it’s a very simple promotion to set up. First, start off with a simple graphic of daily prompts related to your industry or the type of challenge you want to host. Above is an example of a graphic from a recent photo challenge I hosted which brought me thousands of new subscribers in just one month! Next, you will notice I gave my photo challenge a simple yet custom hashtag that is unique to me that people could use to tag their images. This is an important step you want to make sure not to miss because you want people to use that hashtag and that hashtag needs to lead them straight to you, so get clever with the tag but also try to keep it short and simple! Finally, you are going to want to set the time frame for your challenge and promote it through your Instagram and other social media platforms. I’d also suggest getting some friends or loyal customers on board with helping promote and share the image so that it gets around to as many people as possible. Once the challenge begins, feel free to take part in it yourself if you’d like, or simply spend some time each day going through the custom hashtag, liking and commenting on the photos from your participants. The more interaction you provide, the more followers you will garner for yourself!
Those are my three tips for business owners to make the most of Instagram! Like I said, these are all simple enough to achieve and implement immediately, so I highly suggest spending a few minutes today (or scheduling some time coming up on your calendar) brainstorming some styled shots, and working on a photo challenge to promote your brand! Make sure you sign up for a free bit.ly account and start using those custom links asap, you can even go back and edit some old images with relevant links if need be! Let me know if this post helped you and if it did, I would love if you would share it in social media. Leave a link to this post in your Facebook feed or Tweet a link to it out! That’s a quick and easy way to share my content and I sure do appreciate it! Oh, also make sure you are following me on Instagram @MissTrenchcoat and if you want to learn more about how to use photography to help build and promote your business, sign up for my upcoming webinar on Sunday February 21st titled “The 5 Photographic Marketing Assets You NEED to Build a Cohesive Brand Online!” If you are interested in building your brand or business online, this webinar is going to teach you about the images you need to make it happen for yourself and provide some examples and strategy that you will want to implement asap! If you are interested, please sign up for the webinar here!
xoxo,
This post originally appeared on Strange & Charmed on May 14th, 2015 and is being reposted as a Throwback Thursday where I select high value content you might have missed, and share it for any new members of my community! I hope you enjoy this feature!
5 Stress Free Steps to Grow Your Instagram Following!
As you may already know, the other week I hit 20k followers on Instagram, which I was super thrilled about! My growth on Instagram has been a great testament to the fact that you don’t have to do a lot of work or feel overwhelmed hustling to grow your following. Once you find your niche, you can easily integrate slow, steady, sustainable growth for your account, even if you are like me and only want to post about one picture a day. You don’t need to overdo it on Instagram to make an impact, and your Instagram growth definitely shouldn’t be a source of stress for you and your brand. These 5 simple steps will help get you started!
Step 1: Choose the Theme for Your Account
In order to create an Instagram Account that grows consistently, you need to have a clear vision for the theme of your account. What will you be sharing, what types of photos or things you will show on your account, and what will people come to expect to see from you? You need to understand these key items in order to create a consistent theme for your account that is attracting a specific follower that shares your specific interests.
Step 2: Develop a Consistent Posting Schedule
Whether you want to share once a week or multiple times a day, it’s important to define this frequency and stick to it as much as possible. Consistency in your posting will help develop trust between yourself and your followers will ultimately help you gain more followers to your account.
Step 3: Share Great Posts
Remember, your Instagram post consists of two parts, your image and your description. Make sure you are using great photographs first and foremost, but also make sure to take time to craft eloquent descriptions. Although a picture says a thousand words, the message you choose to leave in the description of your post will go a lot further into developing your themes and your relationship with your followers. People love to feel connected to others online, make sure you use your images and descriptions to connect!
Step 4: Use Relevant Hashtags
Hashtags are the search engine of Instagram. If you want to be discovered by new followers and grow your audience, you are going to need to use hashtags to help you get it done! When it comes to hashtags you have a few rules you need to understand. First, you need to use relevant hashtags, meaning, the hashtags people would be using to find your image that make logical sense. If you aren’t sure what these tags would be, just do some research in Instagram and see what existing hashtags have a lot of pictures and if those pictures are similar to yours. Another thing you need to understand about hashtags is that, in my opinion, you should use as many relevant tags as possible. When I was in serious growth mode for my account, I was using around 20-30 hashtags and I think that is reasonable. Instagram does cut you off if you use to many so keep that in mind.
Step 5: Interact with Others!
The final step to growing your Instagram account is to make sure you are interacting with others in the app. Make sure you are replying to comments left on your posts, reach out to other creators on Instagram that are within your market or niche and collaborate, and of course, make sure you support the accounts of your best followers as well by liking and commenting on their posts as well. Remember, Instagram is social media, and the point of it is to be social. You’re not going to grow by posting a picture and walking away from your account, you need to interact in order to gain followers!
I hope these steps have shown you how a few key actions can help you grow your following on Instagram without stress! If you have more questions about taking great photos for your account, make sure to check out this LIMITED TIME OFFER on my Photography Styling Course, The Digital Styling Lightroom which walks you through how to style, compose, shoot and edit great photos!
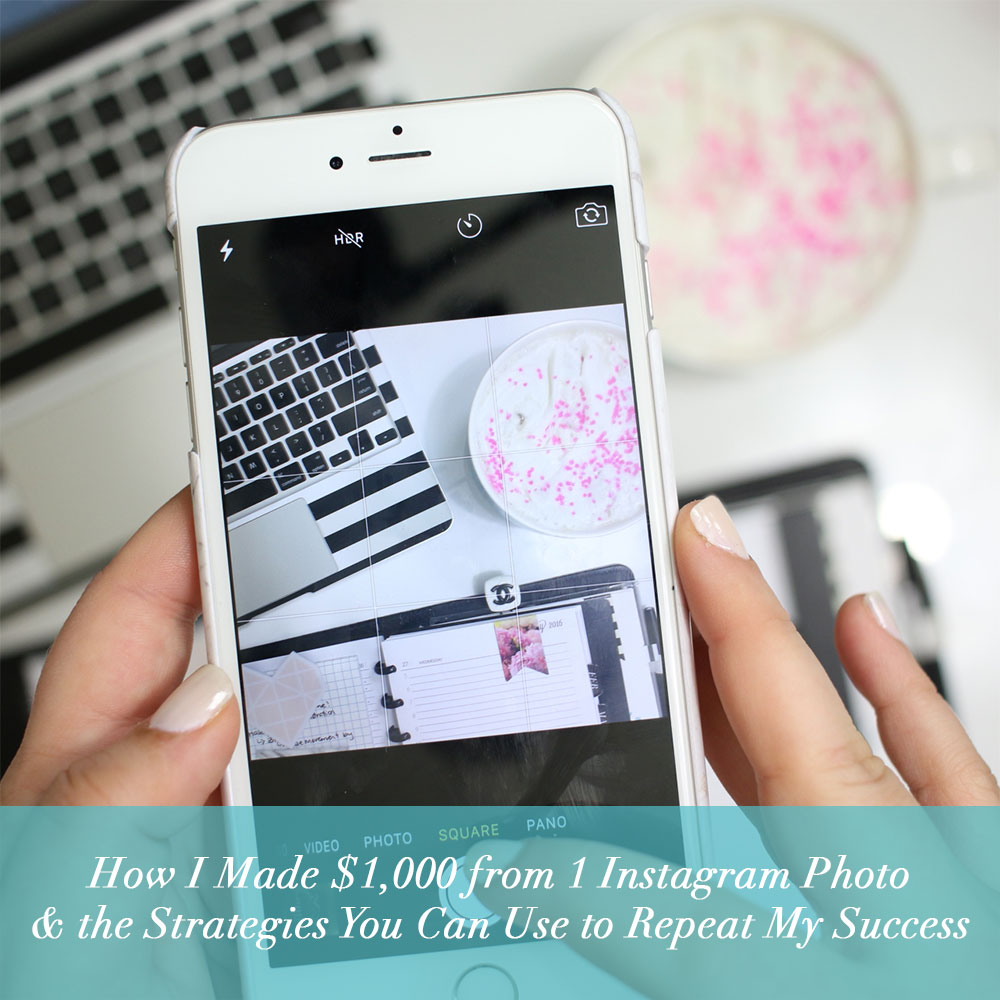
How I Made $1,000 from 1 Instagram Photo and the Strategies You can use to Repeat My Success
I get asked all the time, “Alexis, is it possible to make money from Instagram?” The answer is YES! Today I want to share with you a few strategies for how to monetize your Instagram account and tell you about a strategy that I use to regularly earn hundreds of dollars for each promotional image I place. Now, before I begin, I do want to be clear, that these strategies are not about earning hard money from each and every photo you post on Instagram, in fact, these strategies rely on the fact that you will be posting more than just promotional images onto your Instagram feed in order to build your following. These strategies are also not a one and done deal, meaning they are most effective when you execute them regularly as part of a defined marketing plan for your Instagram account. As always with me and my strategies, it’s about finding a strategy that works for your brand and business and then consistently executing it and growing your results over time. Let’s get started!
First things first, growing your following!
Before I talk about the strategies for earning income from Instagram, we need to talk about the fact that you first need to have a following on Instagram for any of these to work. How big the following needs to be honestly depends on your brand and the market you are selling to, but I do believe that even a small following of 300, as long as it contains a few dozen active followers, will yield results. Obviously, the more followers you have, the more income you can earn, so tomorrow I will be explaining how to grow your Instagram following if that is something you need to focus on! In the meantime, just understand that more followers usually mean more sales (usually because you can’t try to sell something that doesn’t relate to your audience and expect sales) so your personal results will vary, but I have used one of these strategies in particular to earn over $1,000 in 24 hours! Yes, it happens people. It’s not a daily occurrence but when you start integrating these strategies consistently, it is possible to have days where you make big bucks from one single image!
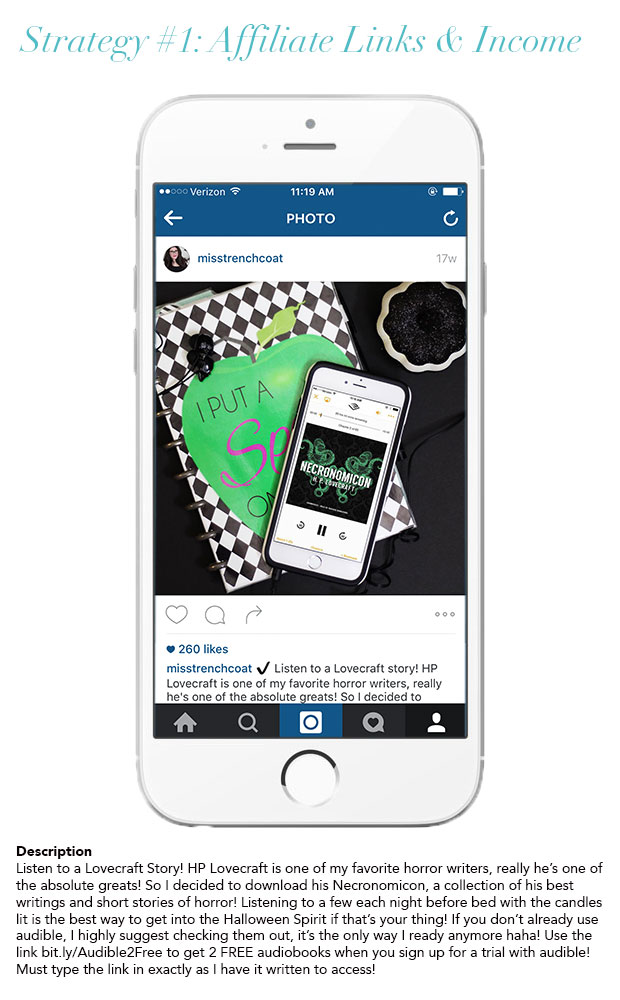
Strategy #1: Affiliate Links & Income
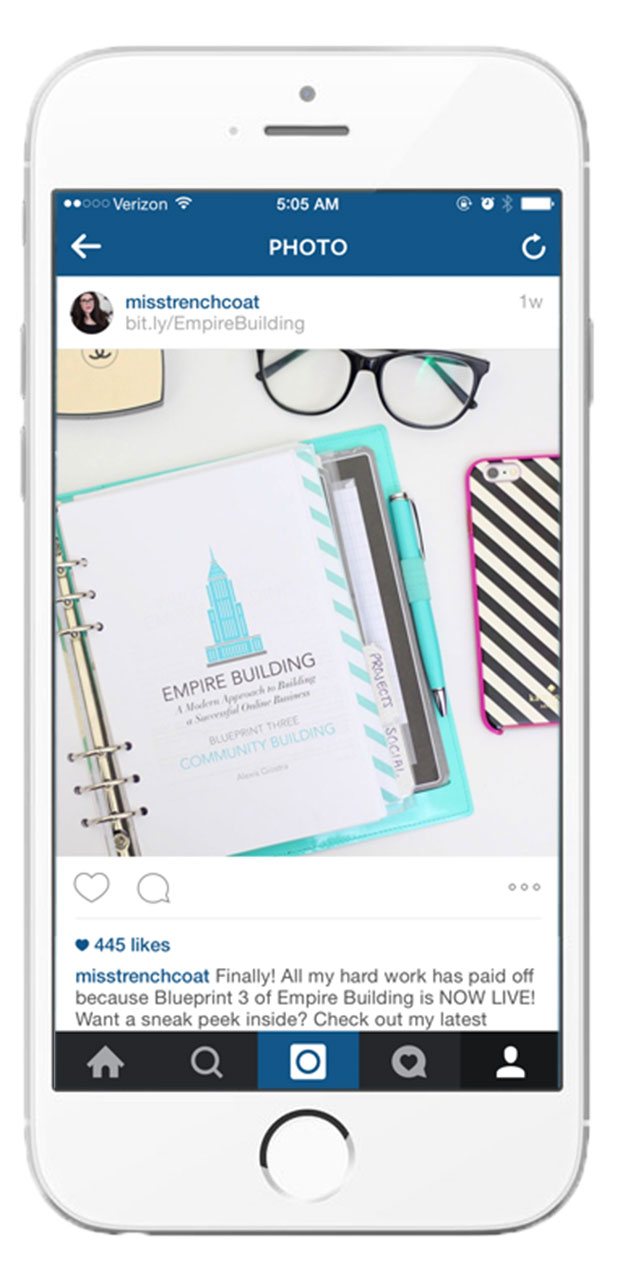
The first strategy for earning an income from your Instagram account is to feature affiliate products and use affiliate links to help people purchase items in your image. If you aren’t familiar with the term affiliate, what this means is that you are promoting the products or services of others and earning a commission from your referral. There are many affiliate programs you can join to help promote the products of other businesses, and the way you use this strategy is to take a nice styled photo of the product in question and then share a link to where people can purchase it in the description. To help with this, I tend to create short links via bit.ly which makes it easier to direct people to the product. Take a look at the image and description for Strategy #1 and see how I have used this strategy in the past!
Strategy #2: Sponsored Posts
The second strategy for earning an income from your Instagram account is to make sponsored posts, which means that a company or business is paying you to share an image of their product in your Instagram feed. More and more this has become a common practice, however, this route does tend to have two drawbacks. First is that when you get paid to sponsor an IG post, usually the amount isn’t a large sum of money. Maybe $20-$100, so you would have to find numerous sponsors or alternate income streams for your IG account in order to make serious money from this strategy. Second, finding sponsors for Instagram is very much dependent on you having a large following in the thousands at the very least. So you do need to have a larger following for this strategy to apply to you, but I have seen some instances of smaller businesses working with niche IG accounts. For me personally, I haven’t engaged in sponsored Instagram posts for a long time, because since starting my own business, I don’t need to get sponsors elsewhere, but check out the image and description for Strategy #2 for an example of how I have executed a sponsored Instagram post in the past.
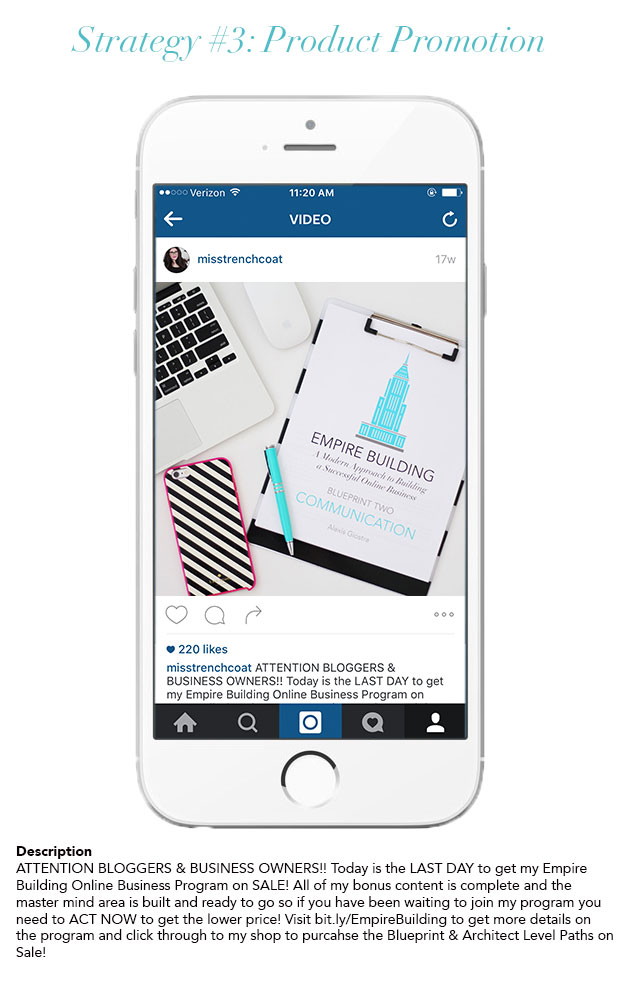
Strategy #3: (THIS IS THE BIG ONE!) Product Promotion
The third and final strategy for earning an income from your Instagram account is to promote your own products or services via your account! This is the strategy that I have used time and time again to earn hundreds of dollars per post. In this strategy all you need to do is share nice styled photographs of your products and, ideally, run some sort of short term sale or promotion to encourage people to purchase your product as soon as possible! That’s it! I know that sounds pretty simple, and it’s because it is. The hard part is growing your following to the level where you can share one picture and a sale here and there and it yields you incredible results. So, let’s go ahead and take a look at the example for this strategy, that $1,000 photo and description I used to get quick sales in one single day!
Now that you know the strategies for earning income from Instagram, go forth and execute! Like I said, check back for tomorrow’s blog post which is all about growing your Instagram following. OH, AND THERE’S ONE MORE THING! A few times in this post I mentioned the key role nice, styled photographs play in the successful execution of these strategies. If you are curious about Styled Photography and want to learn how to create great photos for your Instagram and the rest of your business, including how to edit them and create beautiful ads for your brand, I have a LIMITED TIME OFFER on my Photography Styling Course called The Digital Styling Lightroom! Click here to check out the offer and the course and get started earning income from your Instagram account TODAY!
One of the questions I get asked most frequently is about how I get that perfect styled shot for my blog and Instagram photos. The truth is, there is nothing glamorous or specifically hi-tech about how I achieve these shots, it’s a few low budget items, a nice camera and a whole lot of practice! While their isn’t much that really goes into shots like these, they are hands down my favorite photos to take because I love the challenge of setting up a styled shot that is inspired and lovely. I know it may sound silly, but I take these shots for myself more so than I do for anyone else. You wouldn’t believe how inspiring these shots are for me personally, they are like my personal art form for expressing myself and a lot of thought and curation goes into each shot I take. So, if you would like to know my tips for taking the best styled shots, here you go!
White foam board: One of my biggest tips for taking that perfect styled shot is to use white foam board to shoot on and also as a reflector for the light in your image. When you shoot on a flat white surface such as foam board, the colors and objects in your photos always stand out and look super clear! I like to use one piece of foam board to style my items on and another piece of foam board to bounce the light onto the scene. It helps to get that clean crisp look without any hot spots of light since I don’t let my light source fall directly onto the scene.
Studio lights: I always shoot my styled shots with my studio lights. Usually just one from my set will do the trick. Because I want my shots to look as clean as possible, I find that my studio lights are the best way to achieve the whitest whites and the truest colors for my images. The studio lights I use are seriously nothing fancy, the whole set was relatively inexpensive and easy to store away, here is a link if you’re interested in checking them out for yourself.
A high quality camera: I shoot all of my styled shots with my Canon EOS Rebel T5i and my 50mm 1.8 lens. I find this combo works great and produces the best shots. When taking aerial shots such as the ones pictured above, I tend to set my aperture to 2-2.8 and place the focus on an object in the center of the scene. That way any items that are closer to the foreground, like flowers in a vase, get that lovely blur, but all the objects laid out remain in focus!
BONUS TIP!
Another question I get asked a lot is how I get the screens of my gadgets to look so bright in the photos I take, and the answer to this is simple, I don’t! Whenever you see an image of mine that has a gadget screen visible, I have taken that shot with the gadget turned off, taken a screen shot that I want to use from the gadget in question and superimpose the image onto the photo in post processing via Photoshop! It’s nearly impossible to achieve that sort of look in a real photo because you can either expose the lighting for the overall image or expose for the gadget screen, but you can’t do both, so I find this method is the simplest and creates the best photo over all.
So, now that you know my secrets to great styled photo’s, I can’t wait to see what you all come up with! Make sure to tag me in your Instagram photos @MissTrenchcoat so I can check them out and of course leave you a like and comment! Feel free to leave me your photo questions as well in the comments and I may answer your question in a future post!
xoxo,
This post originally appeared on Strange & Charmed on April 9th, 2015 and is being reposted as a Throwback Thursday where I select high value content you might have missed, and share it for any new members of my community! I hope you enjoy this feature!