Last week, I hit 20,000 followers on Instagram! Thank you all so much for your support and interest in my work. I love that you get as excited as I do about my images because I do truly enjoy photography and there is nothing more fulfilling to me than to help others advance their skills as well, so today I just wanted to take some time to share a video I made last year on the subject of how I style and edit my photo’s for Instagram. If you are looking to replicate my IG success, I suggest checking out this video and keep an eye out on my blog this month because I am going to be sharing some content to help you use photography to advance your brand or business online.
Click here to check out the video in case you missed it, or if you just need a refresher!
There is one other little thing I wanted to let you all in on as well! I will be hosting a special webinar on Sunday February 21st titled “The 5 Photographic Marketing Assets You NEED to Build a Cohesive Brand Online!” If you are interested in building your brand or business online, this webinar is going to teach you about the images you need to make it happen for yourself and provide some examples and strategy that you will want to implement asap! If you are interested, please sign up for the webinar here!
Can’t wait to see you all on the LIVE webinar on the 21st!
As a solo entrepreneur, everything rests squarely on your shoulders. It’s a lot of pressure to manage on a day to day basis, but that pressure exacerbates whenever we take time out from work. I know how important it is to take a vacation every now and then as a business owner- mostly from my own lack of vacation time. Self-care is ridiculously important to help you keep in tip-top shape to face the challenges that each day brings, and vacation time, too, is a requirement to help you relax and recharge your batteries. But, how do you prepare for taking the necessary time away from your business when you are the business? This is a question I’ve been forced to ponder since I have booked my first week long vacation since my business began to take off, and this is what I’ve come up with after taking a look around to see how the best solo entrepreneurs and small businesses manage prepare.
1. Communicate your absence: If you work for yourself, by yourself, the first step to preparing for your much needed vacation is to communicate your time off to your customers. If you have clients, you will want to give them notice of your time off and make sure that you are able to properly schedule your work for them around this time period. If you run a shop, you will want to consider letting your customers know via a newsletter and then post a site-wide notice that let’s people know when you will be away and how that will affect order fulfillment. Whatever you do, just don’t say nothing! Customers are incredibly understanding when they have notice that there is going to be a change in routine, so let them know as soon as you can!
2. Create your vacation protocol:Depending on the type of business you run, you may be able to manage some items of your business while you are away. For example, perhaps you run a digital shop like I do, then your shop doesn’t need to close while you are on vacation, you just won’t be able to respond as quickly to customer service emails. Set the protocol for what is going to happen while you’re away. Will you respond to emails while you are away or will you be some place where you don’t have reliable internet? This will need to be communicated to your customers. Do you have stock that can be sold while you are away, but you just won’t be able to fulfill orders until you return? That should also be decided and communicated. It’s very hard as a solopreneur to step fully away from your business and if you feel like you would still like to be tethered in some way, make that decision and set your protocol. Perhaps you will respond to emails while you are away but not be able to troubleshoot issues or play tech support. Whatever you decide is fine as long as you define it and communicate it before you leave!
3. Pack only what you need to take:Once you have defined your protocol and communicated your absence and plan for managing the business while away, you will want to make sure you pack the specific items you will need, no more, no less. For example, if you know you will have internet access and might want to send emails, bring your smartphone to limit the amounts of emails you will send. If you know you will need to play tech support while you are gone, bring your laptop. Don’t bring more than what you need, “just in case” because you will most likely put yourself in a situation where you end up working more than you need to.
4. Pre-schedule content as needed: If your business revolves around content, you may want to take some time before you leave to pre-schedule some content for the time you will be away. Write your blog posts (or find a guest poster- even better!), take your Instagram pics, and schedule your tweets or Facebook updates as needed. Apps like Hootsuite or Buffer allow you to schedule your content out across multiple platforms so you can ensure promotions are running smoothly while you are away.
5. Close up the office: The final way you can prepare yourself for vacation mode, is to close of your office before you leave! What I mean by this is to make sure your office space, whether its a desk in your bedroom, a home office or even a rented office space, is cleaned up, everything is put away and your equipment is shut down. A simple act like this can go a long way to help your mind turn off from work and turn onto vacation mode!
I hope these tips help you prepare your business for your next vacation! There is one more thing I wanted to mention to you all since I have received some questions about it. I am going on vacation in a few weeks to Disney World in Orlando Florida, and it has been brought to my attention that some of you are in the area and may want to do a meet up with me. If you are in the Orlando area and would like to see if we can make this happen, send me an email and let me know! Can’t wait to hear from you!
This is the first installment of my new feature, Entrepreneurial; a monthly journal entry chronicling my experience as an entrepreneur, my victories and failures each month, and the lessons learned along the way.
Hello my lovely readers! Welcome to my first installment of Entrepreneurial, my monthly business journal. When I first suggested the concept of this blog feature, many of you were incredibly supportive so I hope you enjoy these posts and that you learn a thing or two about the realities of being an online business owner. It’s not an easy job, but it is fun to be able to wake up and have complete control over what you will be doing. I like it. And most of all, I really want to remember it. I think I may have some sort of long term memory problem, because unless I write things down, I forget them, and I often can’t recall the things that happened the day before. Actually, one day last week, I completely forgot what I had done all day and what day it was. My husband was only moderately concerned. Now, I don’t think their is anything medical wrong with me, I just think I have too much information in storage already, so new items just get kicked back out of my system. I’m not very happy about this, and I wanted to do something to change it, find some way to chronicle my journey as a business owner, but most importantly, have a record of what I was doing so that I could keep my eye on the big picture. So, this year I started journaling. You may have seen my disc bound day per page planner/notebook/journal combo in a recent video, I’ve been faithfully writing in it almost everyday and if I do forget, I go back the next day and fill in what I was working on to the best of my recollection so I don’t forget about it. I’m the type of person who gets really excited about a project, starts it, gets it nearly done and then forgets about it. It’s funny because for all the content and products I create and launch, I probably have about twice as much nearly completed that just lost steam or I decided to change direction on. The journal has honestly been very helpful at forcing me to remember what I was doing and why I was spending time on a certain project. I actually started catching myself before I would start a random project that was off topic because I recognized I was about to distract myself from what I really needed to work on. So, I’d say that the journal is working, it’s like my accountability buddy and sometimes it’s like a therapist for me too. If I’ve had a bad day or made a mistake, I vent to my journal and make a plan for how I will course correct and learn from my mistake. I’ve been doing this with some new routines for the year which have actually started to take root. If you want me to do a video or another blog post where I go into the way I use my journal, let me know and I will!
So, let’s talk more about my results for the month. If I had to suggest an overarching theme for January, it would be Introspection. I spent a lot of quiet time this month alone thinking. Not planning, not strategizing, mostly thinking. I thought I had done all the necessary thinking about my business back in December, but apparently, there were more thoughts stuck inside of me that really wanted to break free. I finished a number of books this month, most of them were fiction reads I listened to during the day to keep myself entertained, but for the most part this month felt very quiet. It was a good quiet though, because I never ended up taking an official break from my business at the new year and I quickly realized that not taking a vacation was a grave mistake. By the end of the month before my Charmed Life Master Class launch, my sanity was hanging on by a thread! In fact, within an hour of completing all the work for the master class, my husband and I booked a vacation that we will be going to in just a few short weeks! It will be the first week off I have had since Aruba in June, and technically that was just five days off and I did a good amount of work while I was there, so not a true vacation really. So it was this stress of being worn out from 2015 added to the pressure of a major creative endeavor that left me wiped to the point that I was unable to focus on blog posts, and even creating my videos for the month was like pulling teeth. It was like I only had a certain amount of creative energy to use, and if I put it towards the master class, there was nothing left for other areas. Ultimately, I decided that it was fine, I just had to go with the flow and not get too wrapped up in what I wasn’t doing because I had something important on my plate. If you’ve ever wondered how it is that I get it all done, I think you now have your answer; I don’t always get it all done. If I can’t make it all happen, I have to identify what my priority is and focus on that, and then take it one day at a time!
So, now that we know what went wrong this month, let’s talk about some victories. Like I mentioned earlier, this month I launched my Charmed Life Master Class, a personal development course that teaches you my strategies for creating the life of your dreams. Other than the launch of the new master class which was a major victory for the month, and the success with my daily journaling, I also was able to slowly build up some positive routines. I had been very lax in November and December in terms of my daily schedule and so it was hard to get into a groove in January. I was extremely tired from being mentally tapped out and it took me a few weeks to get my regular schedule back. Thanks mostly to my journal, I was able to retrain myself to wake up early in the morning, and then I started to build up a morning routine that kept me awake all day without needing to take a nap in the afternoon. This was a major success, because I was really worried that I might never be able to wake up before 9am again! Now, I’m waking up between 6:30-7:30 with my husband and getting straight to my morning tasks. Another positive routine I have built this month is my meal planning. I have gotten back into the habit of cooking myself fresh meals instead of eating packaged food that’s filled with junk! I’m back to eating plenty of fruits and veggies, healthy snacks and I’ve been making the most drool worthy Pinterest dinners! Finally, I’ve also built up a self-care routine that involves a simple but consistent skin care regime and weekly lush baths. Overall, I am very happy with what I have accomplished this month. Although many of these items were not directly related to my business, trust me, building up these good habits and routines is going to make a world of difference in my business!
January is about to come to a close and I have a collection of interesting articles from around the web that you may want to check out if you are looking to set yourself up for success in the New Year. Looking for some interesting books to add to your “to-read” list? Perhaps you are looking to map out your path for the year either personally or professionally. This link-roundup has a little bit of something for everyone, and plenty of motivational inspiration to spare!
I hope you enjoyed these selections and hopefully found something interesting to read that you hadn’t seen before. If you have any other suggestions for articles that you think I need to check out, feel free to link them below or send me a tweet @MissTrenchcoat!
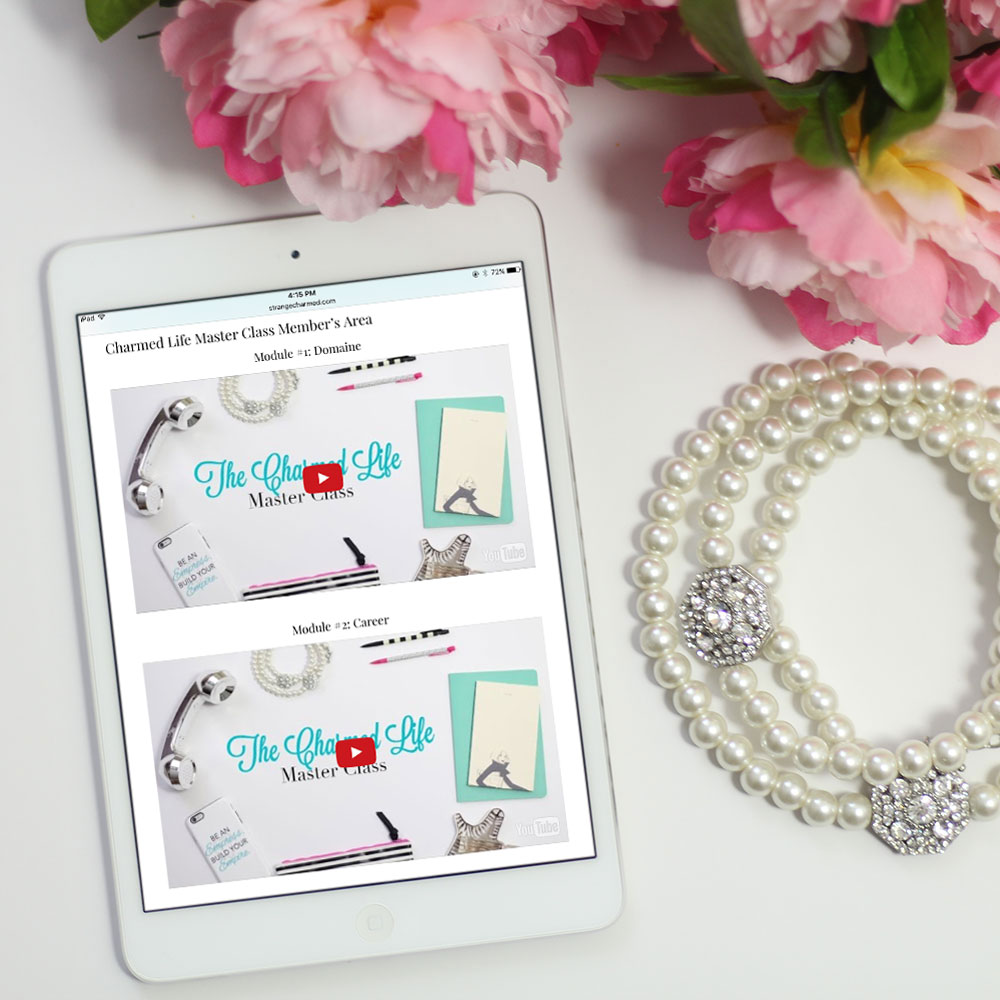
How has your January been? I feel like it’s been a minute since I’ve last chatted with you. I know I was a bit MIA this month on the blog, which I sincerely apologize for. I spent the month in a frenzy of creation for my latest product, The Charmed Life Master Class, which I launched yesterday via YouTube… click here to watch the launch video if you are curious about the class!
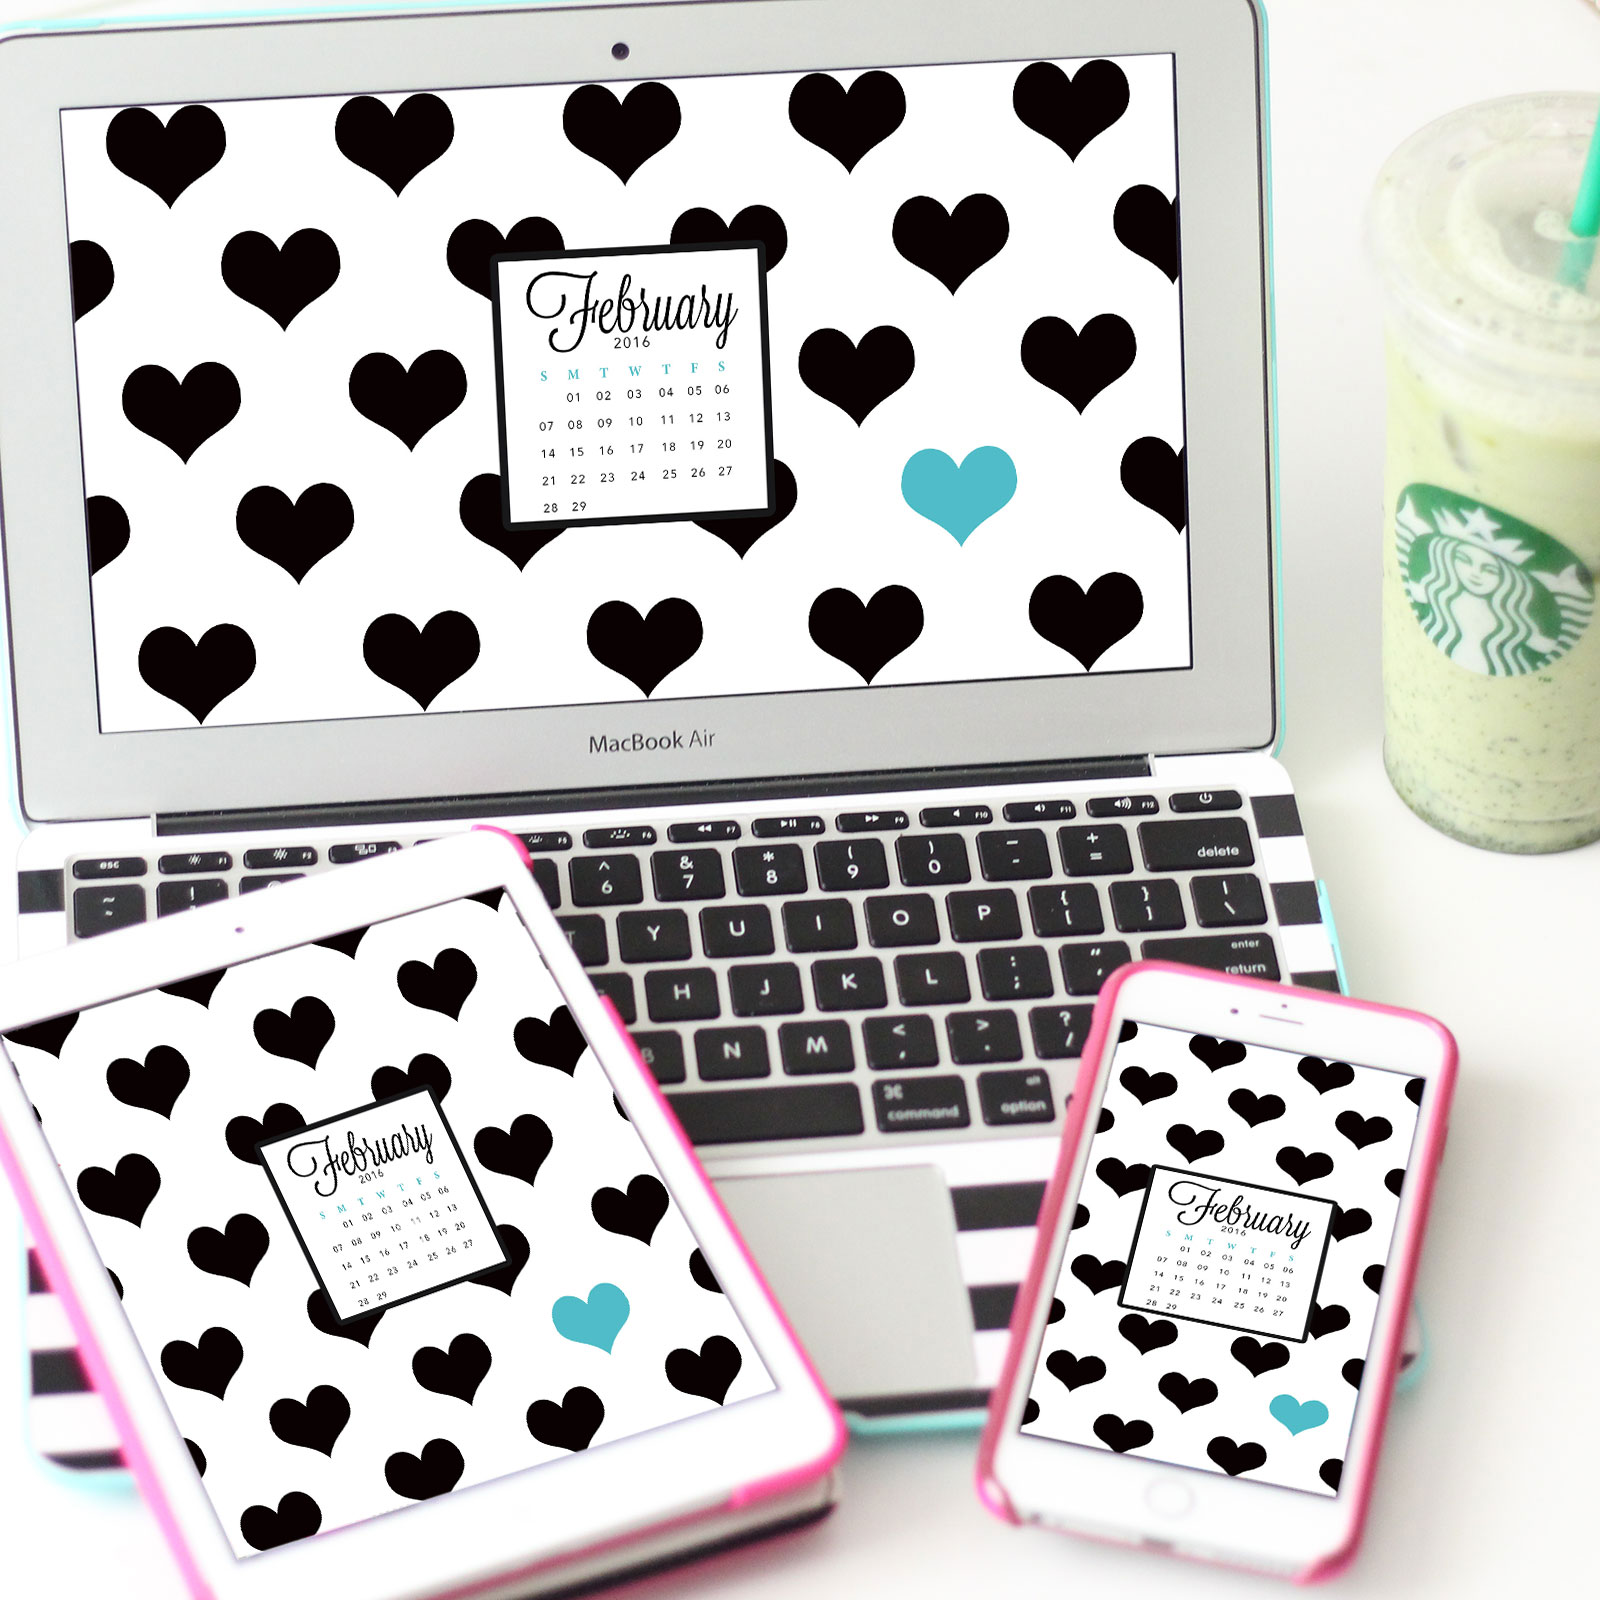
Okay, so let’s talk February Freebies, shall we?
As per the usual, I have a February Dashboard for your planner, along with an updated 29 Ways to Love Yourself monthly task list! They are both in the same shop listing, so you only need to check out once and you get both designs in both personal and A5 size.
Also made a new set of monthly Tech Wallpapers. In celebration of Valentine’s Day, February’s wallpapers are an adorable oversized heart polka dot! I hope you enjoy these wallpapers and that they keep you inspired for the month. I know I love making them for you!
If you download any of these items and put them to use on your gadgets or inside your planner, I would LOVE to see them in action, so please make sure to share your photos on social media, tag me @MissTrenchcoat and use the #CharmedGTD so everyone in the community can see your photos and like them as well!
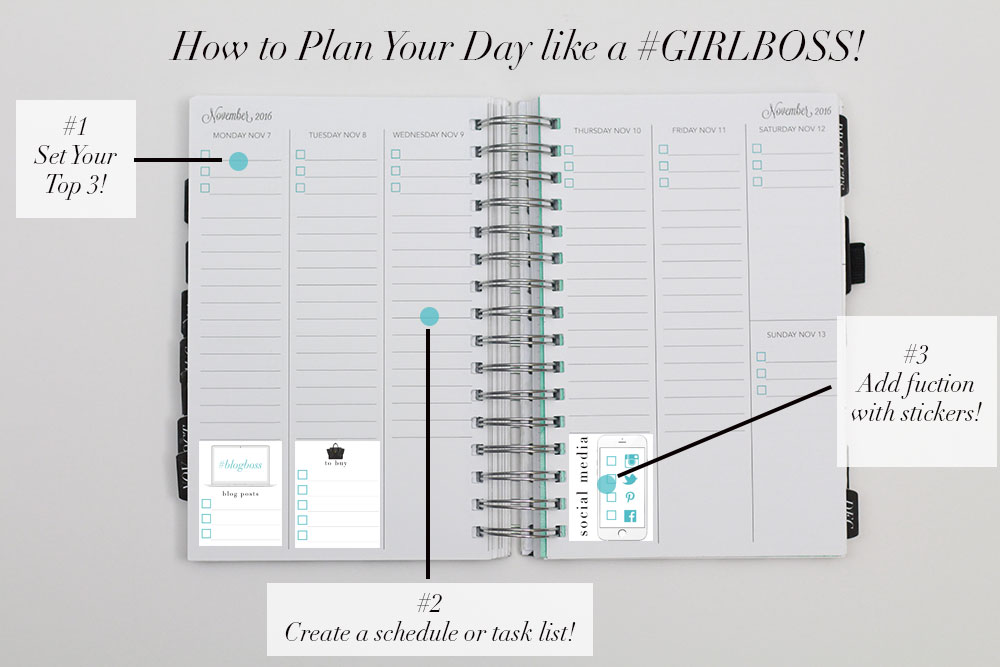
One of the awesome parts of being an entrepreneur is that no two of my days ever seem the same. Although that brings a lot of diversity and excitement to my work, it can also represent a challenge to my planner. What I need from my planning system on a day to day basis can change, but I have no interest in using multiple planning methods to keep up with my business, which is why back in July, I designed my Charmed Life Planner; a complete printable planner that included everything I need to plan my days, no matter what work needs to be done or how crazy (or simple) my schedule looks. The meat of this planner is a vertical week on two pages layout that allows me to see my whole week laid out in front of me, but also gives me the ability to really make use of every inch of space in the individuals days of the spread without feeling like I need more room to write. So, I wanted to take a moment to show you how I use this layout and the tips I have for you to optimize your day in your own planner.
1. Set Your Top 3: When you jump between too many tasks or activities in a day, you end up lowering your productivity. Instead, focus on your top 2 priorities and put those at the top of your list! My printable Charmed Life Planner has a dedicated space for your top 3 sitting right on top of the page.
2. Create a schedule or task list: Depending on your work for the day, you may need either a schedule or a task list. Use the ruled column below your top 3 to break out your appointments or list out lower priority tasks and reminders.
3. Add function with stickers: Stickers aren’t just for decorating anymore! With my line of printable planner stickers, you can add flexible function to your planner by adding a sticker or two to designate special information to help you manage your day.
I’m often asked about how I spend my time as an online business owner. From day to day, my tasks and priorities vary since I am a one woman operation responsible for all the ins and outs of my business, but for the most part, the types of activities I preform can be broken down into one of five categories for how I spend my time. These categories are Developing New Products, Taking Care of Customers and Clients, Creating New Content and Forms of Advertising, Developing Business Systems, and Improving Current Products and Offerings. All of these categories are important priorities for my business, but on a daily basis, one may be prioritized ahead of another for a variety of reasons. For the sake of this blog post, however, I am not going to talk about them in terms of priority, instead I am going to rank them by the amount of time I spend on each overall. As you may expect, I cannot quantify exact measurements of time, nor can I break up these categories into any approximation of percentage of time spent because it can vary. So, here are the five ways I spend my time as an online entrepreneur ranked from greatest to smallest amount of time spent.
Developing New Products
An an online entrepreneur, my livelihood depends on me spending a large portion of my time developing new products because in the ever changing online market, you are only as good as your next idea! I am constantly working on brainstorming, concepting and designing new products and service offerings to help diversify my income. The way I look at it, each new project I undertake is a new venture and a new stream of income in and of itself. Since most of my products are digital, I am able to spend a dedicated amount of time developing one new product after another to add to my shop, creating variety to my offerings so that I am providing products that are interesting to a greater number of people in my community. I never expect that everyone wants all of my products, but as an online business owner I want to create more products so that everyone can find something of value in what I have to offer.
Taking Care of Customers + Clients
There is no doubt in my mind that my customers and clients are my top priority, and because of this they get a great portion of my time and energy. I spend time everyday responding to emails and comments from my customers and working on client products. It is very important to me that everyone who has purchased one of my products or receives my services get their money’s worth from me and I always want to leave my customers feeling positive about their experience working with me. This is probably one of the many reasons that I get so many repeat purchases in my shop. I cannot stress highly enough the importance of taking care of your customers. It makes such a difference to your businesses reputation and the advancement of your brand! I feel very lucky that at this moment in time, my business has not grown so large that I cannot personally handle all customer service inquiries that I receive, because it really gives me such satisfaction to be able to help my customers personally. Customer service tends to be the first thing that gets outsourced as a company grows, and I personally believe that this decision shouldn’t be taken lightly. I have seen many small and very personable businesses take a hit to their reputations once they grew because of poor management of customer service, and so I am very attuned to the needs and concerns of my customers for this very reason.
Creating New Content + Forms of Advertising
Content creation is probably the biggest task I undertake on a daily basis that yields me the least amount of direct income. Every week, I put out three blog posts, two YouTube videos, and a handful of images and tweets to social media, all for the express purpose of giving back to my community. I make very little income from these methods in proportion to the income I generate from direct means like my shop and consulting, yet, these tasks take up a significant part of my week. I cannot stress, however, how important these tasks are to my business overall. Blogging and YouTube are my direct means of communication with my community and the primary means I have for advertising my products. If I didn’t show my products in videos or explain them in blog posts, no one would know about them! And if I didn’t continuously put out high quality content to my blog that adds value to my readers or create fun and informative videos for my YouTube channel on a weekly basis, none of you would trust me enough to purchase what I was selling! You have probably heard the phrase “the proof is in the pudding” and in a lot of ways, that is how I think of my content. It’s my social proof that what I am doing and saying works and is worth your time and attention!
Developing Business Systems
I have done a whole video explaining my various business systems, so I won’t go into much detail here on them, but it has taken me months of working and organizing for me to get this far with my business administration, and this is definitely an area in my business that is frequently improving. To be honest, for me the business administration is the not so fun part of running a business, but thankfully, I spent years doing this sort of organizational work for my previous Fortune 50 employer so I happen to be very efficient at it! Because of this, I am able to get away with paying relatively little attention to this area of my business for the majority of the quarter, and then I may spend a whole day organizing and working out important knitty gritty business things like taxes and filing and fulfilling my obligations as a business owner.
Improving Current Products + Offerings
The ongoing improvement of my existing products is definitely a priority for my business and although my offerings are mostly digital, I still always like to make sure that I am fixing any issues or flaws in my designs as I become aware of them. For someone who may run a business with physical products, I would assume that this subject may be of greater importance as it also ties into quality control, sourcing materials and the ongoing struggle to keep costs low and quality high! For me, however, this is the area of my business where I spend the least amount of time overall, although time spent is certainly not a representation of priority. I take quality control with my products extremely seriously, and whenever I am made aware of any issue with my designs, even something as small as a typo, I immediately act to correct the issue. This ties into good customer service for me, but also an ongoing effort to retain a premium feel to my products.
I hope this gives you some more insight into how I work as an online entrepreneur and perhaps some areas that you may want to be focusing on as well if you run an online business of any kind! I’d love to hear your thoughts and if there are specific areas of your business that you spend a great deal of time on, or perhaps not enough time on, I’d love to know what those are and how I could possibly help you by making those tasks easier or more streamlined! Don’t hesitate to leave me some comments below!
xoxo,
This article was first published on Strange & Charmed on April 27th, 2015 and being reposted as business inspiration for the New Year!
5 Essential Strategies to Jump-start your Life in 2016
In 2015 I spent a lot of time sharing information, strategy and products with my community that revolved around the topics of productivity and business. I think that for so many of us, there is a real desire to make things happen for our lives and lately I have seen so many people step up and acknowledge that one way they see themselves taking control of their lives is by taking control of their careers by creating their own jobs. My motto for my life in the last few years has been “Your dream job does not exist, you must create it,” so I understand full well the power that running your own business can have in helping you create a life tailored to your needs. In the last year, however, I have also heard from many people within my community that know it’s not one of their goals to start their own business, but they still look to me as an example for how to pursue a meaningful life.
Whether you are a budding entrepreneur, a small business owner or not, most of us have a desire to feel like we are truly living a full life but many obstacles seem to stand in our way. I’m not ashamed to confide that for years I felt like a helpless victim in my own life’s story, waiting for the day that I would be able to step into my life, the real life that I always dreamed I’d have. It has really only been in the last few years that I have finally felt like I have “made it” to that place I wanted to be. It took me a long time, years of sticking to the straight and narrow path before I could see the fruits of my labor, and even now, although I feel like I’m truly living a charmed life, I know that I still have more to overcome and will always have some resistance to face for as long as I am alive. After all, life in and of itself, is a struggle. It takes enormous amounts of energy everyday for us to live and when you pile the stressors of daily life on top, like work, finances and relationships, it just gets harder. The key to living well is not removing these stressors from our lives completely, we could really never do that without great hardship, but we must learn the strategies to accept them and manage them seamlessly. In the coming weeks, I am going to share a resource with you, something of my own design to help you learn to manage the ins and outs of daily life, but until then, I wanted to share with you some simple yet powerful strategies that you can implement immediately to help you jump-start your life in this new year. Are you ready to get started?
Strategy #1: Take a Personal Inventory
The first step to getting things moving for yourself is to take a personal inventory regularly.Where are you in life right now and where do you want to be? What have you accomplished that you are proud of and what areas of your life are opportunities for growth both personally and professionally? It’s very important to have a sense of accuracy as to where you are in life and to also have a sense of gratitude for your situation, no matter how much more you want or how much different you wish your life were.
Strategy #2: Set Yourself a Challenge
Many of us set resolutions or goals at the start of a new year, most of which is quickly discarded due to lack of planning and adequate preparation. I have a whole workbook about strategic goal setting if that is something you need, however goals won’t propel you forward in life unless they are challenging to you. I’ll admit that I am guilty of often times setting goals for myself that are almost like forgone conclusions. Things I know I can achieve within my comfort zone. As they say, life lies right outside your comfort zone, so without creating challenge in your life, you can never expect to grow and fulfill the greatest potential for your life.
Strategy #3: Find a Creative Outlet
Whether or not you are a creative person by nature, I think that self expression in one form or another is essential to understanding yourself and what you want in your life. For me, designing stickers, inserts and other printables for my planner is my favorite creative outlet, one that also helps me feel productive. Playing with stickers and stationery, for me, is a way that I express my style and unleash my creative side. It helps to reduce my stress and often, while I’m playing around with paper and pens, I find that business inspiration will randomly strike!
Strategy #4: Set a Reoccurring Date with Yourself
In her book, The Artist’s Way, author Julia Cameron advocates taking regular artist’s dates in order to unleash your most creative work, however, I think this concept is something that anyone, not just artists and creators, can benefit from. Again, not everyone has creative or artistic aspirations, but I do believe that by regularly spending a bit of uninterrupted time with ourselves in contemplation or meditation, we can find a sense of balance and calm that will naturally bring more inspiration and productivity to our lives.
Strategy #5: Find an Accountability Partner
It may sound trite, but as we journey through life it’s important for us to find like minded individuals to share our experiences with that can also serve to mentor and inspire us. If you truly want to make any sort of lasting progress with your life, finding someone to help you remain accountable is going to be crucial. I think that it’s important that this person be someone new that you bring into your life and not someone you are already friends with or someone you are related to. Social media is a great place to find such a person by stepping outside of your comfort zone and finding a new friend in a mutual community or program you may both be a part of.
Next Steps
Although these strategies are relatively simple, they are by no means easy to achieve, so my recommendation to you is to begin on these one at a time for a period of 30 days each. Choose the strategy that to you seems the most urgent or speaks to you in some way and begin with that. Once you have successfully integrated the strategy into your life in that 30 day period, you can add in the next one that draws your interest. I would love to hear your experience as you execute on these concepts so please make sure to leave me a comment to let me know your plan of attack and keep me updated with tweets or Instagram updates through your process. Good luck and I can’t wait to see what you achieve in 2016!
To stay productive and create a theme for the new year, some people choose a word. That word becomes their word of the year and they will keep that word plastered around them as much as possible and turn to that word for encouragement and guidance as the unexpected twists and turns of life conspire to push us off course. That works for some people, but it doesn’t necessarily work for me. Instead, I choose a song- an anthem if you will! Something that’s more than a word or even a mere collection of words because music speaks to my soul. I’m just that kind of person.
I don’t ever set out to “find” my song of the year, in all honesty, it just sort of finds me which is exactly what happened when I first heard Bird Set Freeby Sia during a live performance on SNL last month. The song immediately stirred something inside of me and I knew, and actually said to myself while the performance was still going on, “this is my song for 2016.”
If you have never experienced this song, I’d recommend it. It definitely has a powerful message that I hope will help keep me strong even when things get tough this year- and I know this year is going to get tough. The best years always do!
If you are someone who also sets an anthem for yourself for the year or perhaps you want to now that I’ve introduced you to the idea, I’d love to hear (haha, so punny) what song you choose! Let me know in the comments or tweet me a link to a music video @MissTrenchcoat!
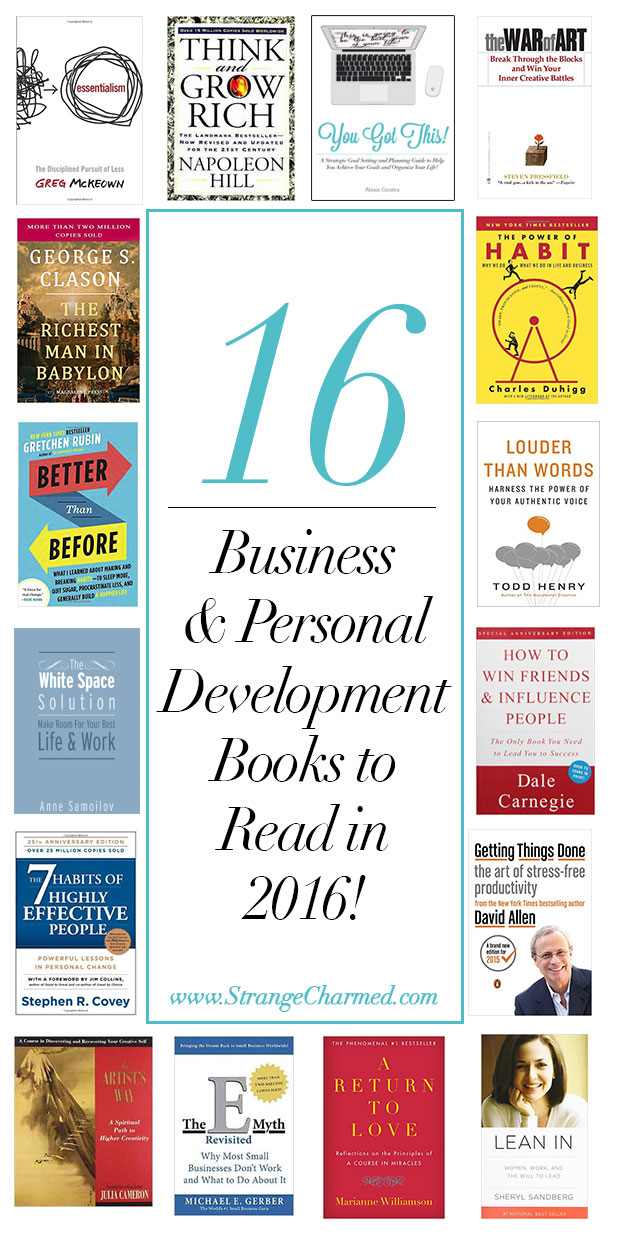
2016 Business & Personal Development Books to Read in 2016
In 2015 I read a lot of business and personal development books. Some were good, and some were not so good, but as an entrepreneur, I think it’s so important to keep your mind challenged and informed and reading books is probably the easiest way to expose yourself to new concepts and methods of thinking. One of the reasons I was able to read so much last year was due to Audible.com which I finally subscribed to after years of dragging my feet and it was one of the best decisions I made for my business in my opinion. If you’re curious about Audible, check out this offer where you can get not one, but two free books with a trial subscription! So, out of all those books, which did I enjoy the most? Well, here are the 16 business and personal development books that I read and recommend you read in 2016!
If there is one book from this list that I would suggest you read this year, it’s Essentialism! So much of my approach to working smarter, not harder is diluted into the contents of this book and I truly believe that everyone – not just business owners – need to hear the message of this book.
A lot of what sets successful people apart is attitude and perseverance. This book is a tried and true narration of what it takes to be truly successful in life and the obstacles that we all must face as we rise to the top. This book is honestly packed with gems of advice and actionable items, so I would suggest getting a printed copy, highlighters and a lot of page flags as you devour this one, or if you read the audiobook as I did, make sure to keep a notebook handy!
I absolutely couldn’t create a list of books for you to read and not include my eBook on strategic goal setting. This is definitely not just a read it once and think about the message type of book, it’s a true workbook with worksheets and actionable items to help you plan your goals and ensure execution by prioritizing them as well as the key routines that will make it easier for you to establish a pattern of success. Hundreds of members of my community have already purchased this book since its release in November, and the positive reviews are rolling in daily so if you struggle with goal setting and making big things happen for your life, this is the book for you!
This short but direct book outlines the mental blocks that keep creatives from doing their best work and how to overcome them. If you are someone who struggles with producing creative work and truly wishes to make a full time career from it, you need to read this book.
In my opinion, this is the only financial book one need ever read. I was first exposed to this book when I was very young and finally reread it this year. To my astonishment, I had spent the years in between actively executing the principles of this book. It’s so funny the way solid financial principles are just timeless and once they are engrained in your mind and put into practice, your whole life can change and set you free from financial burdens. If you struggle with finance and feel like the topic is overwhelming to you, this book will break down money and wealth for you in a series of parables that anyone can relate to and understand.
This is one of two habit formation books I read this year, and between the two, I connected more with this one. I think many of us take for granted the roles that routines play in our lives, but this book really explained in great detail what routines are, how they control us and how, with targeted and sustained effort, we can change them. It’s not easy to break a bad habit and establish a new routine, but if you have something – anything really – that you want to accomplish in your life, great or small, you need to understand how to control your habits and routines and build ones that will actually create success for you!
And this is the second habit formation book I read this year and definitely still enjoyed or else it wouldn’t have been included on this list! In this book, Gretchen Rubin outlines her own experiments in habit and routine formation. She definitely acknowledges the established work of Duhigg and expounds upon it with some helpful personality based observations that are truly the crown jewel of this book, however, this work was a little less science and a little more personal anecdotes. Definitely worth the read, but I’d suggest Duhiggs book first.
Now this is one of those books that no matter who you are, if you want to make any sort of impact at all, either personally or professionally, you need to read it! Again, another short read but one all about tapping into your authentic voice to connect with others and share your personal story to motivate and inspire.
After I read through this awesome eBook by my dear friend Anne Samoilov, I immediately called her to find out why in the world she wasn’t promoting this book to the high heavens because people seriously need to hear about and practice white space in their daily lives. We are all too busy, or so we say. Anne’s book really shows you how important it is to have time and space in your life to create and explore in order to do your best work, be your best self and fully engage in the lives of those who matter most. If you feel constantly busy and overwhelmed, you need to read this one!
10. How to Win Friends and Influence People by Dale Carnegie
This is the quintessential book for interacting with other people. It’s like a psychology lesson distilled into relatable action. Again, I truly believe this is a development book that everyone needs to read, but especially anyone who interacts with customers, clients, vendors or really any people who you need to rely on to help make your goals and dreams a reality.
11. The 7 Habits of Highly Effective People by Stephen R. Covey
This is one of two quintessential productivity classics that I think everyone needs to read. Covey’s book is a long running go to for business professionals, but it certainly applies just as equally to stay at home moms or creatives.
The second productivity classic, again beloved by the corporate sphere but seriously applicable to anyone and everyone! Getting Things Done is an annual reread for me and it seems that every time I dive back in I pick up a new lesson or tweak to my productivity systems that I hadn’t tried before.
Another classic for artist’s and creative types that really dives deep into the creative process and how to support creativity in our lives. If your job or passions are even remotely artistic or fall into the creative space. You should read this!
Out of all the books on this list, this is the only true business book I’ve included, so if you don’t own, or ever hope to own your own business, this doesn’t apply to you, however, if you do you need to read this. You know those statistics people throw around about how many businesses fail in their first year and then how many more fail within a few more years and how many are still standing after a decade? This book explains all about that. It’s actually very interesting to see that lack of customers isn’t actually the thing that kills a business, it’s so much more about plans and systems than you really could ever have imagined.
Yep, I added a woo-woo book to this list, but one that really made a big impact on me. I’ll agree that there are some things about this book that are perhaps a little too much for me, but the underlying message of this book is really powerful and honestly moved me to tears so many times. I think it’s good for us to read personal development, even perhaps spiritual development books (which is really what this book is), that really move us because some times I feel numb to the world and books like this make me feel reconnected to the human race. Definitely not the book for everyone, but I’d be lying if I said it wasn’t one of my favorites.
If you are a male or female working in corporate America and you haven’t read this book yet, please stop whatever you are doing and order it asap. I realize that this book was meant to inspire women, but anyone who works in a business environment should read this. I know this can be a polarizing book, but the results of real research was put into this book and it’s truly heartbreaking to be confronted with the fact that women are held back at work. They hold themselves back, their partners hold them back and worst of all, their own teams and companies hold them back. Obviously this book doesn’t apply to 100% of situations, but its enough that we all need to be aware of workplace biases and work to break our own preconceived notions.
So now you have 16 new books to add to your to read list or Audible queue! I am still in the process of researching the books I want to read for the year. I’m not necessarily someone who makes a full list and then checks books off one by one, but I do want to get started with some new-to-me reads asap. I already know I am putting another Todd Henry book, Die Empty, on my reading list and I have a few fiction novels that I started in 2015 that I want to tie up Q1, but I’d love to hear any suggestions you have for me based on these recommendations or even something totally different that you absolutely love and recommend. Let me know in the comments what you think I need to read this year! Oh, and one final thing I want to say about reading and personal development– I think reading is great, I obviously do or else I wouldn’t share book recommendations with you. However, I want to make sure you don’t spend all your time reading and leave no time for acting on what you’ve learned. Some people have a tendency to go into research and personal development mode before they feel like they can begin to implement and act, but unfortunately, that can often lead to a holding pattern where one is reading, reading, reading and never actually getting started on their business or new and improved life. I guess what I am trying to say is don’t use books as an excuse not to begin living your life. I want you to act on what you learn in these books, not use them as a barrier to keep you from living your dreams!