October is here and I am super duper excited! I know I mentioned this in my impromptu post yesterday, but October is one of my favorite months of the year, mainly because it’s the first official month of fall, and fall is my favorite time of year! October is filled with so many wonderful things, and this month I am hoping to share some of those things with you! You may be wondering, what the heck I am doing writing a letter from the editor to you, anyway. Well, the thing is, I am shaking things up a bit on the blog, as I tend to do from time to time, and I decided that at the start of each new month I would write a personal letter to you, my friends and readers, outlining my plans and the type of content you can expect! I know in the past you could never really tell what you were going to get from me each week here on the blog, and although I’m not going to reveal all my secrets, I thought giving you a sneak peek into the sorts of content you can expect would be a nice way for you and I to connect!
So, what do I have planned for you this month? Well, to start, food… lot’s and lot’s of food! Specifically, I have a couple of recipe posts to share with you guys starting on Monday with a very special seasonal experiment in baking that I have been very excited to share with you! If you follow my YouTube channel as well, you may have seen that last month I started a series called The Lazy Girl’s Cookbook, where I feature recipes for seasonal meals that are super easy and delicious! Well, that series is going to continue on this month as well with a few more of my favorite fall recipes! Moving on from food to fashion, I have a fun scarf tutorial planned just in time to keep you warm in the crisp fall air! Of course, since it is October, and I am obsessed with Halloween, you can expect a Halloween themed Geek Speak feature this month, as well as a seasonal installment of My Productivity Playlist! Rounding out the month, I am also planning a few new reoccurring features around planners and productivity inspiration!
I hope you’re all as excited about my upcoming month of content as I am! I also wanted to take this opportunity to say a sincere thank you to everyone who showed their enthusiastic support for my new shop yesterday and downloaded the 31 Things to Do in October printable! I am so glad that so many of you were as excited about it as I was, and I hope that throughout the month you will keep me up to date as you check those seasonal items off your list! Feel free to tag me in photo’s on Twitter and Instagram so I can follow along with the fun!
Thanks again everyone and I hope you enjoy the great things I have in store for you this month!
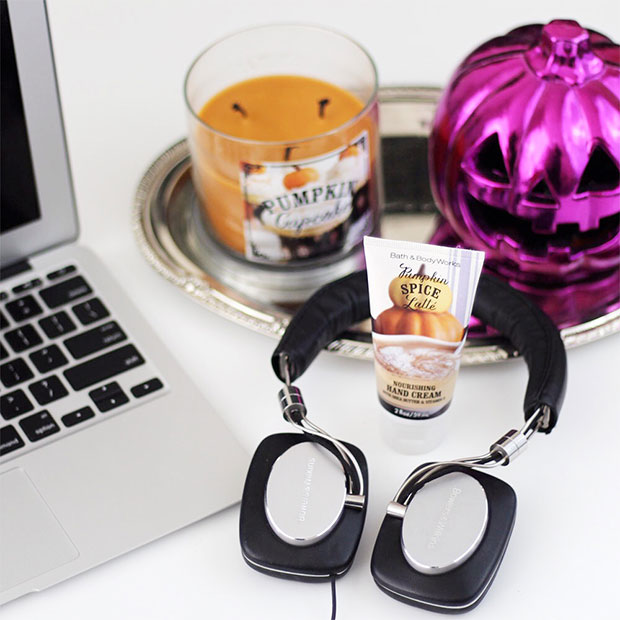
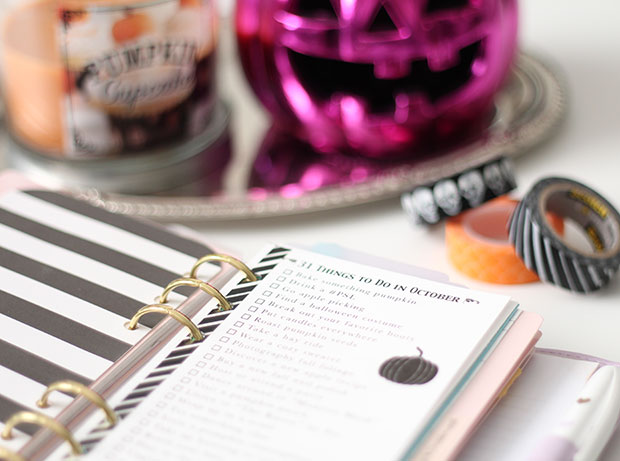
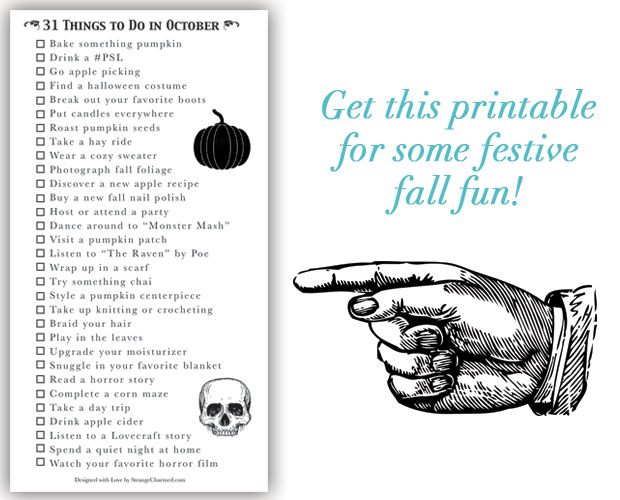
Well, surprise, surprise! I am writing to you mid-week in an unexpected extra blog post because I have created a fun little printable that I wanted to share with you all! I know many of my readers are Filofax and planner lovers, and we all love a good list! So, I have put together a list of 31 Things to Do in October and made it a convenient little free printable to celebrate one of my favorite months of the year! Now, I’m going to go into this a little more in my regularly schedule post tomorrow, but October, to me, means fall is really here and there are a plethora of activities that I enjoy taking part in throughout the month! Yes, a lot of my love for October comes from my love of Halloween, and yes, many of these activities are some of my favorite things to do to celebrate and get into the spirit of Halloween, but there is plenty else to do if Halloween doesn’t happen to be your favorite slice of cake!
To be completely honest, I am taking this 31 Things to Do in October list pretty seriously! In fact, it’s almost like a challenge to me to see if I can fit in all of these activities throughout the month! As an adult, currently without children, I find it hard to get myself into the spirit of a season because it’s not in my face everyday the way it once was when I was in school. So, for me, this is a way to activity participate in all of the fun that October has to offer! Now, I chose 31 Things to Do because there are 31 days in October, however, this isn’t necessarily about doing one thing per day, but you can certainly treat it that way if that is what you would find most exciting! Some things are super easy, some are a bit more involved, but everything is here to help you enjoy the season and add a bit of fun to your daily life!
Wrap up in a scarf: I have a date with a blanket scarf as soon as the weather turns!
Try something chai: It may not be everyone’s cup of tea, but it is a quintessentially fall flavor that everyone needs to incorporate into their October!
Style a pumpkin centerpiece: No matter what your interior design tastes, a pumpkin makes for wonderful fall decor!
Take up knitting or crocheting: It’s officially time for me to start crocheting again, yay!
Braid your hair: Braids are definitely the most fall hairstyle, in my opinion!
Play in the leaves: You’re never too old for this!
Upgrade your moisturizer: Because winter is coming and you need to protect your skin!
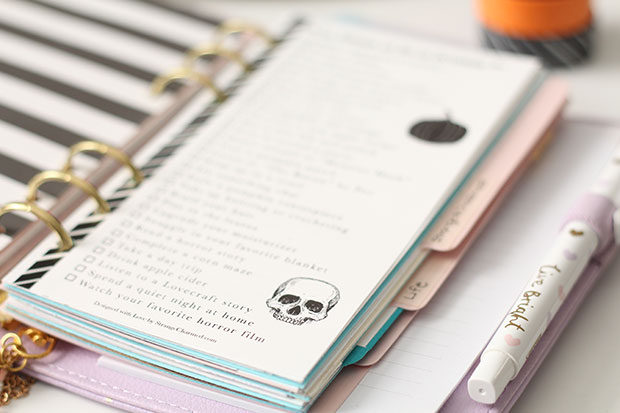
Spend a quiet night at home: I like to light all the candles placed strategically around the house, turn off all the lights and listen to a scary story (like the Lovecraft tales above!)
Watch your favorite horror film: Or just any old Halloween flick you prefer!
So, what do you think of that list? Awesome, right? Well, feel free to download this free printable from my shop and use it to track your fall fun! While you’re in the shop, if you see anything else you like, feel free to use the code SCSHOP20 for 20% off your total order! This code is only good during the soft release of my shop, so make sure to use it before it expires!
On my iPhone is a new monthly feature on Strange & Charmed where I give you a peak into what I have been loving on my iPhone for the month! Covering topics like apps, games, podcasts, music, websites, books and more, I hope this series helps you all discover new and exciting content out there that can be enjoyed from your iPhone! To stay up to date with this series, make sure to follow the On My iPhone tag!
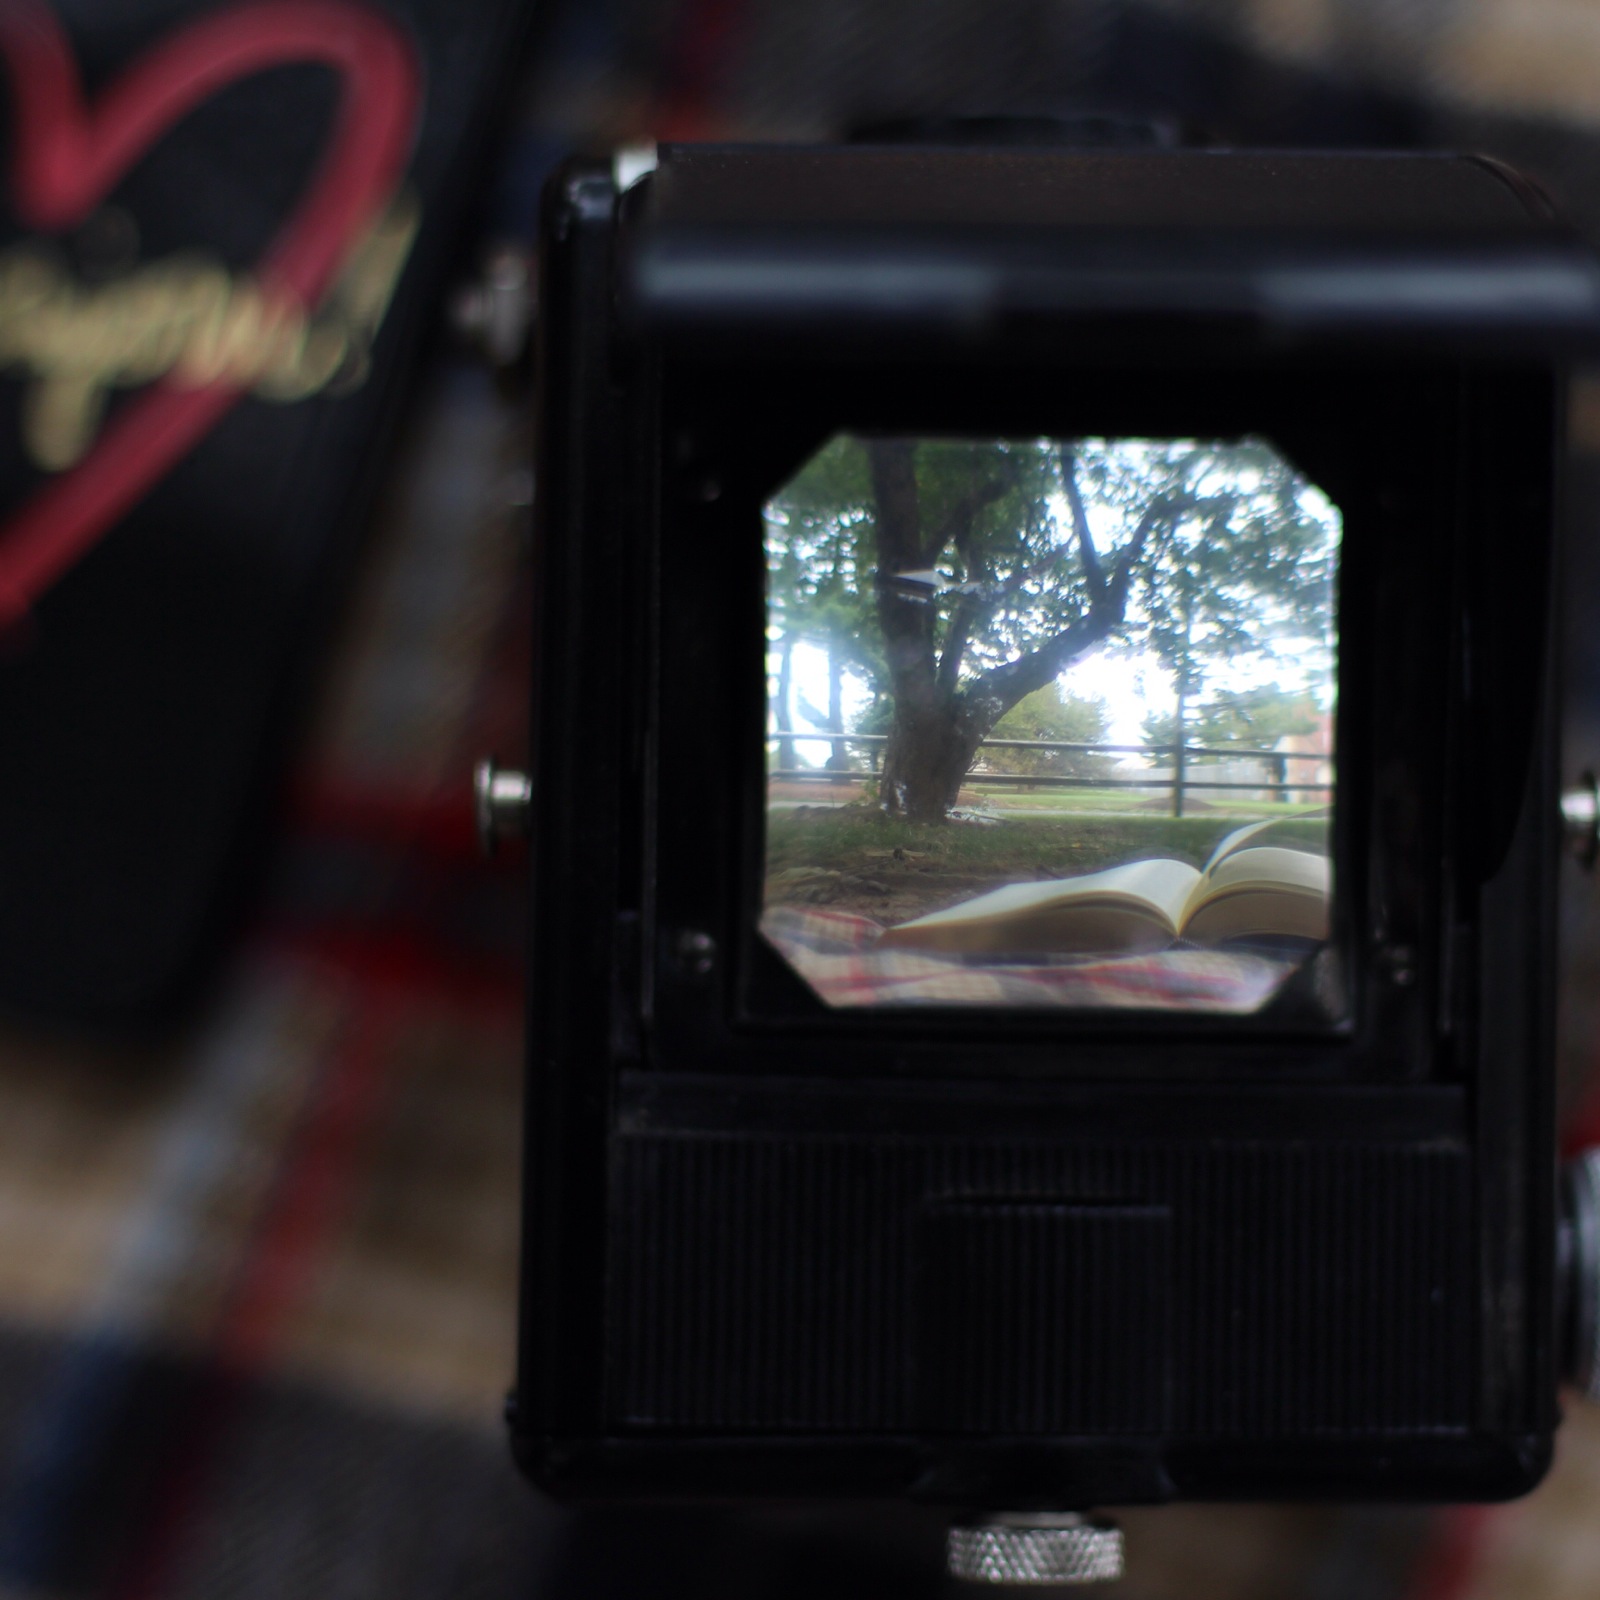
September came and September went, or really it just flew by pretty much unnoticed. From the weather we have been having in PA, you would think that September was just an extension of August and not the transitional month that heralds us into the fall. I did do some typical “September” things this month. I went apple picking with Mike, enjoyed my first official #PSL, and made some other pumpkin spiced treats! I spent some time outside under the trees, reading on blankets and learning more about photography on my DSLR. But September was a pretty productive month for me. I finally buckled down and opened up my Shop! I also spent a decent amount of time searching for inspiration for future projects and collaborations that will hopefully be coming down the pike soon! As I am apt to do, I spent a good amount of time searching for new digital content to share with you as well, so here is what I have been loving On My iPhone for the month of September!
Currently Playing, Lumosity:I have seen ads for Lumosity for years and years now, but I never actually bothered downloading their free app until (surprise, surprise!) it was offered as part of Starbuck’s Pick of the Week program via my Starbuck’s App! I will say though, that even though I am constantly online and in the know, I have been feeling a little mentally sluggish for some time now, and I decided to give the app a go in an attempt to see if I could sharpen my mind a bit! I was actually quite shocked with how I scored on my first attempt at the game, but I am getting better. I feel like this must be a struggle with most people, because ever since I graduated, I have felt my brain slowly softening, and I’m glad I finally decided to give this game a try because I’m hoping it will help improve my memory in the long run!
Currently Reading, Chesapeake by James Michener: Okay, by reading I mean listening to the book on tape via my iPhone! Chesapeake isn’t a new book for me. In fact, I first listened to the book on tape years ago after it was recommended to me by a friend who knew I grew up sailing with my family on the Chesapeake. Lately, I have been thinking about that time of my life a lot and have really been missing it. For some reason, when I was younger, I firmly believed I would have a sail boat of my own one day, and now I find myself contemplating it seriously for the first time in a while. But back to the book- for anyone out there who loves historical fiction, and maybe grew up in the mid atlantic or enjoys American History and/or boating, you need to read this book! Michener is a complete genius at historical fiction and I am absolutely enamored with this lengthy tale that spends decades of history surrounding the Chesapeake Bay and Maryland’s Eastern Shore.
Currently Watching, Frankenstein MD: I feel like a broken record when it comes to these digital short series’ based on classic novels, but I found another one, and I bet you can’t guess which book this one is about? It looks like this time around Pemberly Digital (of Emma and The Lizzie Bennett Diaries) has teamed up with PBS to produce this new series which follows the video diary of medical student, Victoria Frankenstein, as she guides her viewers through the mysteries of the human body! This series is awesome because so far there is a lot of extra content outside of the show that really add dimension to the story. So if you’re a Shelly fan, you may want to check it out!
Currently Surfing, Mermaid Gossip: I have been following Bristol based alternative fashion blogger and Photo Booth maven Emily Fisher for some time now. We were acquainted through mutual friends/bloggers via the Blogcademy and I was instantly taken with her colorful hair and personality! She recently launched her new style blog, Mermaid Gossip, which chronicles her colorful lifestyle and awesome nails!! She also wins a special place in my heart for also being a YouTuber, and you know how much I love bloggers who make the transition over to video! If you love colorful clothing, unique accessories, rainbows and unicorns, I would go check her out!
Oh and that one final thing of course- the iPhone case I have been using this month! Well, to be completely honest, I have been switching it up between a few different cases in September. Something about wanting it to be fall but it still feeling like it was summer had me all over the place with my case choices, but I did pick up this new case this month from Garance Dore for Rifle Paper Company and have been loving how super protective it is!
So, now it’s your turn! What have you been loving on your iPhone or iPad this month? Any great new apps that have caught your attention? Let me know in the comments or better yet, leave me a comment over on Facebook!
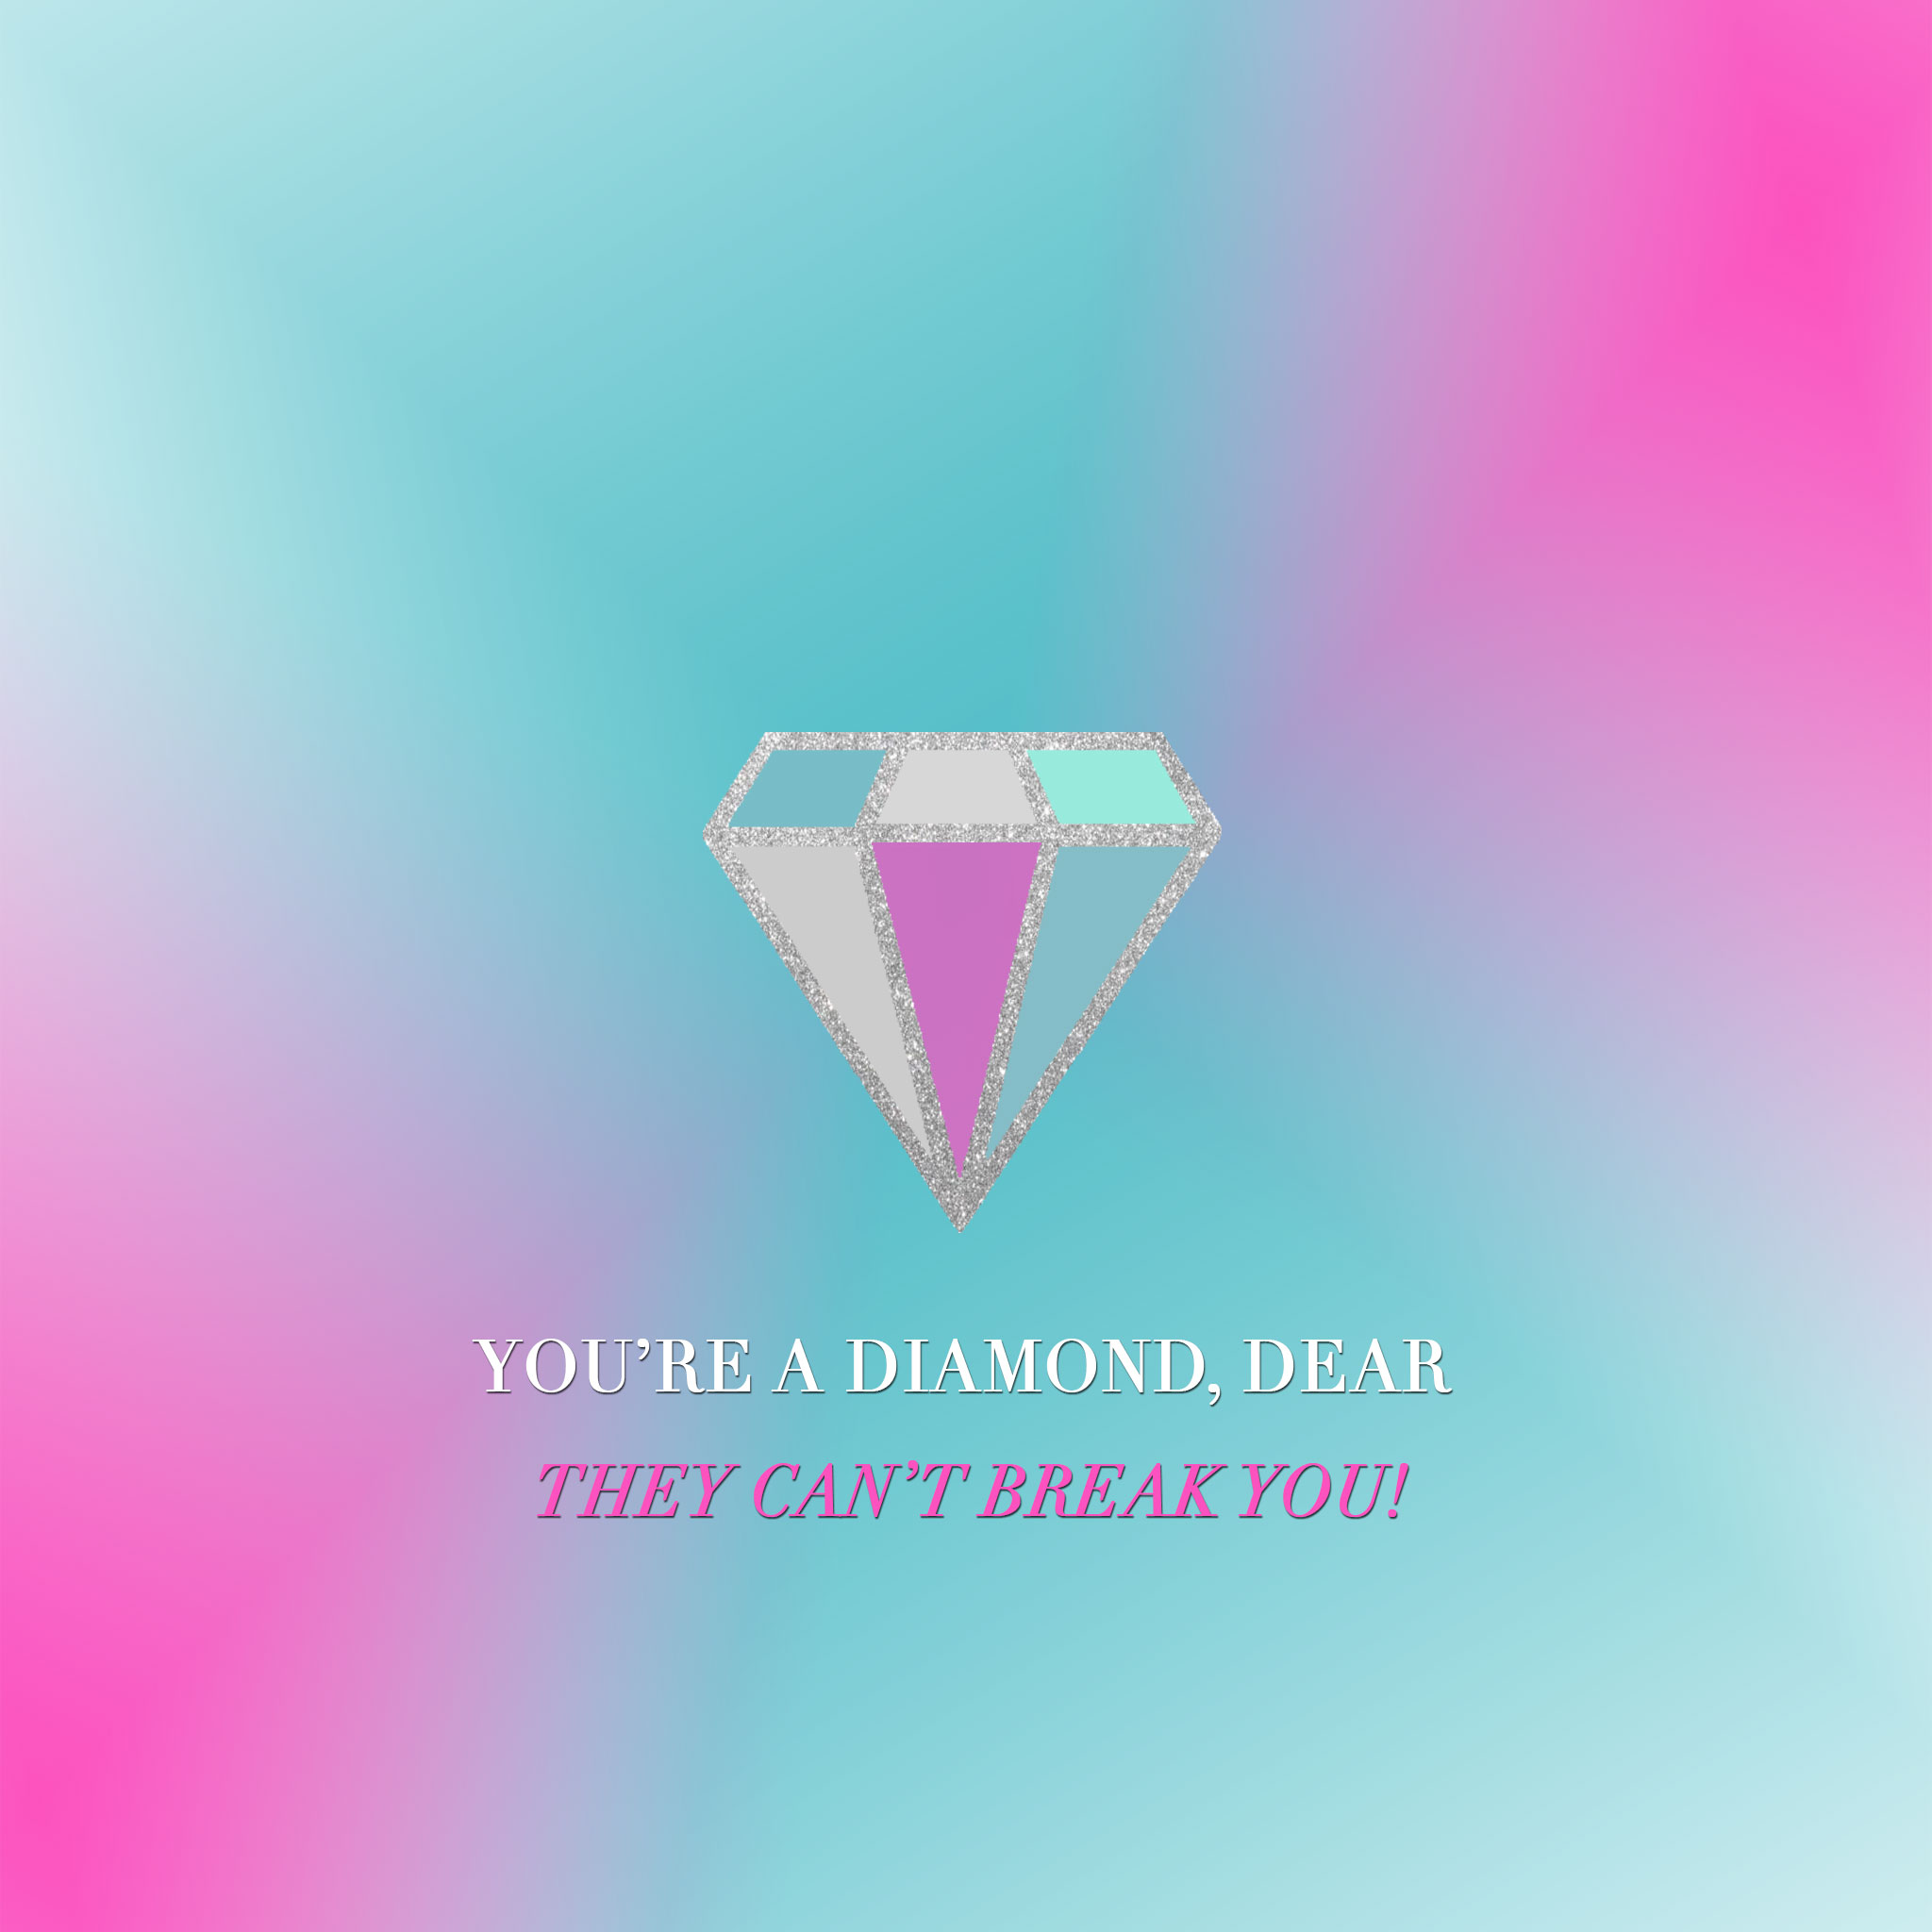
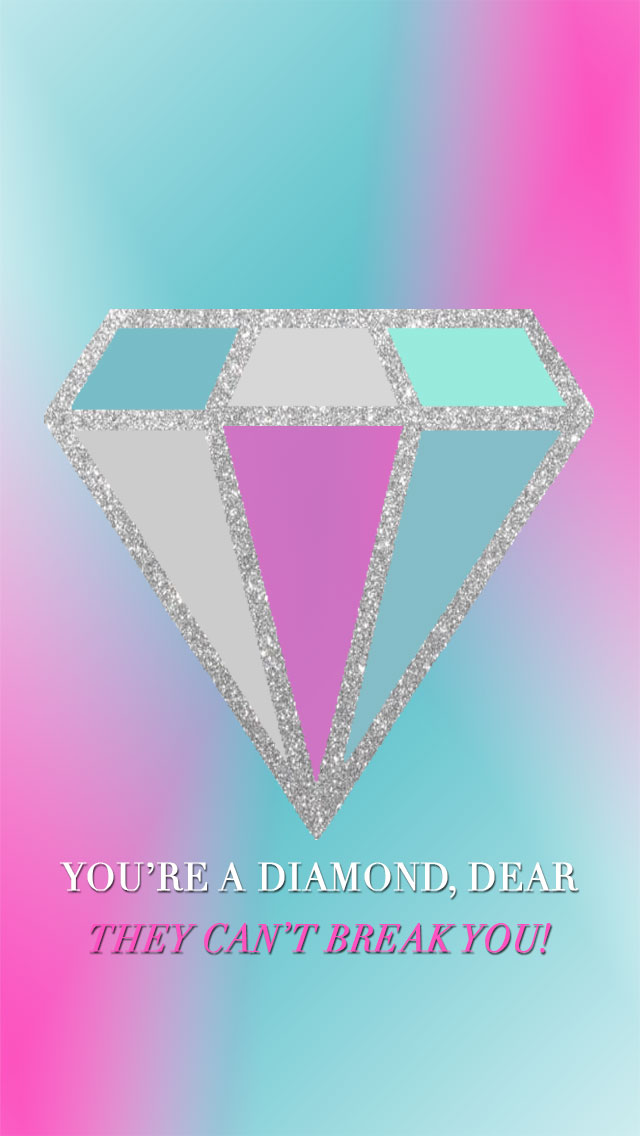
True story- these quarterly wallpapers are some of my favorite posts to do for many reasons! First off, I love design, and any excuse to make something pretty and fun in photoshop, well, I’m all over that! Next of course, is the fact that I love my gadgets and enjoy dressing them up in new wallpapers (and cases!) to give them a fresh new wardrobe every once in a while. Lastly, and probably less obviously, I really take creating these wallpapers seriously because I feel as though they can act as a daily reminder, even affirmation, for our lives. I don’t know about you, but the images and messages I choose to create through this wallpapers are pretty powerful to me, and when I think about the fact that my readers are using these and putting them on their phones and laptops and seeing the messages that I have crafted for them, it really makes me feel like I have done something special!
I know I normally like to theme each of these wallpapers to the season, and I thought about doing something with more of a fall color scheme, but in all honesty, I am not into fall colors so much. I find the browns, dark reds and burnt oranges a little uninspiring, so I went rogue and went for a full on color burst this time around, centered around the image of a multifaceted diamond! I feel like I have been seeing diamonds and diamond imagery all over the place lately, and I feel like diamonds can represent so much. I have seen a few quotes about diamonds all over the place also, not just the quote I use “you’re a diamond dear. They can’t break you,” but also “A diamond is just a piece of charcoal that handled stress exceptionally well.” I think these are really wonderful quotes with very powerful metaphors that we can use to inspire us in our own lives. So, I sincerely hope you enjoy these wallpapers and that you use them to remind you everyday that you have more strength than you even know, and that it is only with great pressure and under great stress that we can truly transform into something brilliant!
For iPad and iPad Mini {right click to save image}For iPhone {right click to save image}For Laptop and Desktop Computers {right click to save image}
These wallpapers do take quite a bit of effort to put together, so if you enjoy this post and like to use these little freebies that I make for you from time to time, please make sure to share this post with your friends via Twitter or Facebook! Also, if you have any suggestions for future tech wallpapers, please feel free to leave them in the comments!
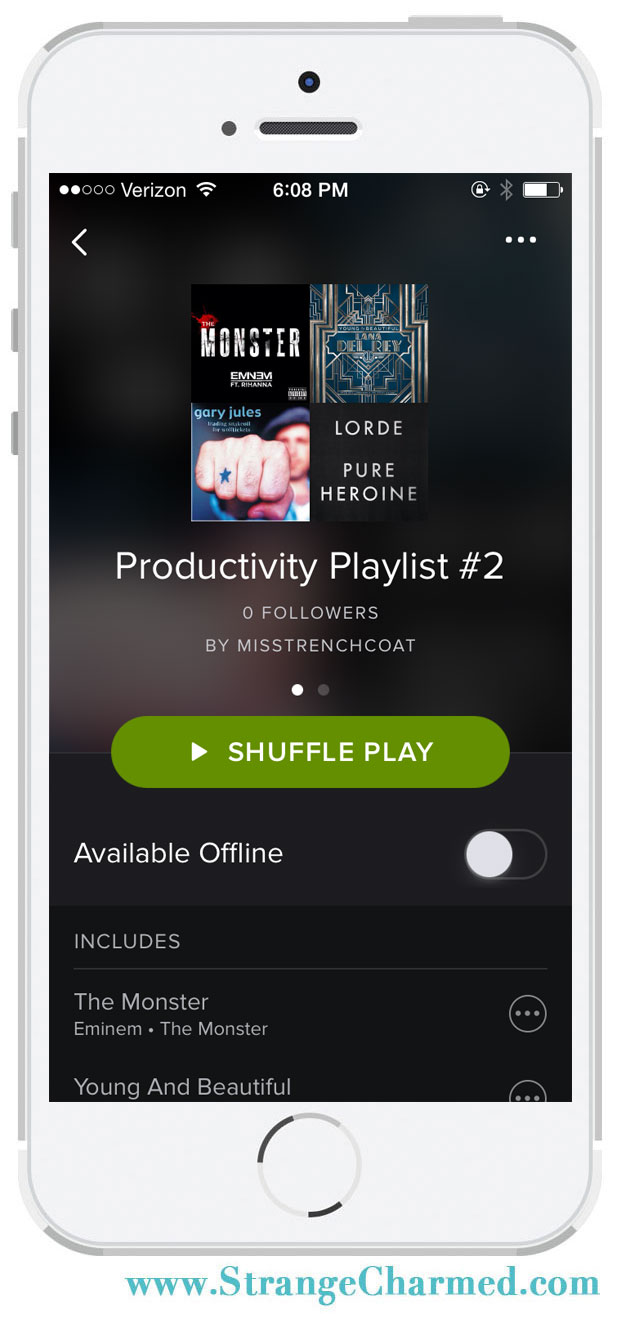
Welcome to my second installment of My Productivity Playlist aka Whistle While You Work 2.0! Many of you told me that you liked the first installment of this series, and I’m seriously thinking this may become a monthly series that I do because I like it as well! I love music and my tastes are so all over the place that I think I may really have something for everyone! Well, this time around, I got smart and realized that you can actually make sharable playlists via Spotify and I could then go ahead and share those playlists with you so that you can actually listen to the music I am suggesting for you. Novel, ain’t it?
So this is what you will hear on My Productivity Playlist this month. Click here for Spotify playlist! Also, if you have Spotify, feel free to follow me!
Happy first day of Autumn everyone! I am so glad that fall is officially here, although it does feel like it’s still summer, I’m just happy that I can start celebrating the season in full force! I thought it would be especially festive if we celebrated together today with a fresh installment of Starbucks @ Home, my recipe series where I teach you how to make versions of your favorite coffee house drinks at home! I have already covered how to make a pumpkin spice latte last fall, but this year I wanted to put together a skinny version of the drink because Starbucks does not have a skinny pumpkin spice latte. The Starbucks #PSL is made with a pumpkin spice syrup that is filled with sugar, very, very sweet and high in calories. As much as I love a good #PSL, I don’t need that sort of added sugar in my diet, so I would prefer to make my own skinny version at home!
Skinny Pumpkin Spice Latte Recipe
Coffee of choice (a pumpkin coffee would be perfect!)
2 packets of stevia (or other sweetener of choice)
A shake or two of Pumpkin Pie Spice
Sugar Free Creamer (I use hazelnut flavored because I believe it brings out the pumpkin flavor, but any dairy or non dairy creamer or milk of choice works)
Fat Free Whipped Cream (optional but exponentially more festive!)
So, let’s be honest, you don’t need me to tell you how to put together a coffee, so instead of writing a how-to summary, I thought it would be fun if I just made a little video showing you how I assemble my skinny #PSL! Below is a very short, but fun video walking you through the recipe! Enjoy!
I hope you enjoyed this video and my Skinny #PSL recipe! Are you a fan of the Starbucks #PSL? Are there any other Starbucks drinks you would like to see me make an at home version of? Let me know in the comments!
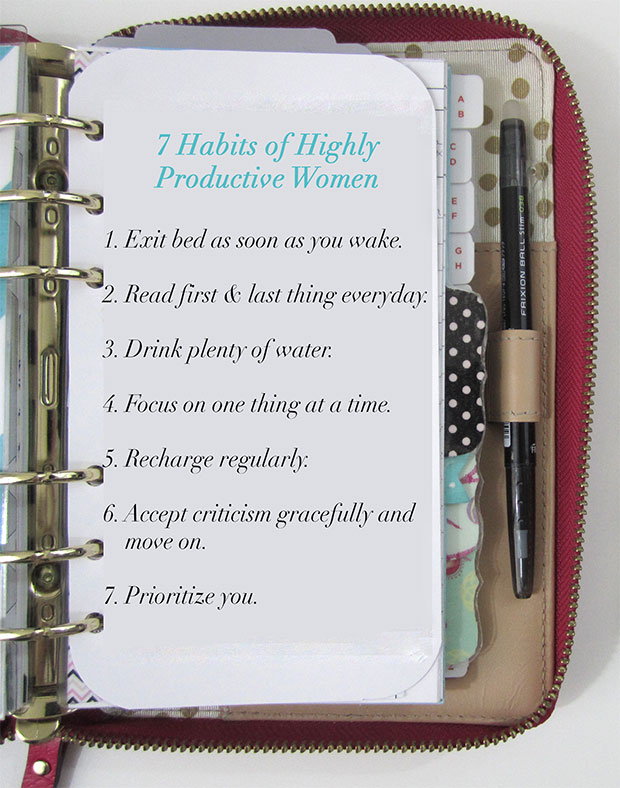
I have a lot of female role models that I love to read and learn about. What is their secret to success? How can I be more like them? What’s the magic formula that they have harnessed to make their lives so productive and interesting? Wouldn’t we all like to know? The truth is, as much as I look to other women, these role models for inspiration, I know deep down in my heart, that it really is just simple hard work that brings you from average to extraordinary. It’s all about the doing, making things happen and having the follow through to see a project from start to finish! You may be familiar with this popular quote seen all over the internet lately “You Have the Same Hours in a Day as Beyonce!” Yes, we all do, so it’s all about how you spend that time and making every minute count. So here it is, the not so secret 7 Habits of Highly Productive Women!
1. Exit bed as soon as you wake: How many times do you wake up in the morning and just lay around in bed playing on your phone or trying to catch a few extra minutes of sleep? I know I am very guilty of this one, but the truth is, when we wake up in the morning, it’s very important that we don’t waste those precious early moments. Get out of bed immediately to wake yourself up and just start your day without delay!
2. Read first & last thing everyday: The most productive women in the world all have something major in common. They are all readers. More specifically, they are all constant learners who read anything from the daily news, to industry updates, to popular literature on a constant basis. When you start to prioritize this sort of important knowledge, you begin to sharpen your edge and boost your personal productivity. For some, it can be a challenge, but give yourself a goal of reading something, even a short news story or a chapter of a book first thing in the morning and last thing before bed!
3. Drink plenty of water: Hydration really does play a major part in our overall wellbeing throughout the day. When I haven’t had a drink of water after a few hours I begin to lag and feel myself drying up, not just physically but physiologically! Although we are often told to drink 8-10 glasses of water a day, that is actually not a precise figure. To figure out how many ounces of water you need per day, take your body weight and divide it in half. That is how many ounces of water you need! So, get yourself a large water bottle or tumbler, keep it with you all day long and feel the energy and productivity boost a simple element like water can bring to your day!
4. Focus on one thing at a time: Although most women would consider themselves professional multi-taskers, when it comes to being productive, it’s actually better for you to focus on one thing at a time. Yes, we all have a lot on our plates, and yes, we will need to move between multiple different tasks and projects throughout our days, not just for work, but for many of us, home and personal obligations as well. But, when you go to complete a task or series or tasks, it’s much better if you onto do one thing at a time. This is precisely why I prefer to batch my work, taking care of all my calls at one time, my emails at one time, and doing certain receptive tasks in bulk, instead of moving from one thing to another more frequently. Give it a try to see how your productivity improves!
5. Recharge regularly: I think there is a major misconception out there that in order to be productive, you need to be focused on work. It’s all work, work, work, right? No time to dilly dally! Well, that’s not exactly true. You can’t expect to carry on non-stop forever, that would be a disaster, which is why it is so important to take time off and recharge your batteries. Throughout a busy work day, schedule in 5-15 minutes every 2 hours or so for you to just take a moment and gather your thoughts. Send a quick text to a loved one, play a quick game on your smartphone or browse a few pages of your favorite magazine, anything that will take your mind off of work and bring a little happiness to your soul. During days off, make sure you really spend a little time resting and relaxing. Go to bed early or schedule some time to sleep in, enjoy the company of friends and family, and just give yourself time and permission to turn off from work. It will do you wonders!
6. Accept criticism gracefully and move on: Everyone faces criticism, that’s a fact! And the truth is, the higher you rise the more criticism you are gonna get because more people are going to be aware of you and your work. Is that any reason to stop what you’re doing or spend hours of your precious time worrying about what other people are going to think? No way! The most productive women in the world face terrible criticism each and every day and they just smile through it and move on.
7. Prioritize you: As women, we are often lured into something of a mart complex, a sense that we need to put everyone else above ourselves in order to be successful and productive members of society. Let’s be honest, we all know women like this, or are ourselves striving for this delusional ideal that a women needs to be everything to all people, a wife, a mother, an employee, a student, you name it, we have to become it! With all that time spent focusing on the external elements of our lives, we often find that we put ourselves last. Unfortunately, this leads to some devastating developments for women, health-wise especially! We need to stop perpetuating this notion that women must do it all in order to have it all, so that we can start putting ourselves first! I’ve written about this before, but one of my favorite examples of why it is important to put yourself first, comes inside a little safety pamphlet found in each and every airplane. You’ve heard the phrase before, “secure your own mask first before attempting to help others.” That’s right, in the event of an emergency during air travel, you are directed to make sure you have taken care of your own safety before attempting to help those around you. Why? Because if you aren’t taken care of, how in the world can you be expected to take care of others? It’s common sense. So, seriously, start putting yourself and your needs first! Make sure you do all those little seemingly insignificant things that help support your well-being, because in the end, all those little things add up to something very, very important!
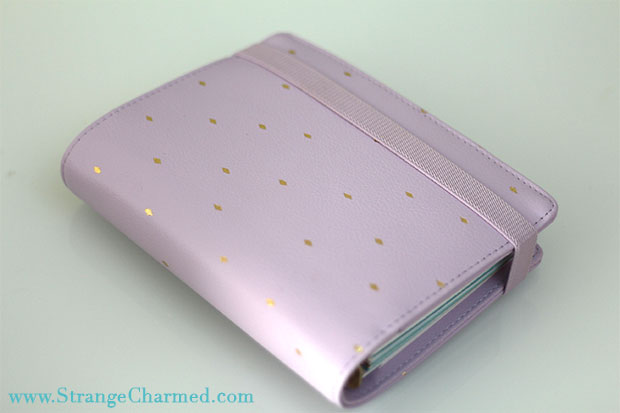
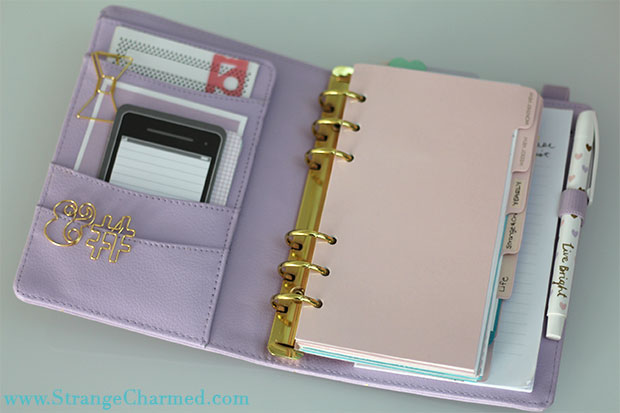
Some of you may recall earlier this year when I received my first filofax style planner, an A5 mint beauty from Kikki K that I wrote a rather extensive blog post about! I love my A5 Mint Time Planner, but after acquainting myself to the filofax and planner community, I began to realize that an A5 planner was just too large for my needs. Yes, it holds a lot of information and yes, the pages are much larger so you can really capture all the details of day-to-day life, but for me, it wasn’t perfect. When I moved onto my personal sized Kate Spade Wellesley Planner, I began feeling a little more at home in a 6 ring planner. It was more compact, easy to carry and write in while I was on the go and it fit nicely into more of my handbags. But still, it just didn’t feel 100% right to me. For a lot of us in the planner community, the search for that perfect planner is something that seems to elude us. Many of us have collections of planners that may seem frivolous to some, but those who understand know that our planners are like our babies. Okay, not literally, but like children or pets, our planners each seem beautiful and unique in their own way, and again, like children or pets, sometimes they just aren’t perfect and we try to work through issues to come to some state of balance. I have to say though, this last week I received a beautiful gift from one of my favorite stationery companies, Kikki K, and it has really been making me question my loyalty to my other planners. I was sent a Medium 2015 Lilac Time Planner (with a matching adorable pen!) and although it wasn’t something I was ever expecting to like, I have fallen head over heels in love with it!
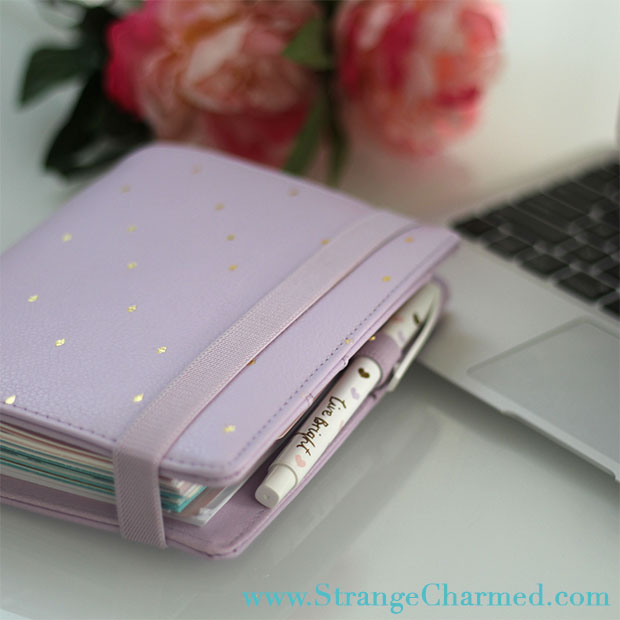
There is something about the Kikki K planners that I just like. They are made from soft leather, have a nice rounded feel in the hands and the color, oh the color, it’s breathtaking! I’ve never thought of myself as a purple person, but this lilac is sophisticated and feminine, and surprisingly neutral! I also just love the dimensions of this planner. When I compare it to my Kate Spade planner, it’s slight wider and slightly shorter, but more of a square shape overall than the obvious rectangular shape of the Wellesley. To me, the proportions feel anatomically correct. Of course, there is also the elastic closure band, which I am a major fan of and was one of the reasons I purchased the mint A5 earlier this year. I think the elastic band is secure, but forgiving! You can stuff it with more inserts, stickers, notepads, and washi samples than a traditional planner with a button or zipper closure and it all holds together!
Another thing Kikki K gets right with this planner is the pockets! The inner cover has an array of pockets, from a large secretarial pocket, perfect for loose papers, cards, mail and more! Then, it has a selection of pockets, some deep, some small, but all have a variety of uses and can fit a plethora of planner goodies and decor! One thing I am very pleased about, in comparison to my mint planner, are the dividers! They are a lovely shade of peachy pink that work nicely with the lilac planner. They are so lovely, in fact, that I didn’t bother making my own personalized dividers, because I loved the stock dividers so much!
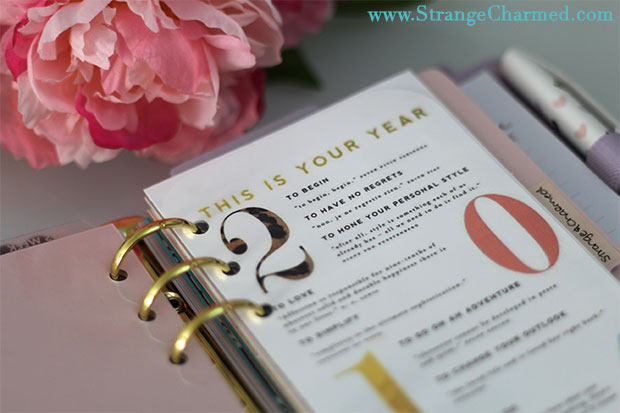
Now, on to the inserts and the various sections of this planner! The planner came with a variety of inserts: month on two pages spread, week on two pages calendar, address book inserts, birthday and anniversary pages, shops and restaurant tracker, to-do lists, and expense sheets. I love the Kikki K calendar inserts, however, the dates began with 2015 so they weren’t much use to me. So, I used some free printables from Philofaxy to hold me over until the new year! I also put aside the address book, birthday/anniversary, shops/restaurants, and expense sheets because they aren’t any use to me. Instead, I broke my planner down into the following sections: Monthly View, Weekly View, Yearly, Strange & Charmed, Life, and To-Dos!
My monthly view is my editorial calendar for my blog and YouTube channel, helping me keep track of posts and regularly scheduled content!
In my weekly view, I opted for a week per page layout paired with a custom Task List that I designed myself! These two together help me manage my tasks and important items throughout my week.
My yearly section is geared towards helping me organize big picture life goals and tasks. I use a variety of pages in this section to help keep my focused, breaking down my year by month and seasonally.
The Strange & Charmed section is devoted to my blog and YouTube channel. Here I keep track of blog posts and YouTube video ideas with custom trackers I designed for myself. I also keep a variety of loose notepaper here for taking notes or brainstorming.
The life section encompasses everything else in my life that I need to keep track of. This is my place for storing inspiration, my wish list, and taking extraneous notes.
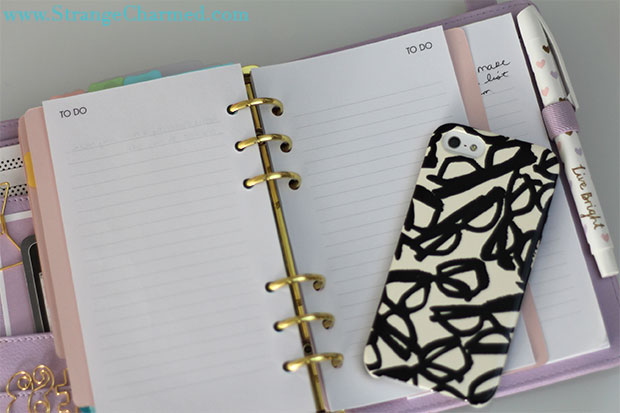
Finally, the meager to-do section is where I keep a running list of to-do items that need my attention.
Overall, I am loving this little planner! I think the size is perfect for me as the planner fits everything I need, all in one place! I am obsessed with the color, which is such a random thing for me, but I just think its such a great shade! I am so excited and thankful that Kikki K was kind enough to send this planner to me, and if you have been thinking about this planner, I definitely think you should pick it up sooner rather than later, as these tend to go out of stock as we get closer to year’s end. Of course, if you want to see an even more in-depth look at my planner set up, make sure to check out my YouTube video below, which basically walks you through the entire planner! If you are interested in any of my custom planner inserts, feel free to visit my shop!
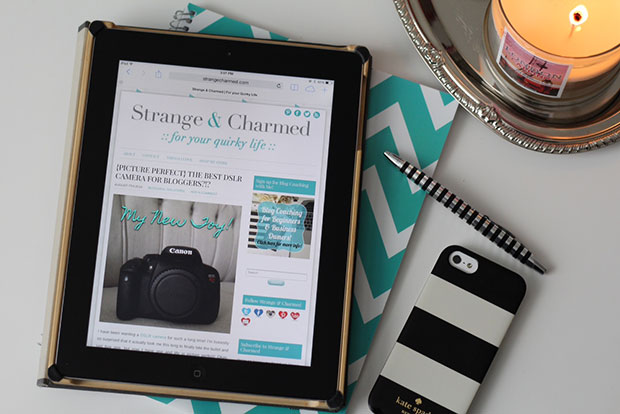
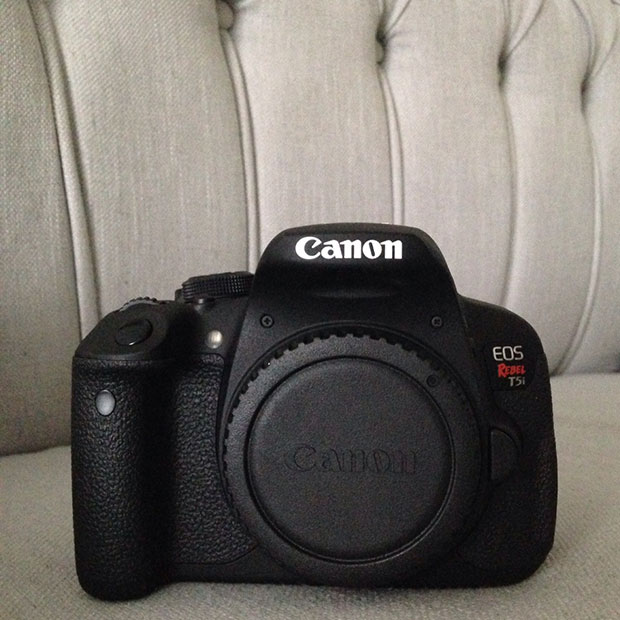
Ever since I purchased my new DSLR, the Canon EOS Rebel T5i, I have received numerous questions about how I’m liking it as my first DSLR experience. So, I thought I would go ahead and do a proper review for anyone who was considering their first DSLR, or may be looking to upgrade from an older model to something new! When I first introduced this camera on my blog, I made something of a bold statement. I suggested that the camera could possibly be the best camera for bloggers out on the market currently, and after weeks of using the camera and taking it on multiple day trips to get some good shooting experience in, I am actually prepared to defend this statement! But before I do, I am going to have to amend it. You see, the Canon EOS Rebel T5i isn’t just a great camera for bloggers, it’s also a great camera for scrapbookers, project lifers, parents, students, and anyone else who is looking to take great quality photos without having to spend extra time and money!
The Canon EOS Rebel T5i is an awesome camera with some very useful features that make DSLR photography seem simple, even for beginners or those who don’t have the time or interest in learning the ins and outs of photography, but still want to get the most bang for their buck when it comes to taking great photos. Here’s what I love about this camera:
3.0 inch Touch Screen LCD Display with Live View and Touch Shutter: The touch screen display on this camera is an absolute lifesaver and makes the T5i a breeze to use! First off, the display moves and tilts so when I am taking portrait shots of myself or using the camera’s video mode, I can keep an eye on everything and make sure I am in frame and properly composed. It also helps when I am taking shots from high or low angles because I can see everything in the shot from practically any position. The fact that this display is touch screen is almost an afterthought, something you wouldn’t necessarily mention, that is, unless you are using a previous generation model that lacks a touch screen. Then, you miss the convenience a touch screen display brings, especially now that we are all so used to touch screen devices- it’s like second nature to touch a display to manipulate it! Not only is this display touch screen, but it also has an awesome touch shutter feature which allows you to take a photo just by tapping on the display. It’s great when you are using a tripod to shoot and really using that display to compose your image, because it means you don’t have to wait to take the shot, you can just tap the screen and capture your image. Finally, the fact that this display has full live view preview means that what you see on-screen is what you get when it comes to your images. When using the creative filters built into the camera, you actually get to see those filters in action before you take the shot. Again, this sounds like child’s play to anyone who has an iPhone, but this sort of technology is still relatively new to entry-level DSLRs.
Built-in stereo mic: You ‘d think that a built-in microphone would be a standard feature in a digital camera that was made to capture video, but you’d be surprised at the number of DSLRs that actually lack them. Although I didn’t buy the Canon T5i to use for videography, it was definitely a feature I wanted in my camera for occasional use. Now, it’s not the greatest mic in the world, and if you do plan to use your DSLR for videography, you will certainly need an external mic if you want to get top-notch audio, but something is better than nothing when you are in a pinch.
18.0 Mega Pixel CMOS Sensor with Hybrid AF: The sensor of any digital camera is probably the single most important feature because it is what captures the images. 18 mega pixels may not be the highest number of mega pixels available, but it is more than enough and certainly nothing to laugh about! What is really important about the sensor, however, is the hybrid AF system that basically makes all the cool live view features possible. It makes live face detection and auto focus possible with nine all cross-type auto focus points.
Aspect Ratio Function: Now this function may be a minor one, but it tops my list of my favorite features on the Canon T5i because it makes my life as a blogger and Instagram enthusiast much, much, easier! The standard aspect ratio for a digital camera is 3:2 and that’s the ratio of the LCD display, however, through the magic of technology built into this camera, you can actually change the aspect ratio for your images to 16:9 or even 1:1. Why is this important? Why can’t I just crop my images in post production? Well, glad you asked. Yes, I can crop my images in post production, however, when it comes to properly composing an image, it’s much easier when you can see your final product while you are shooting. So, if I am taking a picture that I plan to use on my Instagram account, I can switch to 1:1 aspect ratio and compose an image that is perfectly square. If I were to take all my photos in 3:2 aspect ratio, I would have to make a visual guess as to whether or not my image is composed in a square, which I may or may not get right, it’s basically up to chance! Same goes with 16:9 aspect ratio that is standard for YouTube cover photos. Normally, I would crop those down to the right size, but thanks to the aspect ratio function built into my camera, I can take the right picture from the start and not have to mess around with the crop in Photoshop!
Compact body: DSLR cameras come in many shapes and sizes, but the Canon EOS Rebel T5i has a relatively compact body that contains all those glorious functions I mentioned above! Now, it’s not the smallest DSLR in Canon’s lineup, however, when you take into account the fact that it is such a full featured camera in such a compact body, you really begin to appreciate the fact that you get so much power without having to lug around a huge camera.
Overall, I am very pleased with this camera and I think I made an excellent decision with this purchase. It really is very easy to use and a great camera for someone looking for quality without needing to know the ins and outs of DSLR photography! If you are interested in picking up this camera, here is a link to where I purchased mine for a very good price! Also, in case you were wondering, I purchased the body of the camera alone, and then also purchased this 50mm 1.8 lens to use with it, since I knew the kit lens wouldn’t be useful to me. If you would like to know more about why I chose the 50mm lens, let me know in the comments or send me a tweet. I may very well make it the subject of a future post in this photography series, especially if I know people are interested in the topic!
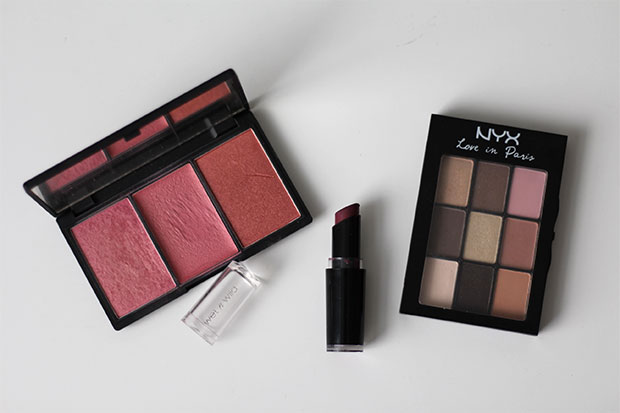
At the end of August, I picked up the NYX Love in Paris eye pallet and immediately knew it would be my go-to for fall! It’s a great neutral eye pallet with a selection of cool tones, some matt, some iridescent, that I couldn’t help but compare to the ever popular Urban Decay Naked pallets, but at a fraction of the cost. For me, it was perfect, and I immediately began experimenting with different looks for fall. Once I found the perfect fall eye look, something simple and taupe-y, I began messing with my blushes to find the right shade in my collection that would compliment the fall tones I was going for. Eventually, I settled on a creme blush out of my Sleek Blush by 3 Pink Lemonade Pallet because it was a matt, berry/rose color that was somewhat deeper than my normal rosy pink blushes of choice. Then, something funny happened. While putting on my makeup one day, I realized that the NYX Pallet I was using and the Sleek Blusher had a similar name; Macaroon! I thought this was highly ironic, because I love french macarons (although I normally spell the word with one “o” not two) and I was surprised that I hadn’t noticed the names of the colors before this! So, I immediately thought to myself that this was a sign that I should film a makeup tutorial for my channel based on the look, and viola, Macaron’s in Paris was born!
I think this is a perfect fall look because the taupe eye is slightly smoky and chic for fall, and works very well with the berry blush and purple shade of lipstick. To me, these tones are all very sophisticated and can be worn light (as I show you) for the day time, but can then be darkened and deepened for a show stopping evening look.
I hope you check out the video and see how I pull this look together using just a few drugstore items! Let me know what you think and if you’d like to see more makeup tutorials by me. I know I am far from a beauty guru, but I do get complimented on my makeup regularly, so I guess I must be doing something right!